

Part 1: create a Google Tag Manager container, install it in Webflow with the head code and a body embed, and test it. Part 2 adds Google Analytics 4.
Update, October 2026: Google has changed a few things since we wrote this. Universal Analytics stopped processing data in July 2023 and Google Optimize was shut down in September 2023, so if you see them in the screenshots below, you won't need them. The Tag Assistant Chrome extension we use for testing has since been merged into one extension, simply called Tag Assistant, at the same Chrome Web Store link. The steps below still work, but Webflow has since added a native Google tag setting under Site settings, Apps & Integrations, and Webflow suggests moving custom-coded Google tags over to it (here's their post on it). Webflow says you can connect your Google tag or Google Tag Manager there, so it's worth a look if you'd rather skip the code. We haven't tested that route ourselves, so the head code and body embed method we show below is the one we know works. If you'd rather run your tags at the edge, take a look at our guide to Cloudflare Zaraz and Google Analytics 4 on Webflow.
While Webflow is usually the simple no-code solution of choice for quick and easy website design, and dare I say development, getting Google Tag Manager installed properly can be a bit of a hack. Webflow has unfortunately left us with a quick, but not robust way of adding GA to your project. Nothing wrong with that, and if all you need to do is add Google Analytics, then just follow their guide. If you need something a bit more flexible for adding not just Google Analytics, but conversion tracking, ads, social etc, Tag Manager is the way to go.
Today we'll walk you through the simplest solution for getting Tag Manager up and running as quickly as possible while still functioning 100%. Milk Moon Studio is a small design-focussed Webflow studio, so for us a low-code solution is the simplest way of getting this done with as little effort as possible. Using Tag Manager helps avoid having a ton of tracking and conversion scripts sitting in the project <head> that you must manage and maintain. With this approach you'll add the Tag Manager script, and from then on, you can manage everything else in Tag Manager. Neat and tidy, just the way a Webflow designer likes things.
But first things first:
Set up a Tag Manager container
If you haven't done this yet, we'll run you through this quickly. (We've done a separate post on why you should be using Tag Manager and not just the vanilla Google Analytics installation by pasting in the GA UA tracking code on Webflow, and on a myriad of other Tag Manager benefits: why you should use Google Tag Manager in Webflow.)
Step 1: Create a Tag Manager account
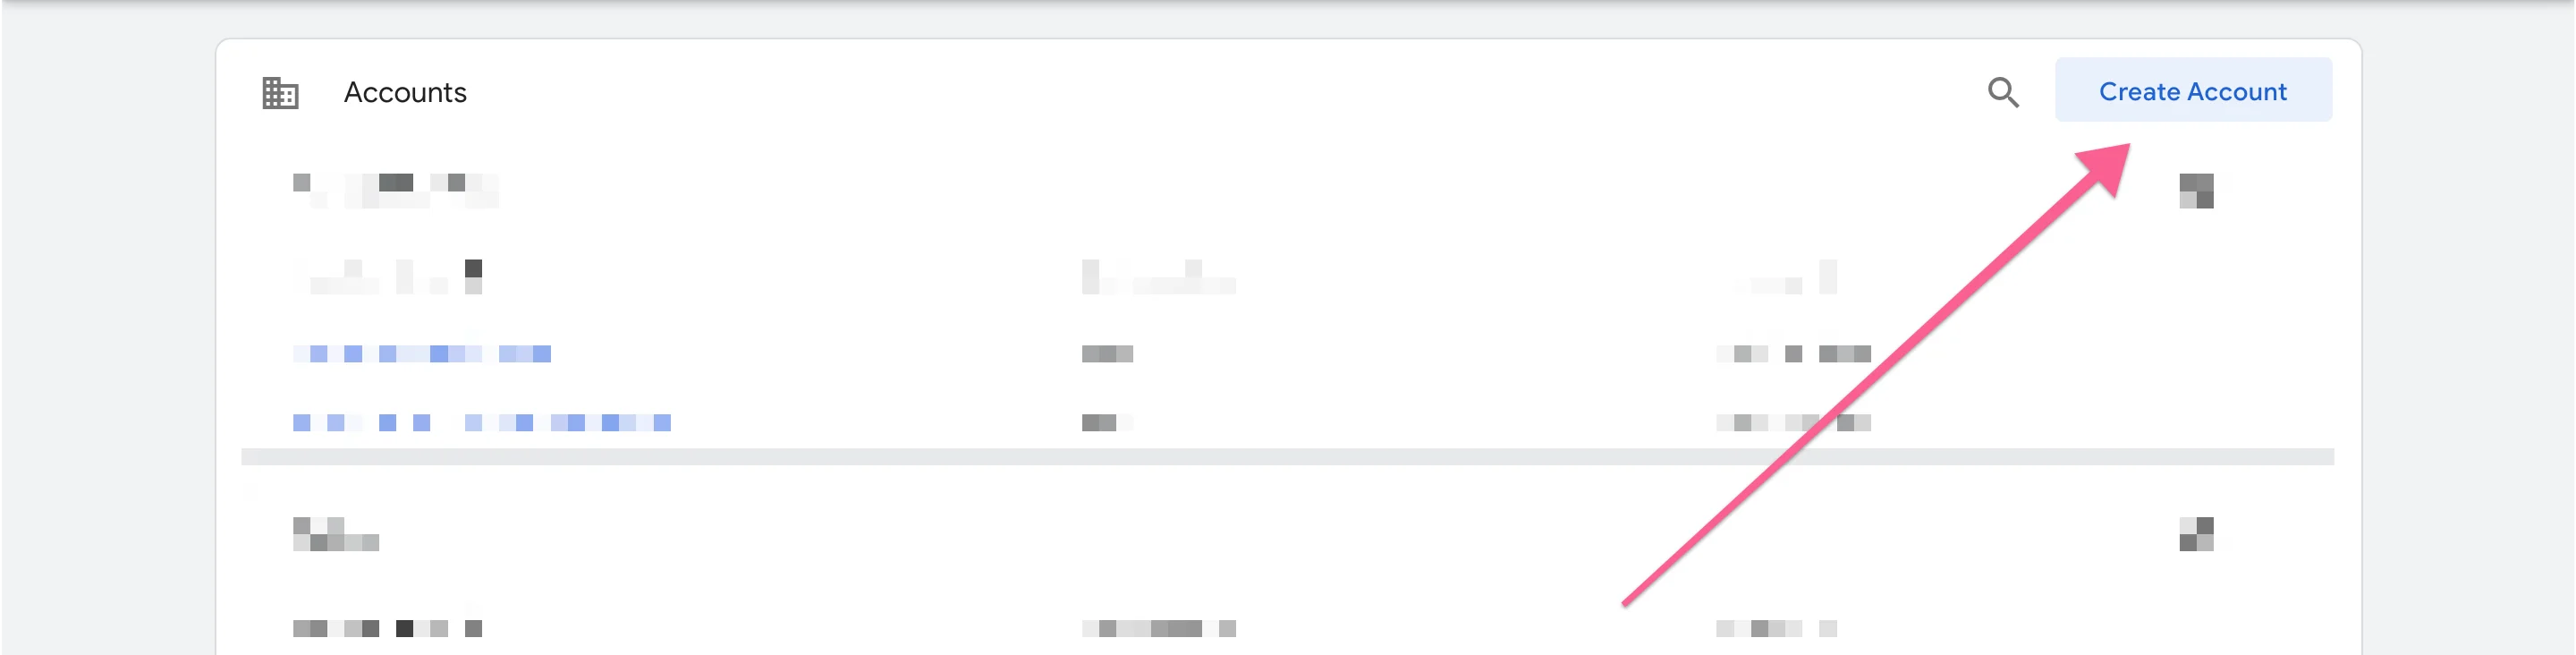
This bit is super easy. Sign up for Tag Manager and hit Create Account.
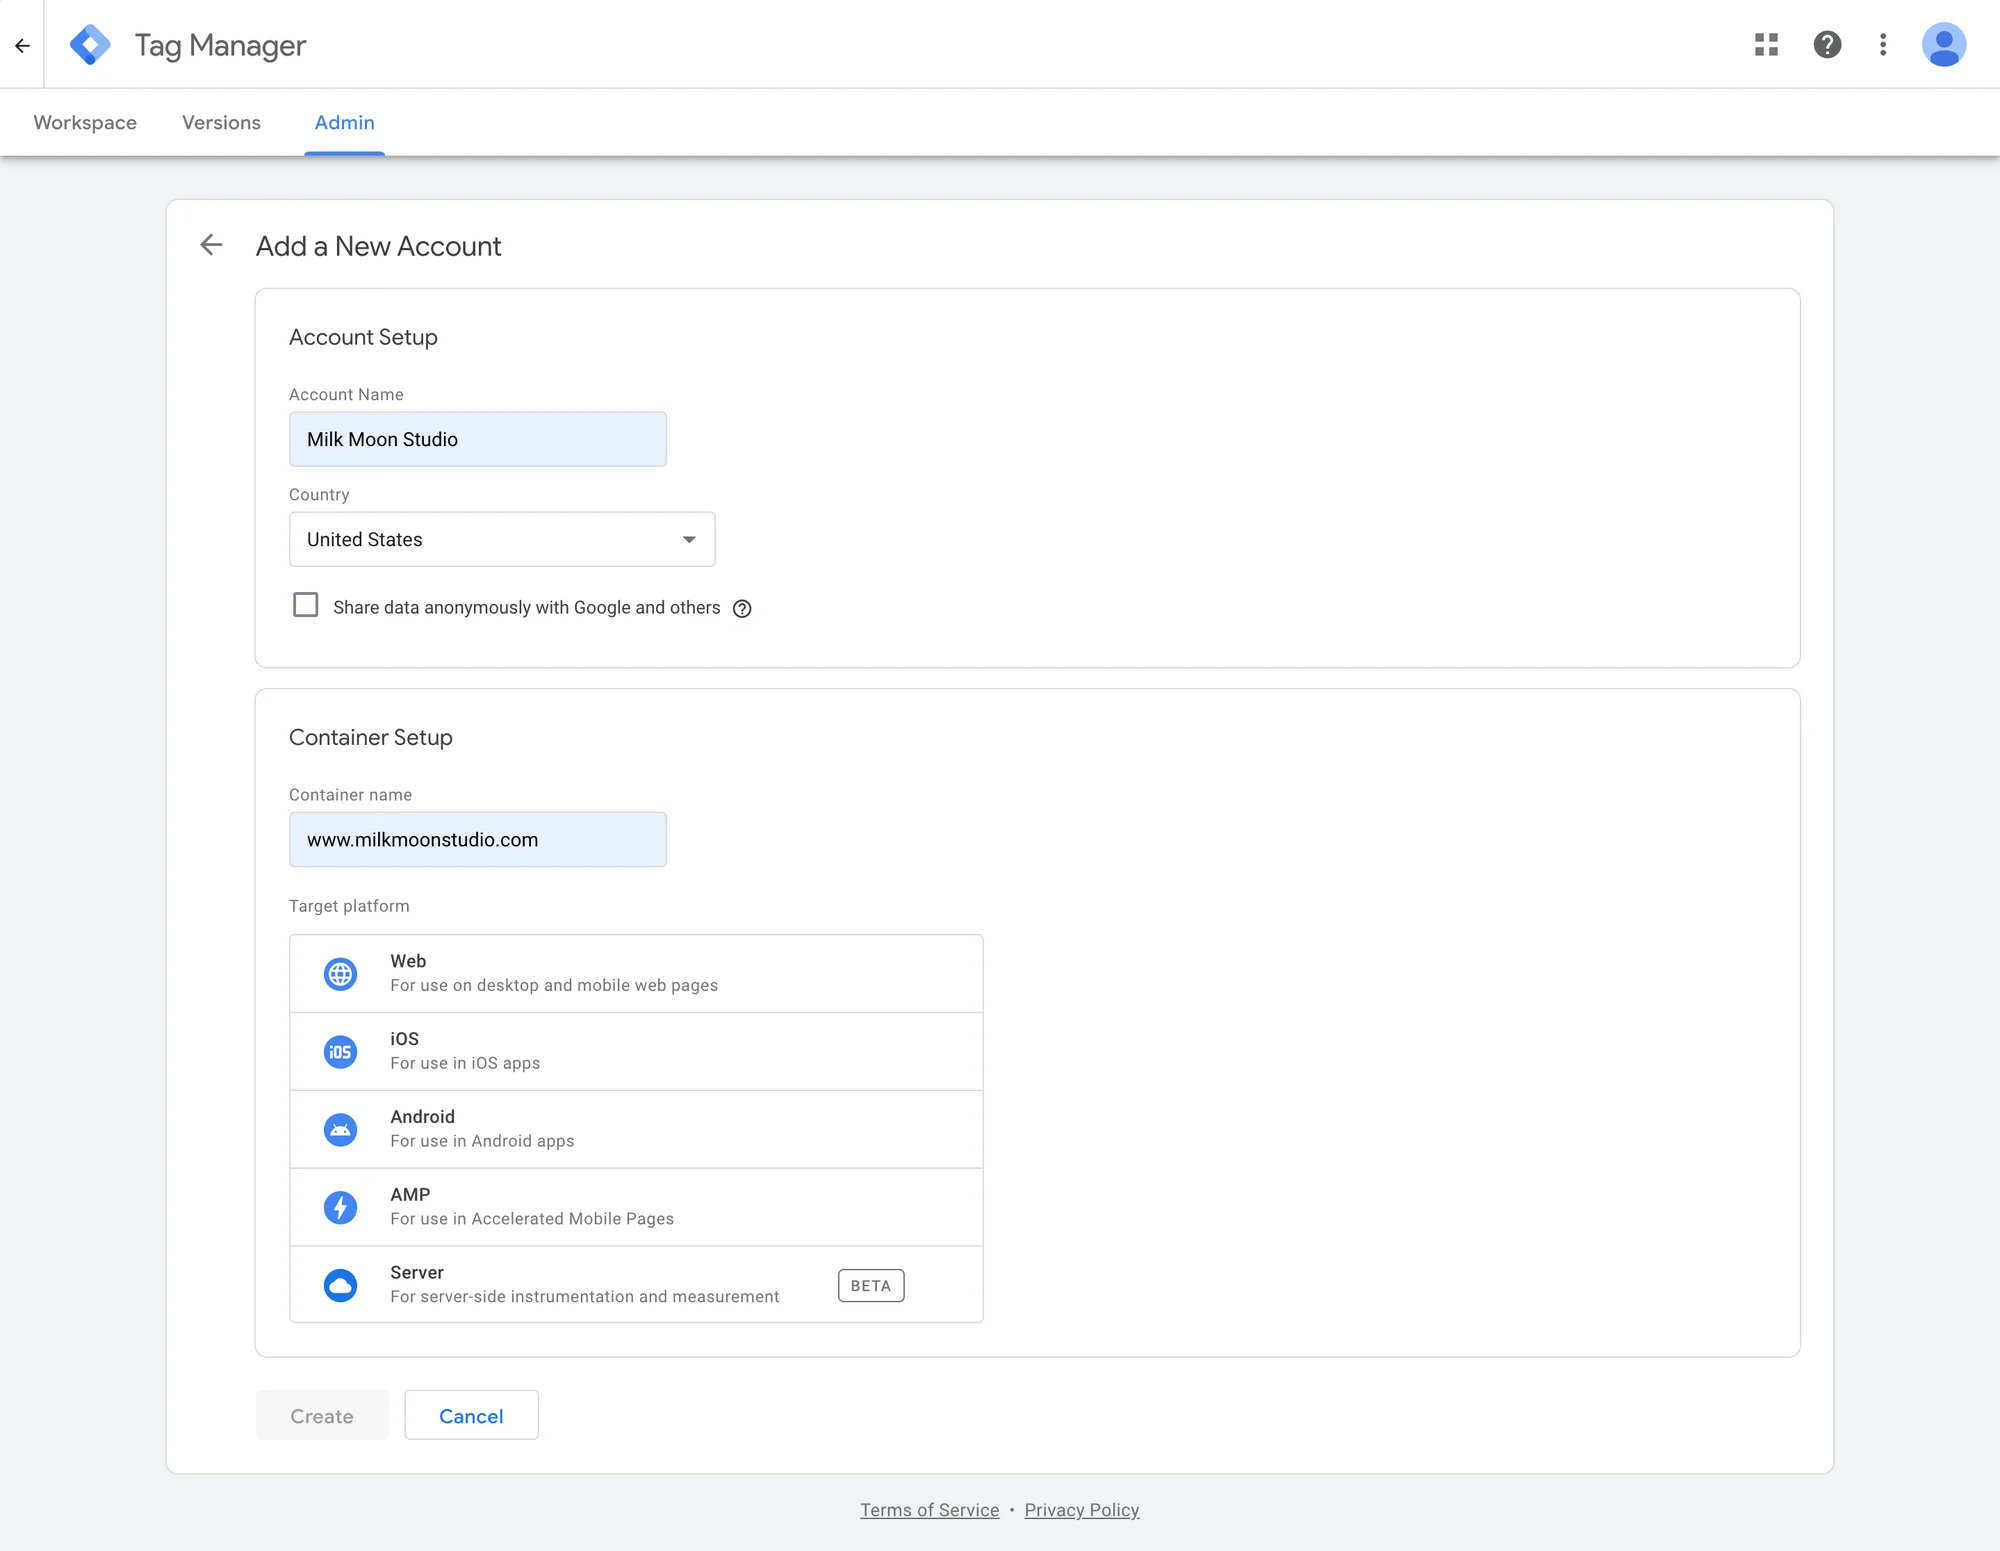
Give the account a name, select the country, stick in your URL and hit Web.
After you accept the user agreement you'll end up with the installation instructions. The first bit will just be a copy and paste, but the second bit that goes in the <body> tag will be a bit harder.
Step 2: Installing Tag Manager in Webflow
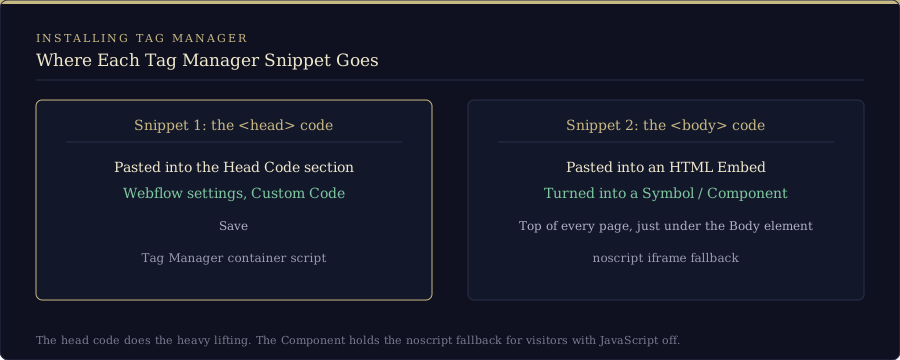
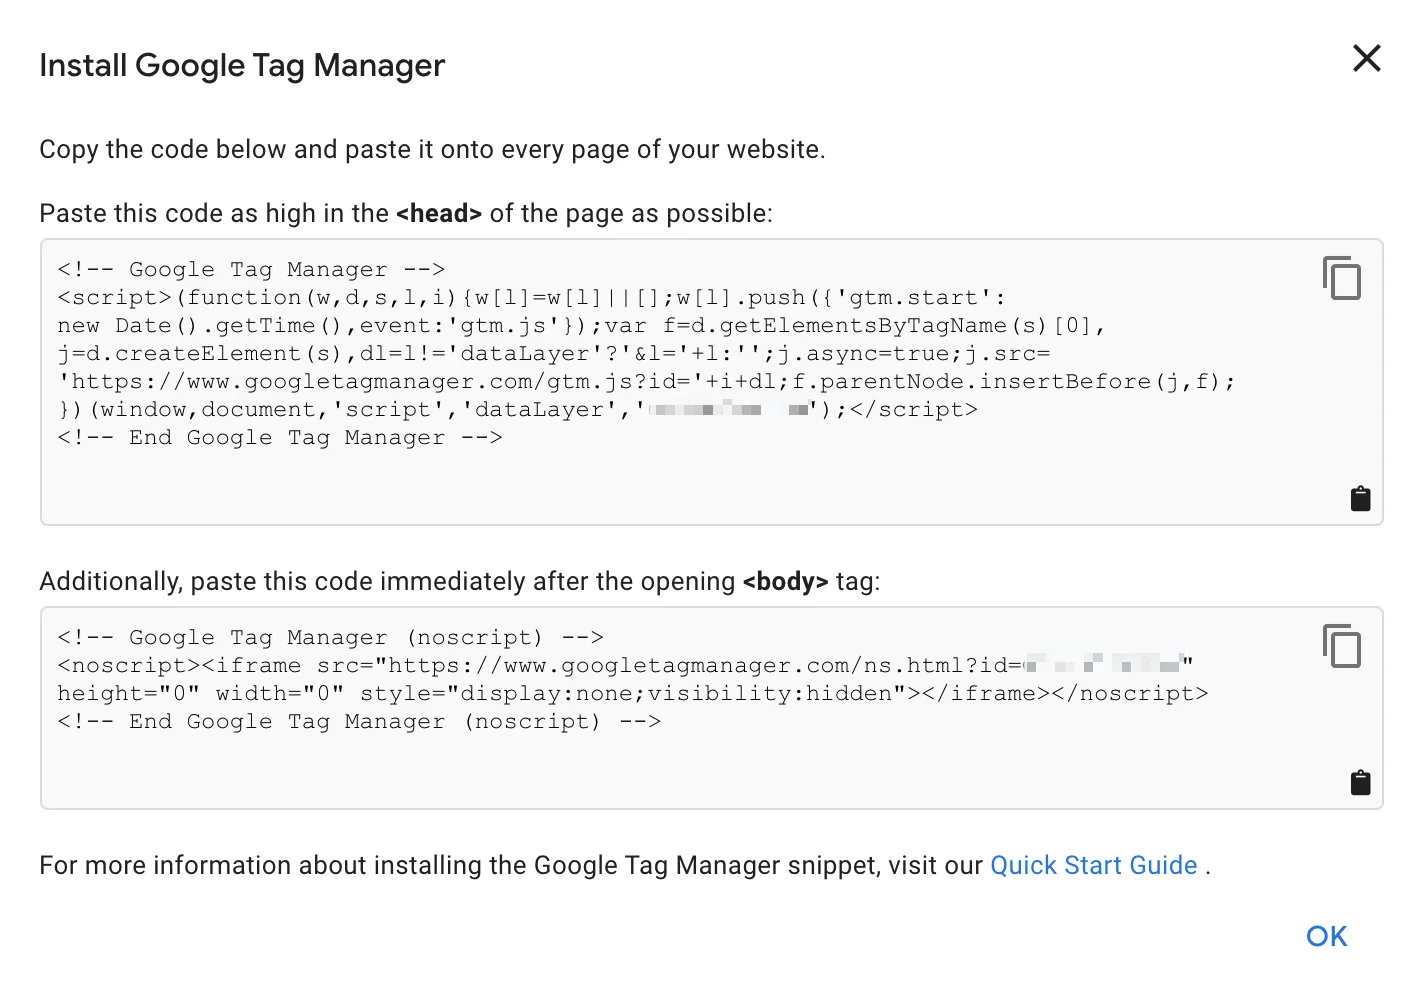
Once you've reached the above screen you'll want to copy the code that goes in the <head> and head on over to your Webflow Project settings page.
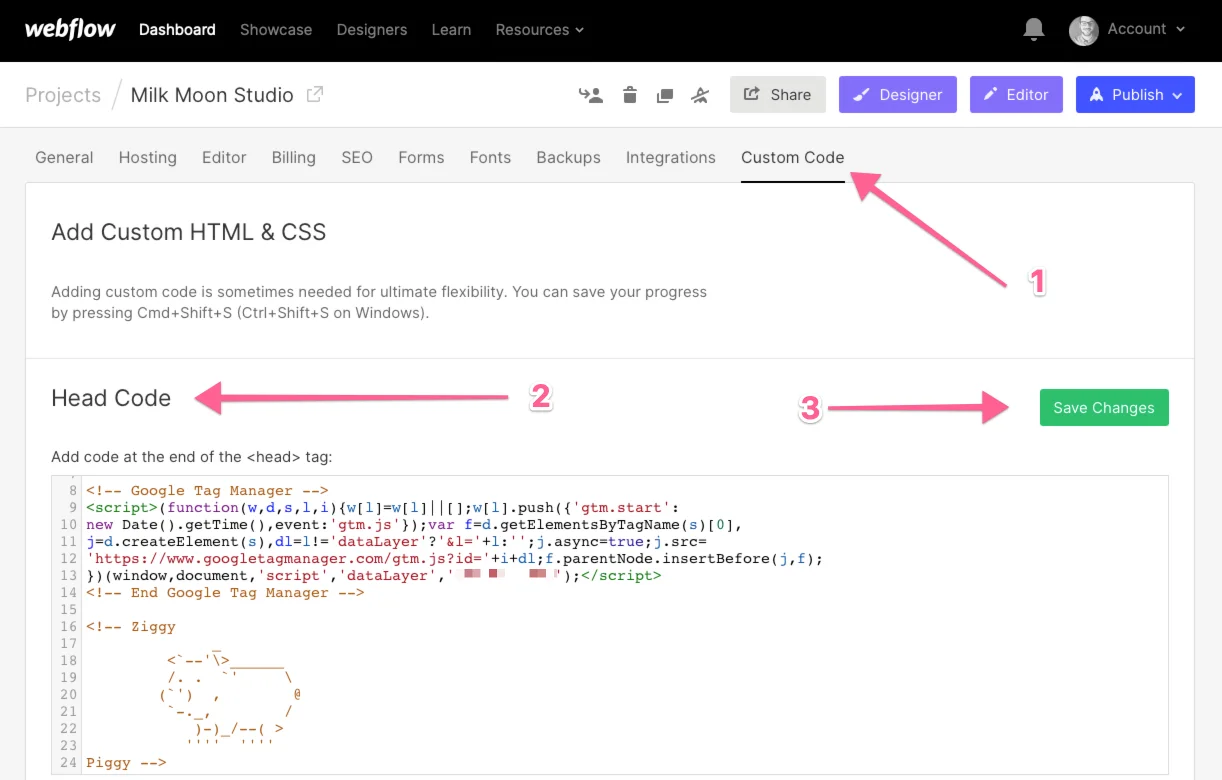
Once you're in Settings, open up Custom Code and paste the Tag Manager Container code into the Head Code section and save. This bit's as easy as 1, 2, 3.
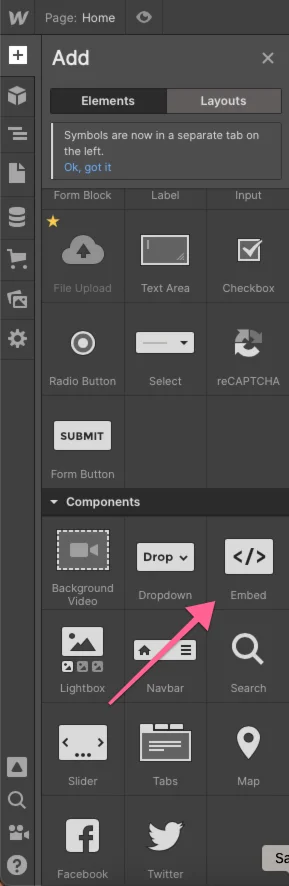
Next stop's the Designer. Add a new HTML Embed.
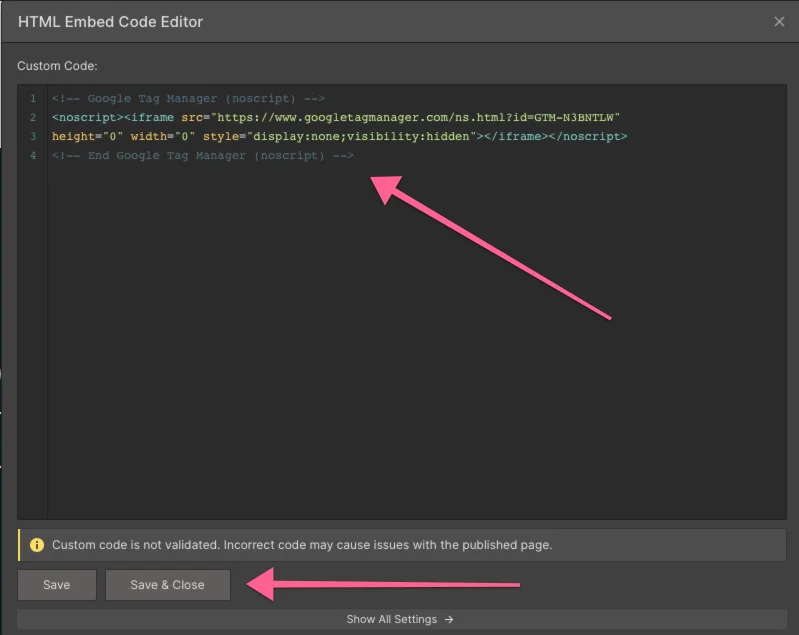
Paste in the second bit of code from Tag Manager that's supposed to go in the <body>. Save and Close.
We recommend turning this into a Symbol / Component, as you're gonna reuse it on every page in your Webflow Project.
Once you've turned it into a Symbol, drag it all the way to the top so it sits just under your Body element. You always want this to be right at the top of every page's list of elements.
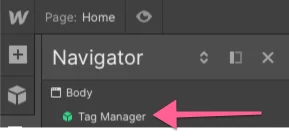
And that's it. Tag Manager is now safely embedded in your Webflow Project. Just remember to make sure it's sitting at the top of each page in your element list under Navigator and publish the container in Tag Manager before you publish your Webflow Project. Your <head> code does the heavy lifting. The code in your symbol is the noscript fallback, which only kicks in for visitors who have JavaScript switched off.
But wait, there's more:
Step 3: Testing
Naturally you want to make sure Tag Manager is installed, so let's test.
You're going to want to install this plugin for Chrome (sorry Safari users).
Make sure you've published Tag Manager and then Webflow, now head over to your site.
Open the plugin and hit Enable.
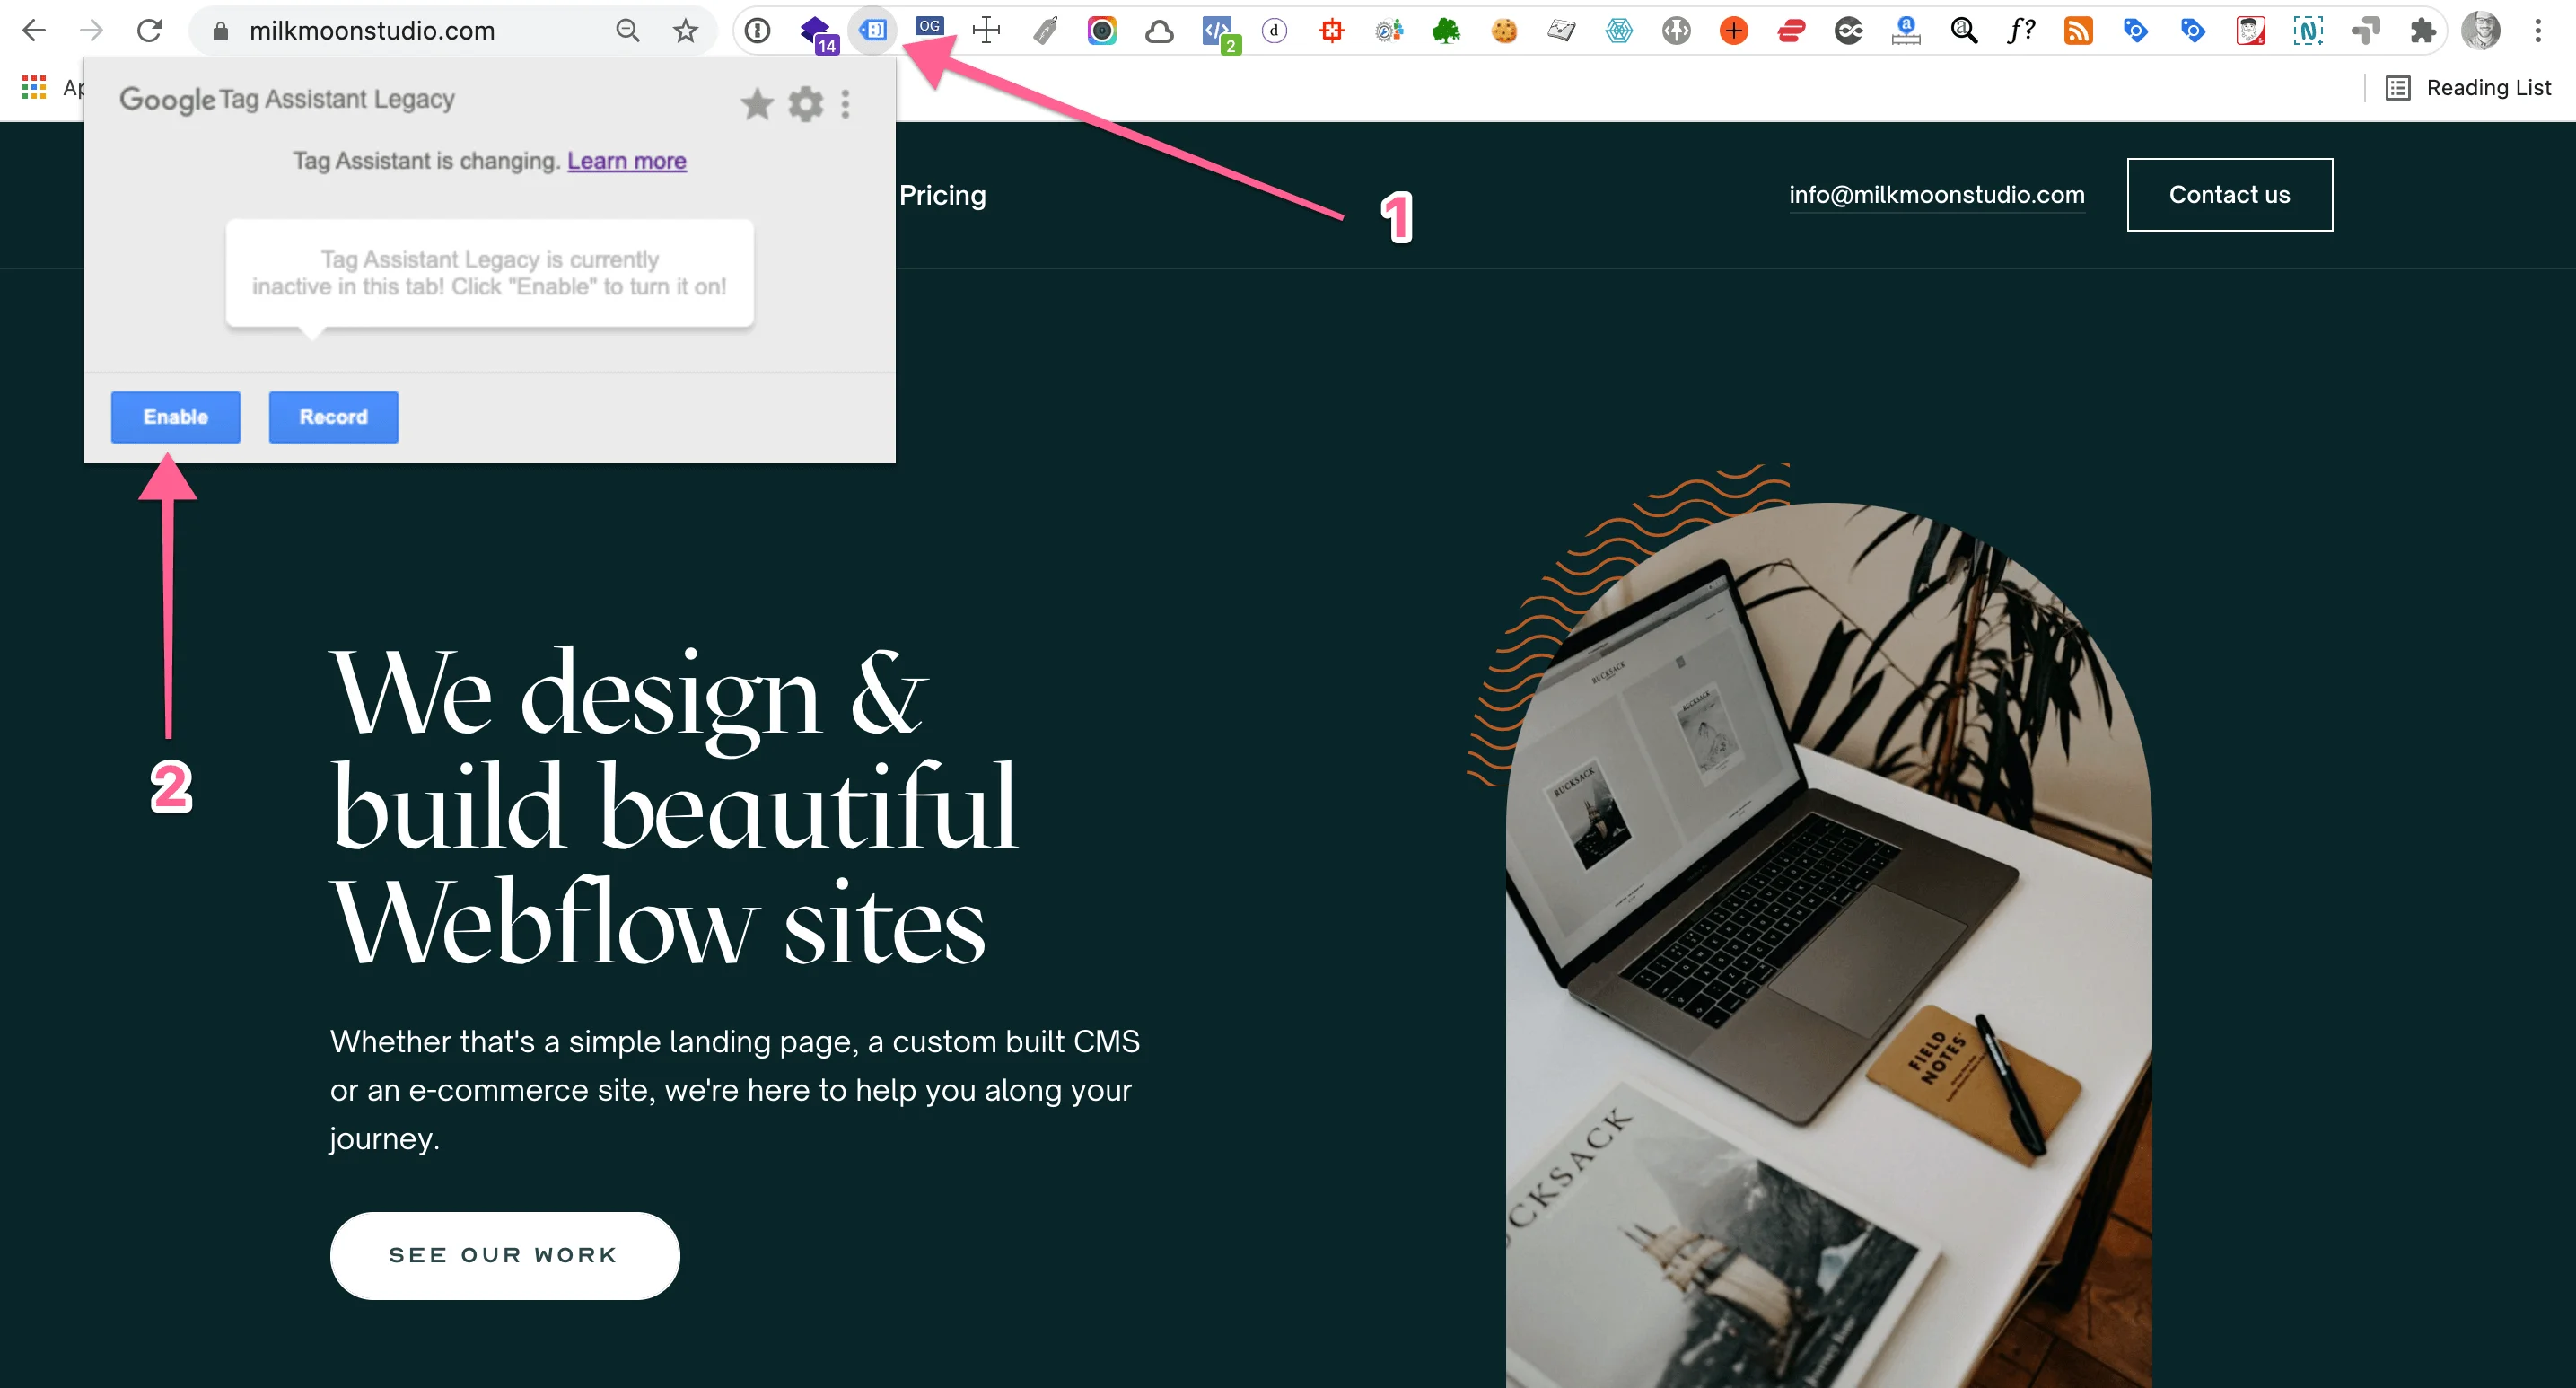
Once you've done that, refresh the page (command+R).
The Plugin should now show a little number (this will differ depending on the number of tags loaded):
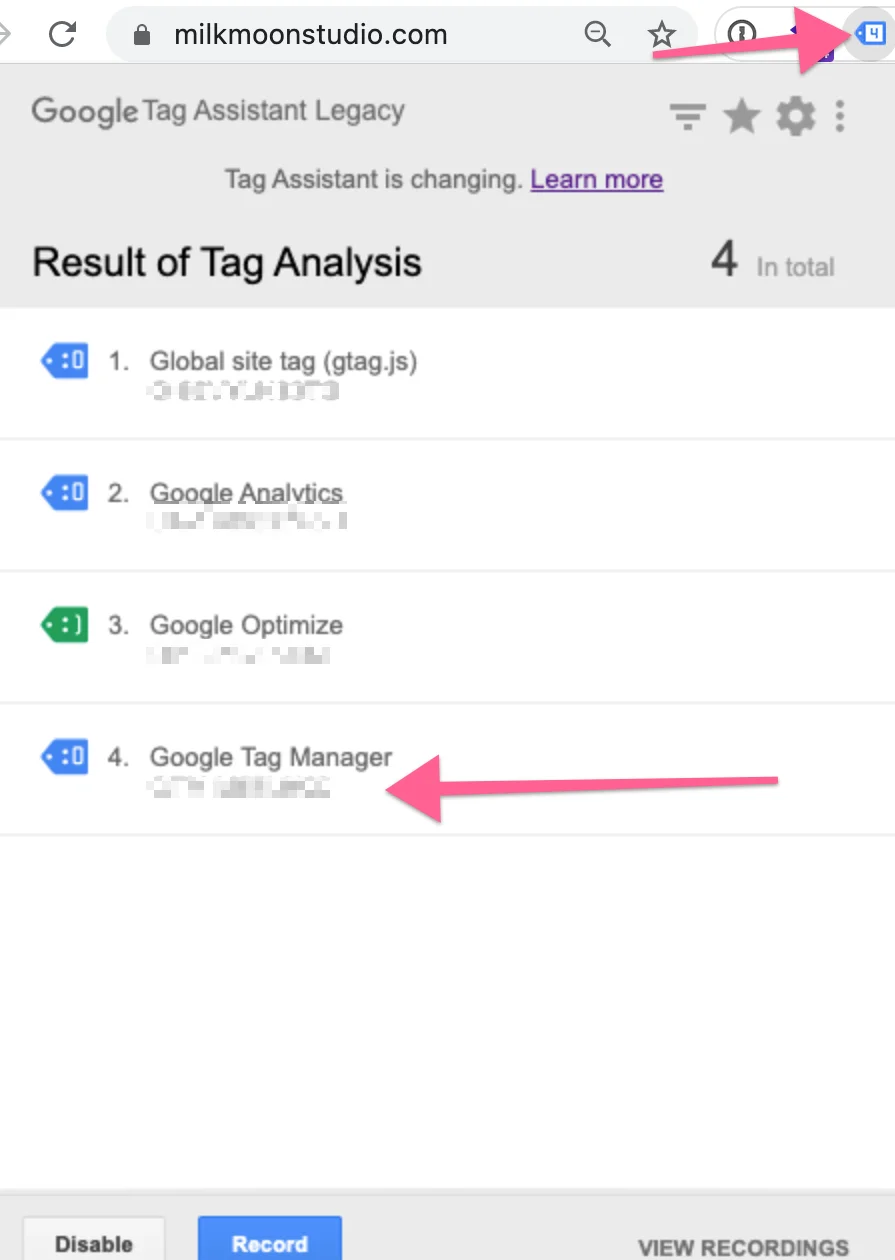
You'll notice mine has four. Number 4 is my Tag Manager container; the blurred bit is my container ID that should match my Tag Manager Container in Tag Manager itself.
No 1 is my Google Analytics 4 Tag, no 2 is my old Google Analytics Tag (Universal Analytics), and no 3 is Google Optimize. We've got posts about setting these up in Tag Manager, including adding free behavioural insights with Tag Manager and Microsoft Clarity, so don't worry, if you've just created your container you won't see any of these.
But yeah, that's it, well done, you've set up Google Tag Manager in Webflow. As a side note, don't worry about the sad little blue face next to the Tag Manager container, that's just because this is a non-standard Tag Manager implementation. Sadly this is pretty much as good as it gets, until Webflow changes things you're not gonna see a green smiley, but everything works just fine, trust us.
In part 2 of this series, we'll cover setting up Google Analytics in Tag Manager. You can find Part 2 here. You can also check out how to link your GA4 account to BigQuery here and a guide on speeding up your site using deferred Tags here.
Frequently asked questions
How do I add Google Tag Manager to Webflow?
Create a Tag Manager container, paste the first snippet into Site settings (called Project settings when we wrote this), Custom code, Head code, and add the second snippet to an HTML Embed at the very top of every page, just under the Body element. Then publish the container in Tag Manager before you publish your Webflow project. Steps 1 and 2 above walk through it.
Where does the Google Tag Manager body code go in Webflow?
In an HTML Embed that sits right at the top of every page, under your Body element in the Navigator. We turn that embed into a Symbol / Component so it can be reused on every page. It holds the noscript version of the container, which only runs for visitors who have JavaScript switched off; the head code does the real work.
How do I add Google Analytics 4 to Webflow using Tag Manager?
Install the container first, as above, then add your Google Analytics 4 tag inside Tag Manager. We cover that in part 2, adding Google Analytics to Webflow using Tag Manager. If Analytics is all you need, Webflow's own Google Analytics setup is quicker, but Tag Manager is more flexible once you add conversion tracking, ads or social.
Why does Tag Assistant show a sad blue face next to my container?
Because this is a non-standard Tag Manager implementation, and Webflow doesn't let us do it the standard way. Everything still works just fine.
Got any questions, hit us up in the comments, and remember to check out the How-To section of our blog for more tutorials.
Update We have added some video content at the top of the post to make it easier to follow along, so hopefully that helps. Please subscribe to the channel to stay up to date with our latest how-to's and updated content.