
Webflow's not that great at adding background video to elements using the CMS. In this how-to we'll show you how to create CMS powered background videos.
Why do you ask would you want to do this. Well you might for example want a different background video playing on the hero section in a CMS Collection list's template page. You might have a Collection list on a page and need a different video playing in each item. For us us, as a Webflow studio, it was a recent project for a client where we needed the hero section on the homepage to change based in the day of the week and have a different video playing as a background element each day (more on how we set up the video to play based on the day of the week in an upcoming post), and then that same video playing on the occasion's collection list page. We needed the CMS items to determine what video was playing, but we couldn't do that with the stock background video element in Webflow, so we did this:
We're going to show you how to add the background to a CMS item by uploading it to Webflow in a Background Video element, we're going to use an HTML embed element to get the video onto the CMS Collection List Item in the template page or collection list element on a page, and then we're just going to hide the original background element so it doesn't disappear once you publish. Milk Moon Studio is a small Webflow studio, so we like things simple and low-code, and that's what we're going to show you.
There are two schools of thought on how to do this though, and we're gonna use the first, but you can try the second, so we'll list them.
- You upload the videos you want to use to Webflow in a background video element that end up hiding so the video remains on your project. This approach allows you to, in a sense, still use the native functionality with a bit of a hack. Webflow will still transcode the video and output it in Webm and MP4 and you'll use both of these and let the user's browser decide which one to render on the page based on what it supports. You'll also be using Webflow's AWS CDN to host the content in Amazon's data centres.
- The second approach works the same when it comes to setting up and embed and a field to reference the video in your collection list, but you don't host the video on Webflow. You instead go ahead and purchase a Video account. This will allow you to customise embed settings etc. and then you reference the video in the CMS item. Instead of using a Webflow transcoded WebM or MP4 video you'll then be looping a Vimeo video in the background. The code differs a bit, more on that at the end of the post. We have recently added a post about controlling and optimising the Vimeo background video embeds with object intersect observer code, so check that out as well.
- Option 3, yeah we said two, but there are three. Combine options one and two. Buy a Vimeo Pro account so you can get the urls of the videos on Vimeo, then use the embed code we're supplying for option one with the Vimeo video links and don't use the Vimeo IDs as you would in options 2. We've not gonna cover this one, you'll figure it out.
So, let's kick if off with the Webflow method:
Step 1 - Setup your CMS Collection
You're going to need two fields, one for the URL of the MP4 video and one for the WebM one.
- Create 2 fields, plain text, one called MP4, one called Webm.
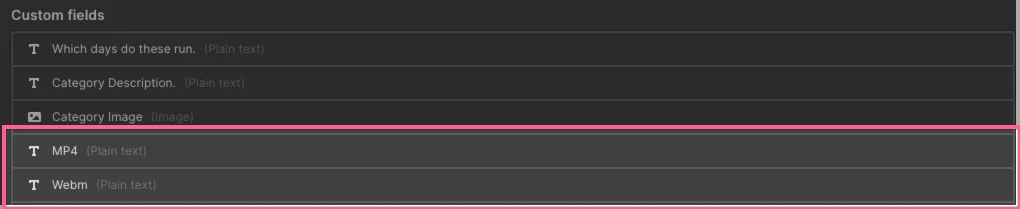
That's the CMS Collection List setup done. Naturally you can go ahead and add any other fields you're gonna need in the Collection List
Step 2 - Setup your background video element in the CMS template page or collection list item
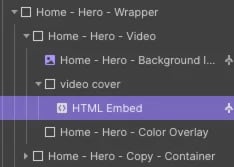
- Head to wherever element you need the video to appear in. This could be in a Collection List item on a static page or on a CMS Template Page. You're gonna want a wrapper for the video, so drop in div, we're gonna call it video cover.
- Set the div to relative and size as you would have sized the Background video element had you been able to use it. If you're gonna have text or whatever over the video you're also going to want the element this div is sitting in to be set to relative so you can stack them using z-index. We've got the video wrapper set to 1 and the content above it set to 2 so we can stack them nicely and the video is below.

We've named everything nicely in the screenshot so you can see how we stacked them. video cover is the div wrapper that will contain the embed element. We've got a color overlay on top of it with a 20% black opacity to make the compression a bit less obvious (more on that in the tips at the end) and the copy sitting on top of that. The colour overlay also make the text more readable as some of our videos contain elements that are white. Our video cover div is also set to Absolute Positioning with a 100% width and height, we want it to fill the whole background of the Hero section on this page.
- Now, go ahead and drop a HTML embed in your video wrapper. This will contain the code that makes this all work nicely:
- Add the following code and select the MP4 and WebM fields you created earlier.
<iframe height="300" style="width: 100%;" scrolling="no" title="CMS powered background videos in Webflow - WebM and Mp4" src="https://codepen.io/milkmoonstudio/embed/ExpGNzB?default-tab=html%2Cresult&theme-id=light" frameborder="no" loading="lazy" allowtransparency="true" allowfullscreen="true">
See the Pen <a href="https://codepen.io/milkmoonstudio/pen/ExpGNzB">
CMS powered background videos in Webflow - WebM and Mp4</a> by Jakes van Eeden (<a href="https://codepen.io/milkmoonstudio">@milkmoonstudio</a>)
on <a href="https://codepen.io">CodePen</a>.
</iframe>
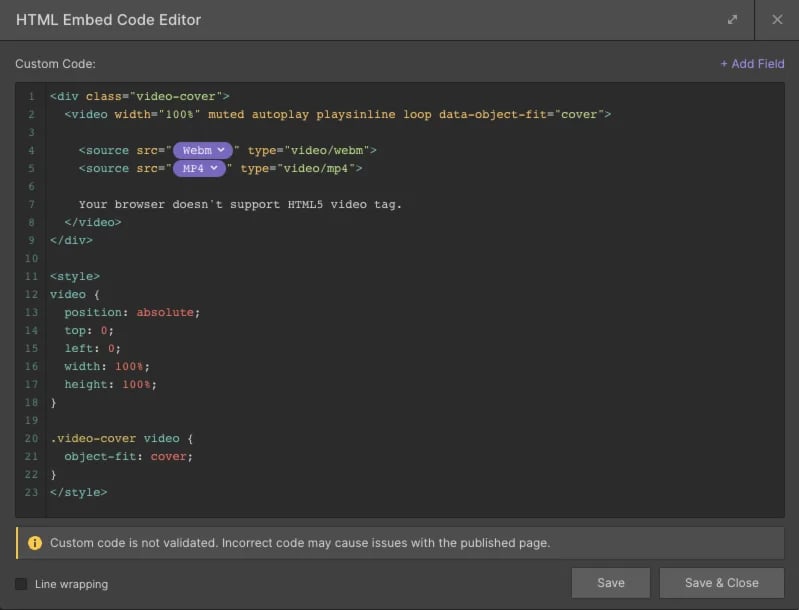
So what's happening here? The embed will play an inline background video that is set to loop. If the browser supports HTML5 video and WebM it'll pick that, otherwise it'll default to the MP4 video.
That's it for the CMS setup, but where do we get the URLs for the videos that we need to add to the CMS items in the Collection List.
Step 3 - Get the Video URLs.
The not so fun part. You can't just go upload the videos, Webflow need to transcode them and addd them the the CDN. The easiest way to complete this step is to create a static page, drop in a background video element for each video you need, add the videos to said background video elements and publish the page. Go to the published page, inspect the code. Each video you uploaded will have a MP4 and WebM video URL (wait for the videos to be compressed in Webflow before you do this). Copy the WebM and MP4 url for each background video element and paste the URL into the corresponding CMS Item's two video fields you created in Step 1.
Very important, do not delete the background video element you just created. They need to stay in Webflow for as long as you need the videos in the CMS. Just go and switch the static page you created to draft to remove it from the live project and you'll be just fine. The page will not be visible on the published site, but the video assets will remain.
That's it, you're done, go ahead and preview the published videos.
Tips for better background videos
- COMPRESS the living crap out of the video. Webflow's gonna transcode the video and spit out a WebM version, but you wanna go ahead and compress beforehand. Usability is key and you don't want it to drag down the user's browser so start small. We recommend Handbrake, it's free and you can spend a day tweaking settings till you get what you want. We seen a lot of folks saying you should aim for roughly 720p with a low frame rate of around 25 frames per second, and bitrates between 750k and 1250k, before choosing the lowest one that you think is acceptable. You can squeeze it down a bit more and try the next two tweaks once you've added the videos to Webflow
- Color Overly. You need a big video, but after getting it to the size you want it's not looking to hot, drop a black overlay over the video, tweak the transparency so you still see the video, but the overlay softens the compression you applied.
- Blur. Same as above, drop a div over the video element and apply a blur to soften the artefacts created by the compression.
- Pattern overlays can also help, set transparency on the pattern as low as possible while still hiding artefacts.
- Struggling to keep things small, pick a video that's very short but will loop perfectly. The shorter the video the smaller the size and if you can find something where the beginning and the end line up the loop is less obvious.
- Avoid motion, which sounds counter intuitive and you'e trying to add video, which inherently has motion... we just mean fast movements, shaky video, that kind of thing.
- For those who are a bit more intrepid, you can also pause the video using some javascript after a certain amount of loops, this will lighten the load on the browser.
- If you're worried about mobile, set the video to display: none on mobile and use a static image or very very small gif instead (we say jif).
- If you've not confident using Handbrake or some similar app for compression Webflow recommends ChimpChamp, just note that the Free plan only exports SD.
Vimeo Method
For Vimeo you'll need a paid account to get the IDs for the embed and it's harder to get it to cover an area as the element will try stick to the original aspect ration. Don't stress though, the hack they have here works very nicely, so go check that out. We've used it as well with a tweak here and there.
There are a few different Vimeo implementation out there in terms of the HTML embed code. It'll look something like this:
<iframe height="300" style="width: 100%;" scrolling="no" title="CMS powered background videos in Webflow - Vimeo Embeds" src="https://codepen.io/milkmoonstudio/embed/LYBMxVG?default-tab=html%2Cresult&theme-id=light" frameborder="no" loading="lazy" allowtransparency="true" allowfullscreen="true">
See the Pen <a href="https://codepen.io/milkmoonstudio/pen/LYBMxVG">
CMS powered background videos in Webflow - Vimeo Embeds</a> by Jakes van Eeden (<a href="https://codepen.io/milkmoonstudio">@milkmoonstudio</a>)
on <a href="https://codepen.io">CodePen</a>.
</iframe>
Remember to double check it covers the area properly on all device breakpoints.
We have found that while the Vimeo method sometimes reports slower pagespeed results, the time to interaction, where the user can actually use the, site is a bit faster with Vimeo, but the video does take a bit longer to load due to the iFrames. We'll leave it up to the Webflow experts to decide which option they like best.
We will say that sometimes a video element works better with Vimeo. Something like this:
<iframe height="300" style="width: 100%;" scrolling="no" title="Vimeo Background Video <video> element embed" src="https://codepen.io/milkmoonstudio/embed/LYMoGxm?default-tab=html" frameborder="no" loading="lazy" allowtransparency="true" allowfullscreen="true">
See the Pen <a href="https://codepen.io/milkmoonstudio/pen/LYMoGxm">
Vimeo Background Video <video> element embed</a> by Jakes van Eeden (<a href="https://codepen.io/milkmoonstudio">@milkmoonstudio</a>)
on <a href="https://codepen.io">CodePen</a>.
</iframe>
You have more control as Vimeos adaptive bitrate etc. doesn’t kick in, just know that it’s a bit more work, in this example you’ll add three URLs from Vimeo for the file instead of just the Vimeo ID. Also make sure that when you copy the URLs form your video’s Vimeo page you use the Vimeo download urls and not the Vimeo player URLs, the player urls expire after 2 days. Simply click on the video name, get the links in the dropdown, and remember, the download URLs. Which ones you choose are up to you and depend on the quality of the uploaded file, you’ll usually opt for a high, medium and low quality one, but you can add more etc, up to you.
We did also create a newer post specifically dealing with Vimeo background video and using object intersect code to both optimise and control videos and other elements on the site based on video states, so check that out as well, but for the video tags you can use Finsweet’s Play and Pause script to optimise performance by simply playing the videos when in the viewport or pausing when they leave the viewport.
If you have questions, feel free to leave a comment and if you're looking for more how-tos check out this link.