


How we built a no-code Webflow popular posts section in 2021, sorting a CMS collection list by pageviews with Google Analytics, Google Sheets, an API connector and Zapier.
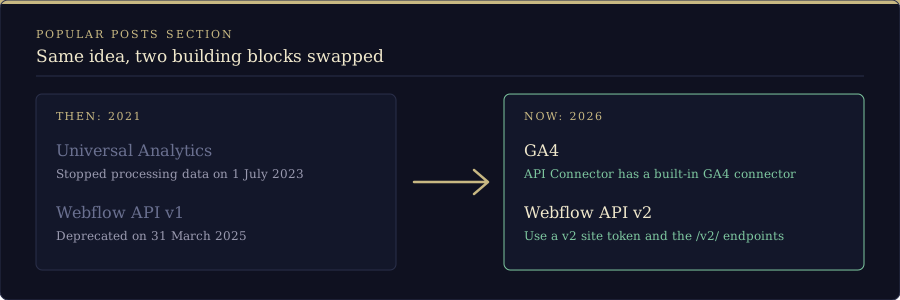
Update, October 2026: This is a 2021 workaround, and two of its building blocks have since gone. Universal Analytics stopped processing data on 1 July 2023, which broke the Google Analytics Google Sheets add-on below, and Webflow deprecated the v1 API we call from Google Sheets on 31 March 2025. The approach still stands as a record of how we did it at the time. To build it today you need GA4 (the API Connector add-on used in Step 3 has a built-in Google Analytics (GA4) connector; check its current pricing, as its OAuth connectors have needed a paid plan beyond the free trial) and the Webflow v2 API.
We're not gonna lie, this was not easy. It took a lot of trial and error, but we got there in the end. There are probably much simpler ways to do this by just querying the Webflow API and the Google Analytics API and then using the Webflow API to push the pageviews back to Webflow, but we chose Webflow as our platform of choice because we're not coders, we're a Webflow studio, and well, we wanted no-code. We promise, this is a no-code solution, just copy and paste and some spreadsheet skills. We've been thinking about how to do this for a while and had half a solution for a few months, but gave up (we wrote about it on the Webflow forum at the time, but that thread is no longer available). Anyhow, today we were sitting around waiting on feedback in Figma from a client and decided to make it work, and weirdly we figured it out this time round. It's only been running a few hours, but we added a new post to the blog, published it, went and clicked on it, and a while later Zapier updated the pageviews in Webflow for the new post as well. So here we go.
So let's start at the beginning. We're assuming you haven't set any fields in your CMS as required, because that means you have to fill them in when you update a live item via Zapier, so with that assumption things are simpler. (If you do have required fields, you're gonna have to fill them in via Zapier with the data on the Webflow post export sheet we'll create later.)
Our initial idea was the following: if we could get our blog post pageviews out of Google Analytics into a Google Spreadsheet, we could update the collection list with a pageview field in Webflow and then simply sort the collection list by that pageview field. It turned out to be more complicated, and we'd like to start off by saying that if you have a better solution, or can make even one step below easier, please please comment and let us know. We asked a number of Webflow experts and so far there hasn't been an easy way. We want this to be as simple as possible, and it's easy to implement, but not super simple at the moment, so as Webflow designers we're failing there for now.
Anyhow, like we said, our assumption was wrong. We didn't just need pageviews; to update a post via Zapier we needed three things:
- The post (collection list item ID)
- The post name (collection list item name)
- The pageviews for the corresponding post from Google Analytics
Unfortunately, there's no easy way to just get the Name and ID out of Webflow with Zapier or just about anything else without using the API, and we wanted none of that, so we came up with a solution that would do alllllll of this in a Google Spreadsheet and then use Zapier to push the pageviews to Webflow.
Let's start by listing what you're gonna need and why:
- Google Analytics: you're gonna need this to track your pageviews, and you're gonna need to use Google Universal Analytics and not GA4, as the Google Analytics add-on for Google Sheets uses UA and not GA4 (in 2021, anyway; see the update note at the top). For help on setting up Google Analytics in Webflow, follow this post on installing Google Tag Manager and then this post on adding Google Analytics with Tag Manager.
- A Google Sheet to do all this in. It's free, just sign up. Your Google Sheet will include a scheduled import from Google Analytics, a scheduled import of your blog collection list from Webflow and some extra sheets to do some calculations and cleanup on. You could probably do this with a lot less effort than we went through, but our spreadsheet skills also suck, so if you can make anything easier, just shout in the comments.
- The Google Analytics Google Sheets add-on (no longer available, see the update note). We installed it from the Workspace Marketplace. This allows you to import the latest pageviews for your blog posts from Google Analytics straight into Google Sheets and schedule the import on a daily or hourly basis.
- The Mixed Analytics API Connector add-on for Google Sheets. Get it here. This allows you to import your Webflow Blog CMS posts right into Google Sheets without any code, giving you the Collection List ID for each item and the item name that you'll need when you update the live items via Zapier. We paid, so we had no limitations on how much or how often we could use the tool.
- Zapier to check for new pageviews in the sheet and instantly update the pageviews field in your Webflow blog's collection list once new pageviews were imported from GA. We already have a paid account for this as we use it for a lot of other things, but you can probably get away with a free account.
- We used to share our Google Sheet here so you could follow along, but it is no longer available, so the formulas below are the reference. (Don't judge our pageviews, nobody's very interested in our posts about Webflow Analytics and whatnot.)
Step 1: set up Google Analytics if you haven't done that
You can follow these two posts on how to do this via Google Tag Manager and then add Google Analytics. That is the way we would go every time, and we wrote them specifically for Webflow, but if you're not comfortable with that, just set up a Google Analytics Universal Analytics (GA3) account and add the UA code to your Webflow project settings. If you haven't set this up yet, you're gonna want to wait a day for some data to come in, otherwise you're gonna have no idea what you're doing as all your metrics are gonna be empty. (Today that means GA4 instead; our post on adding Google Analytics 4 to Webflow with Cloudflare Zaraz shows one way to do that.)
Step 2: import your Google Analytics pageviews into Google Sheets
Create a Google Sheet. This is gonna be the sheet we do everything in, so file it away nicely and don't lose it.
Once you've done that, add the Google Analytics add-on.
- Go to Add-ons, then Get add-ons, and look for Google Analytics.
- Create a new report (Add-ons -> Google Analytics -> Create new report).
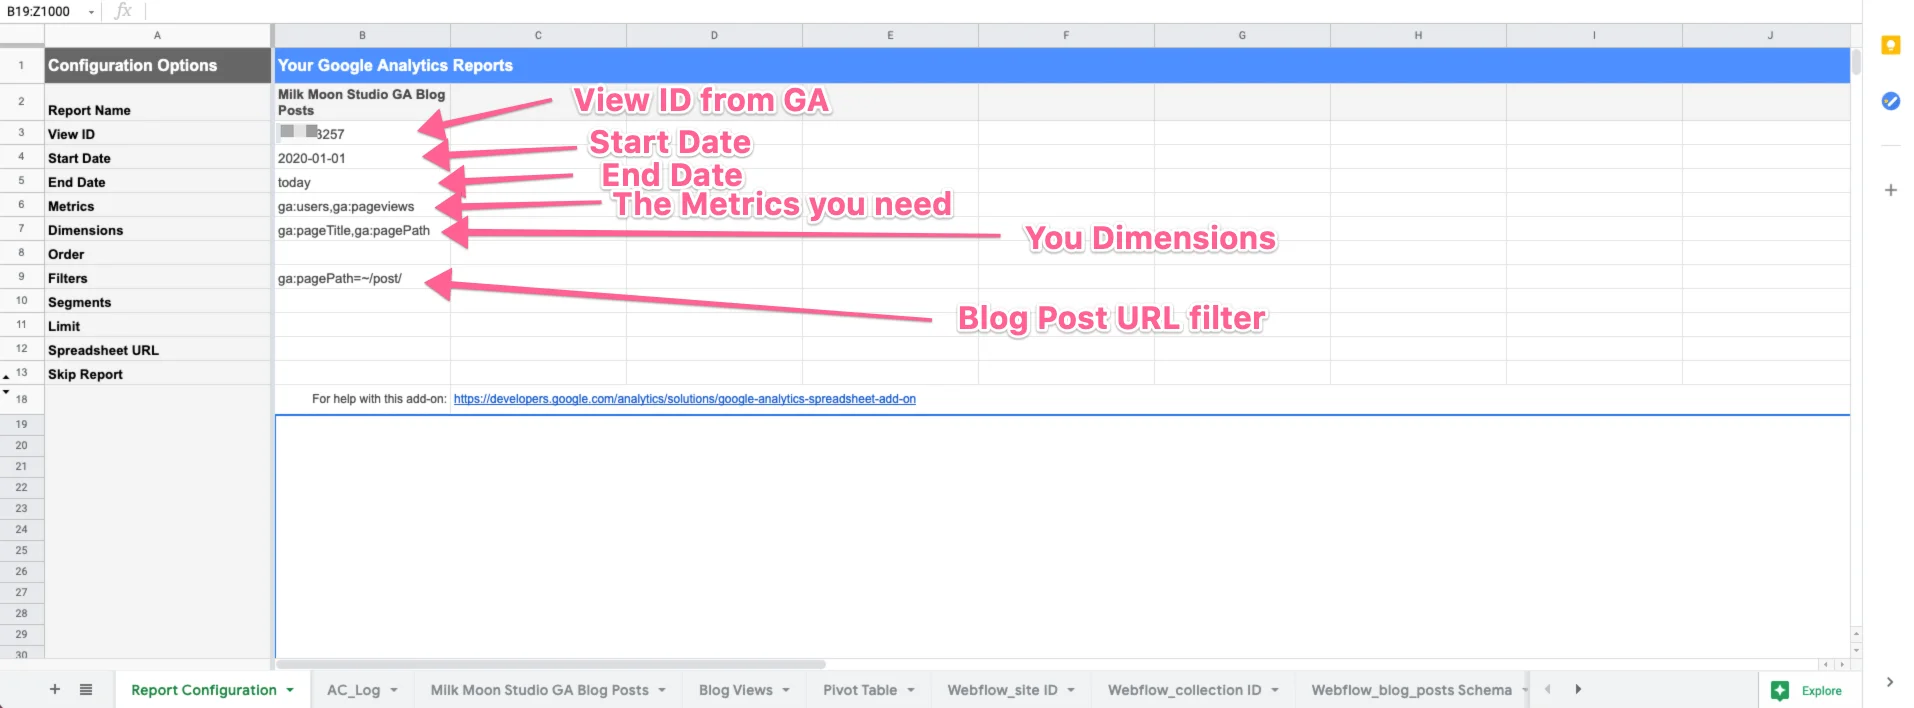
You're gonna want the following:
- Your View ID from Google Analytics. The add-on helps you with this in the setup.
- A start and end date, so from when till when you want the report. We went with the start of the year till today (just add yesterday in the end date field if you're gonna schedule this to run daily, or today for hourly).
- What metrics you want to see. We went with users and pageviews, but you just need pageviews.
- What dimensions you need to pull. We went with Page Title and Page Path, but you just need the path.
- And we added a filter so we only get the pageviews from our blog posts. Our collection list is just titled posts, which means the page path for all our blog posts starts with /post/, so our filter is set to contain /post/.
That's it. It should look something like this in the spreadsheet once you're done:
Now test by running the report: Add-ons -> Google Analytics -> Run reports.
You'll end up with a new sheet containing the report that looks something like this:
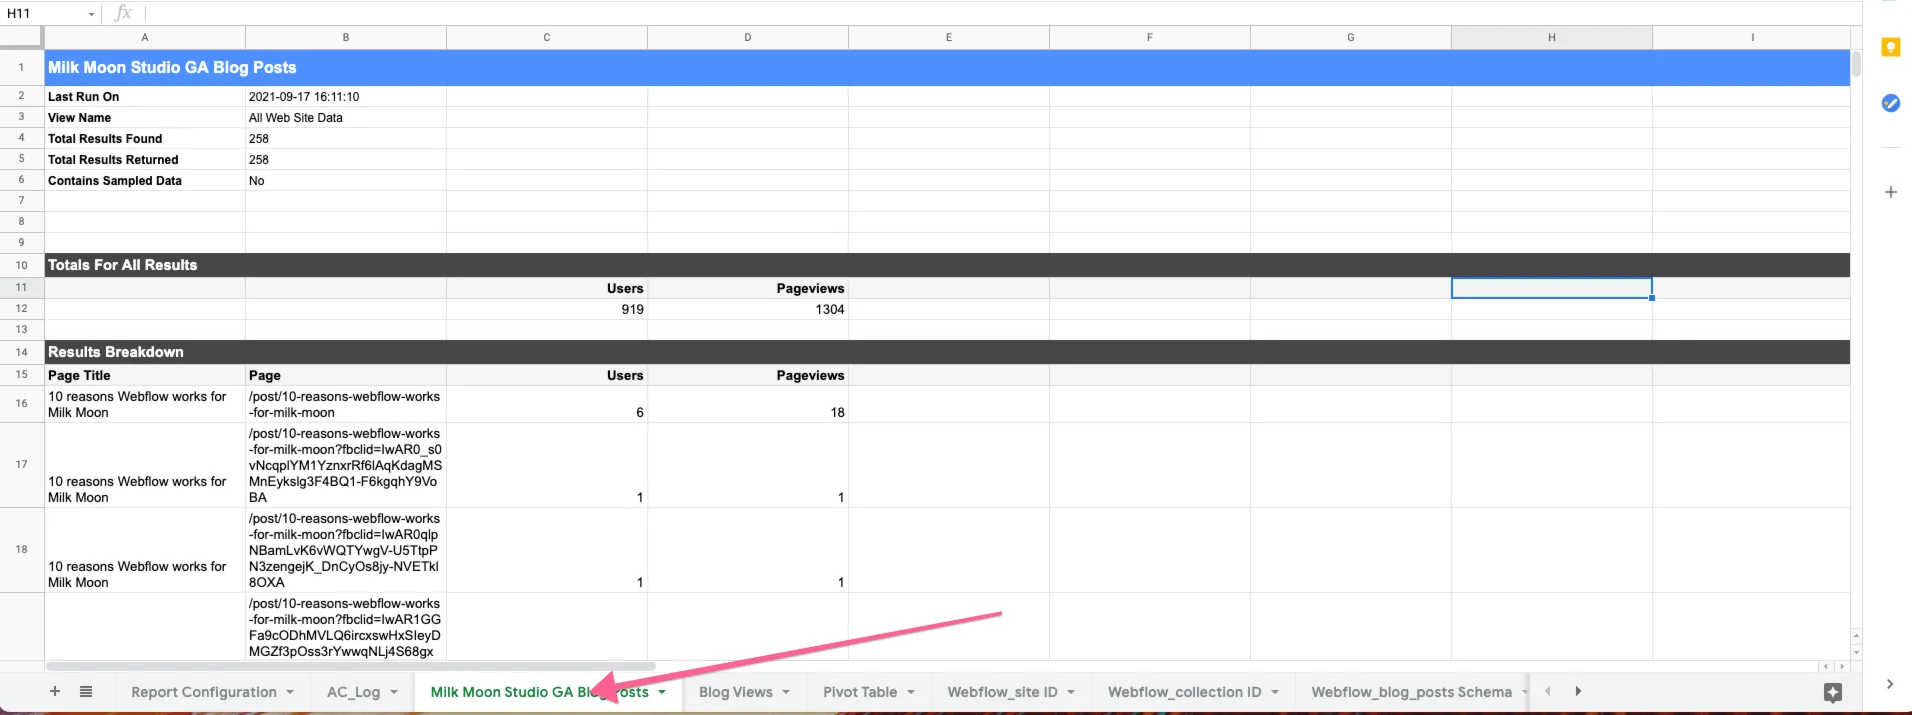
If you're happy that everything worked, you can go ahead and schedule it. Ours runs every hour as our end date is set to today, but you can just go ahead and do it once a day if you're happy with that.
Step 3: import your posts from Webflow
(2026 heads-up: the requests below use the Webflow v1 API, which was deprecated on 31 March 2025 and no longer receives support. Webflow has stopped creating v1 site tokens, so today you would use a v2 site token and the v2 endpoints under https://api.webflow.com/v2/, as in Webflow's migration guide. The spreadsheet steps stay the same.)
You need to do this so you can get the post ID and title that you'll need when you push the pageviews to Webflow via Zapier. Go ahead and install the API Connector for Google Sheets. Do it through Add-ons like before or get it here.
Now follow these steps to import your posts:
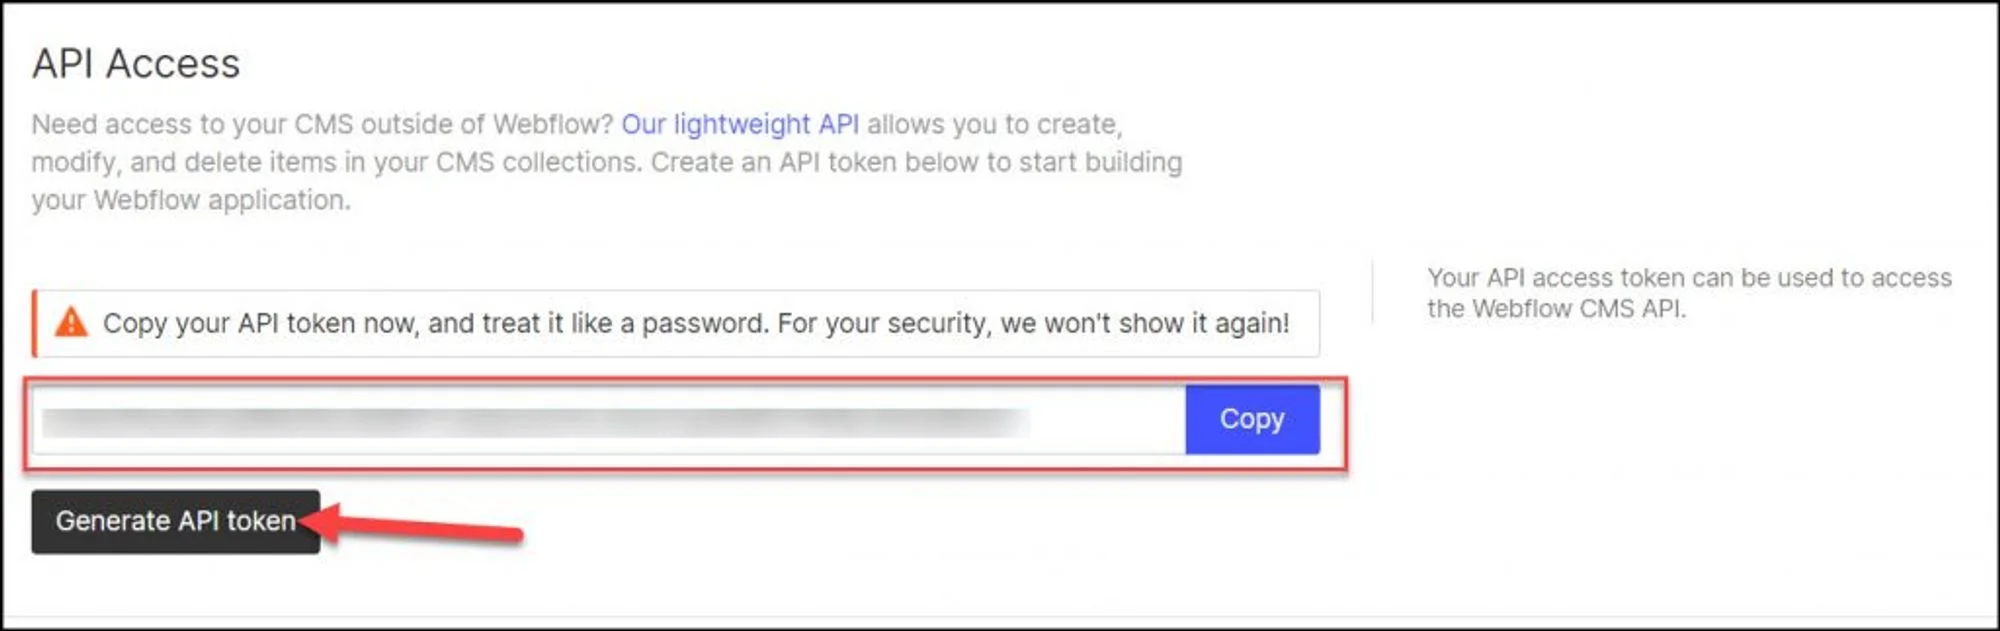
- Get your Webflow API key and save it somewhere. Navigate to your site’s dashboard and open Settings and go to the section Integrations, followed by API Access.
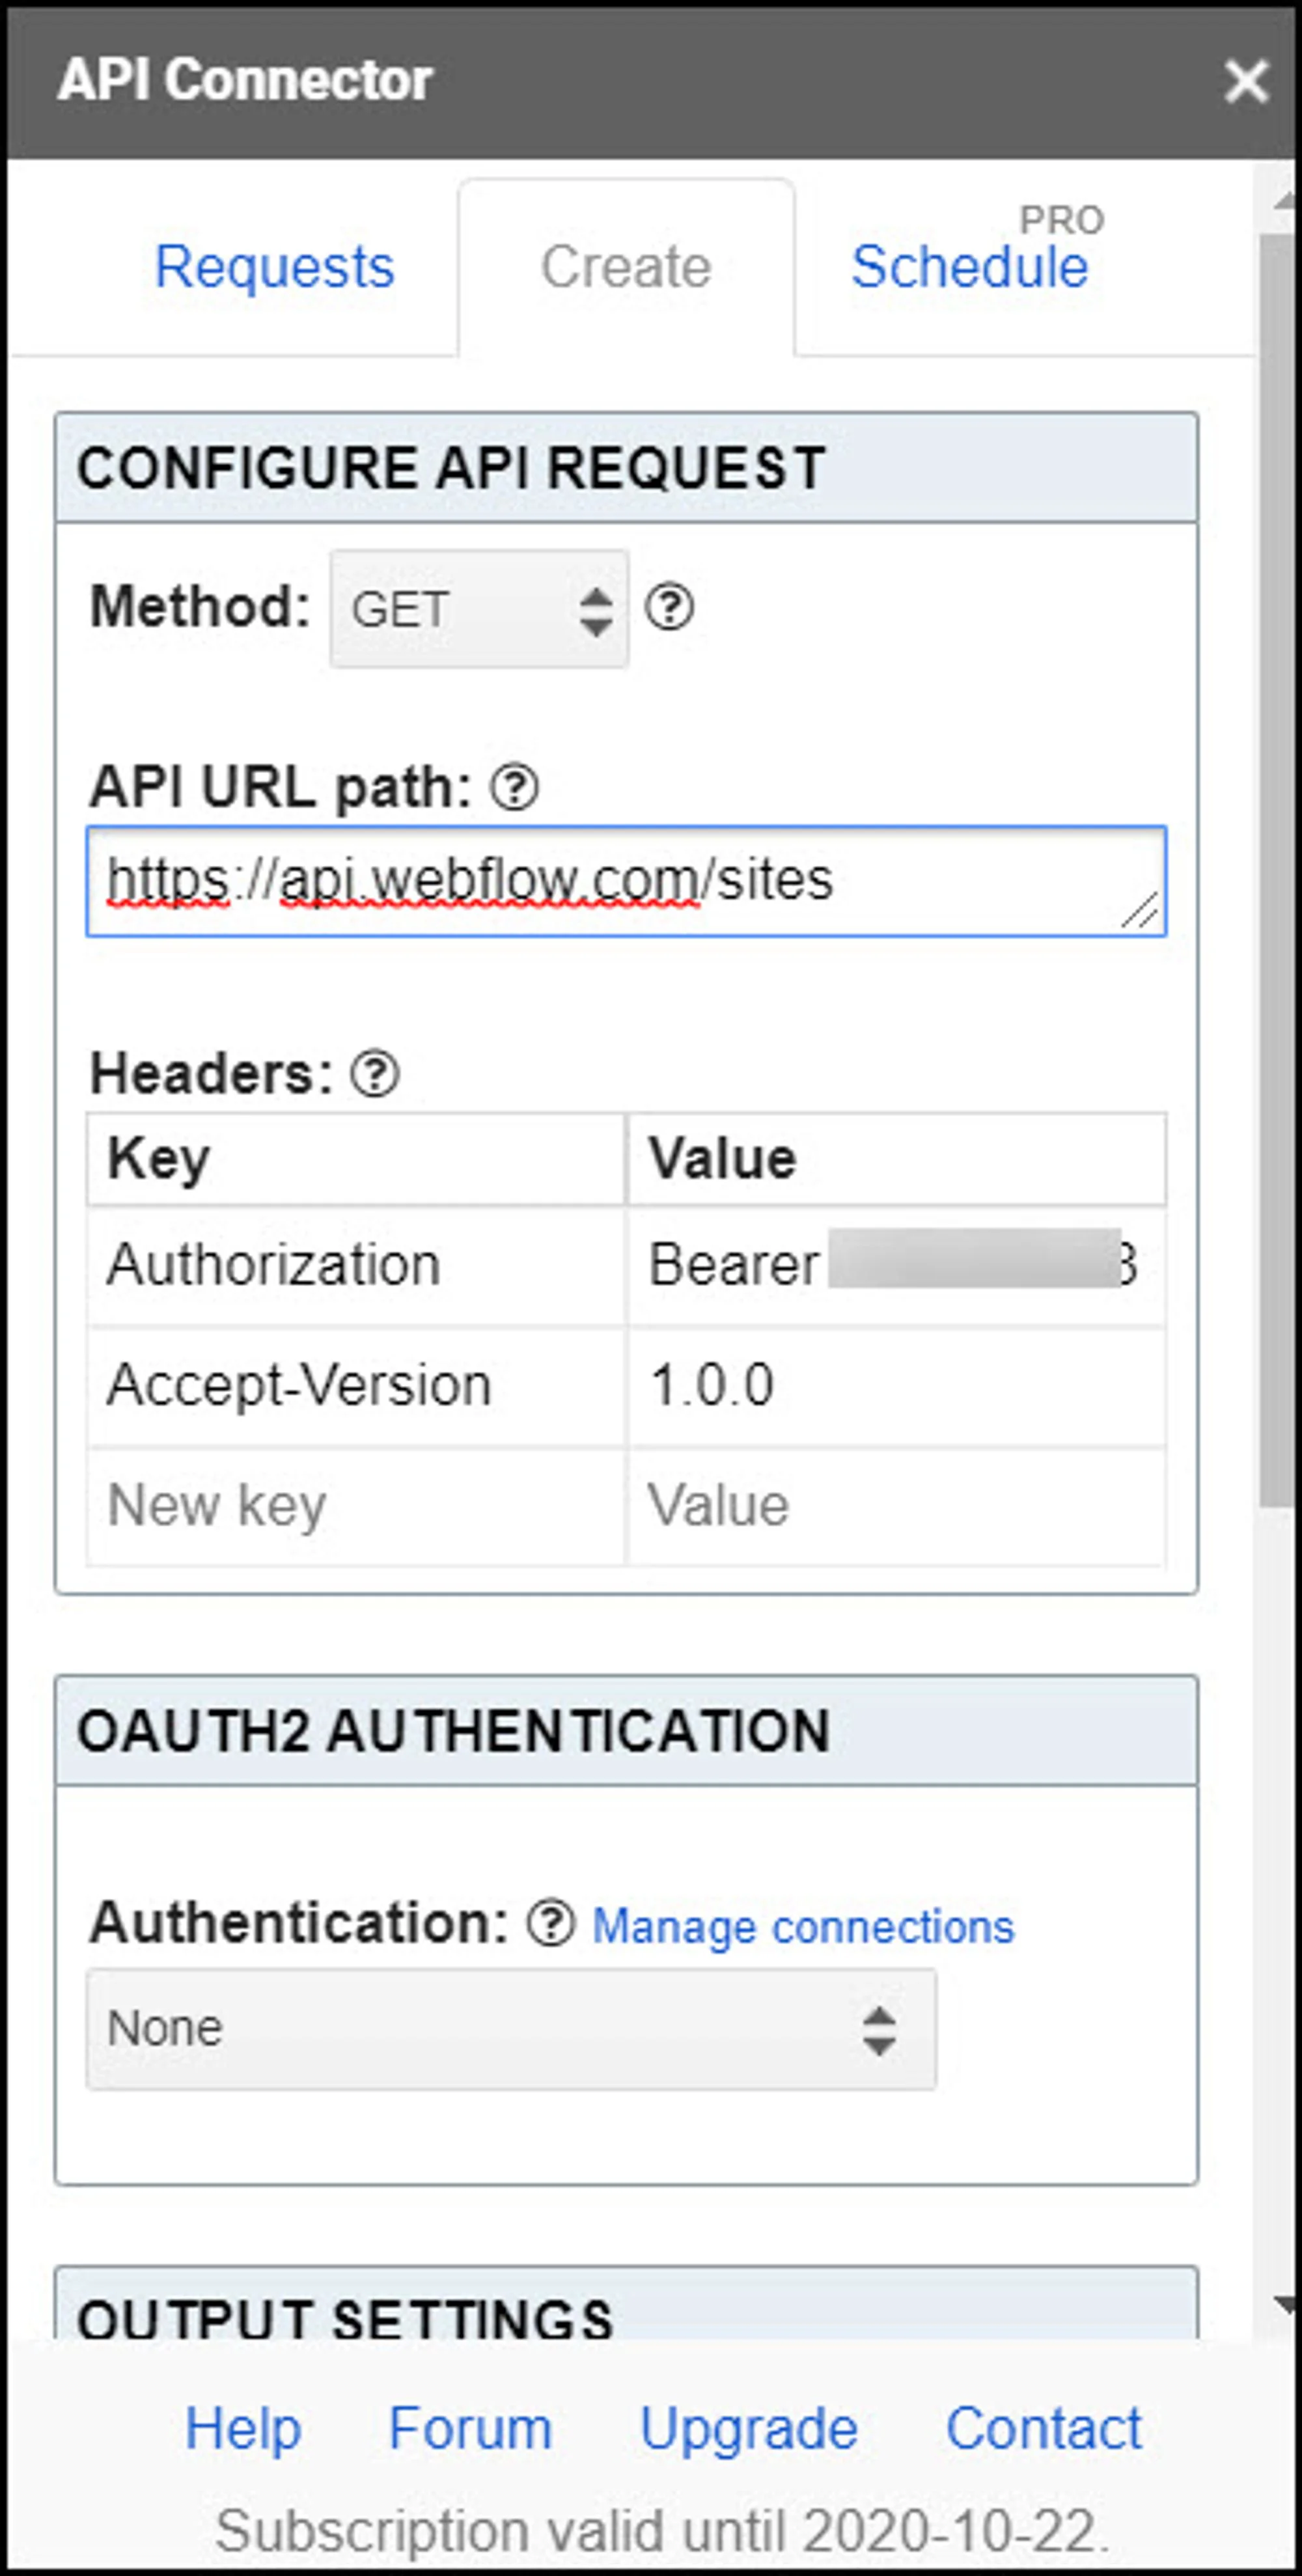
- Get your site ID. Go to Add-ons in Google Sheets, then API Connector, then Open, then Create or Add New.
- For this step the API URL path is:
https://api.webflow.com/sites - The value pairs are Authorization: Bearer {API_TOKEN_HERE} and Accept-Version: 1.0.0
It should look like this:
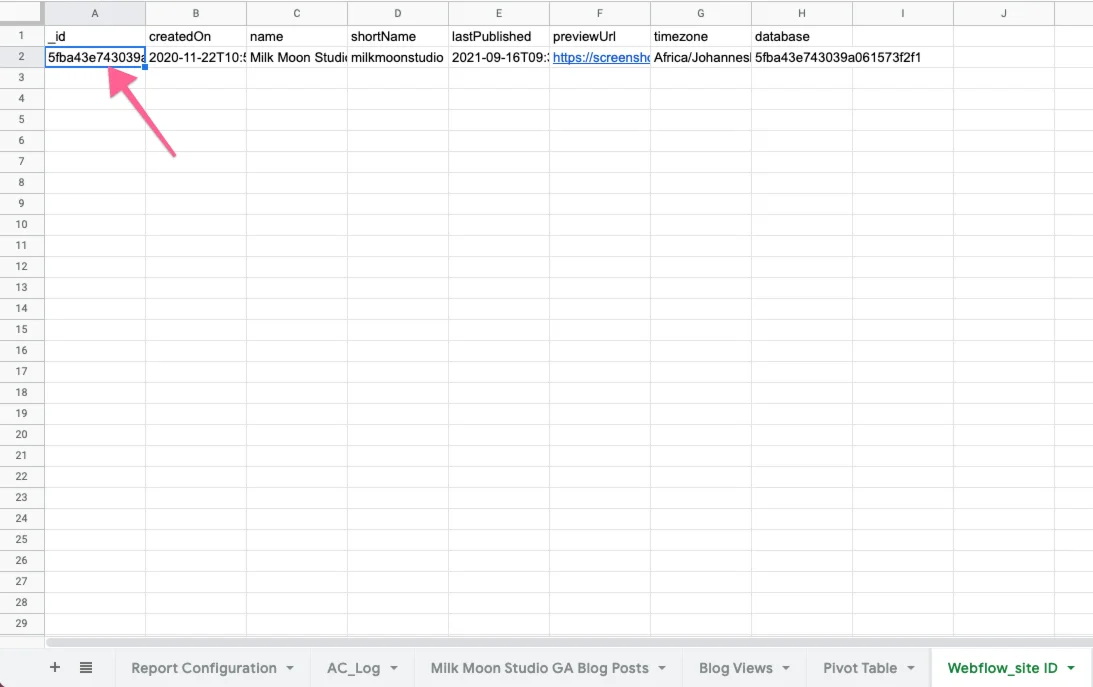
Give the destination sheet field a name, then name, save and run the API request. You'll end up with a new sheet that will contain the site ID. It should look like this:
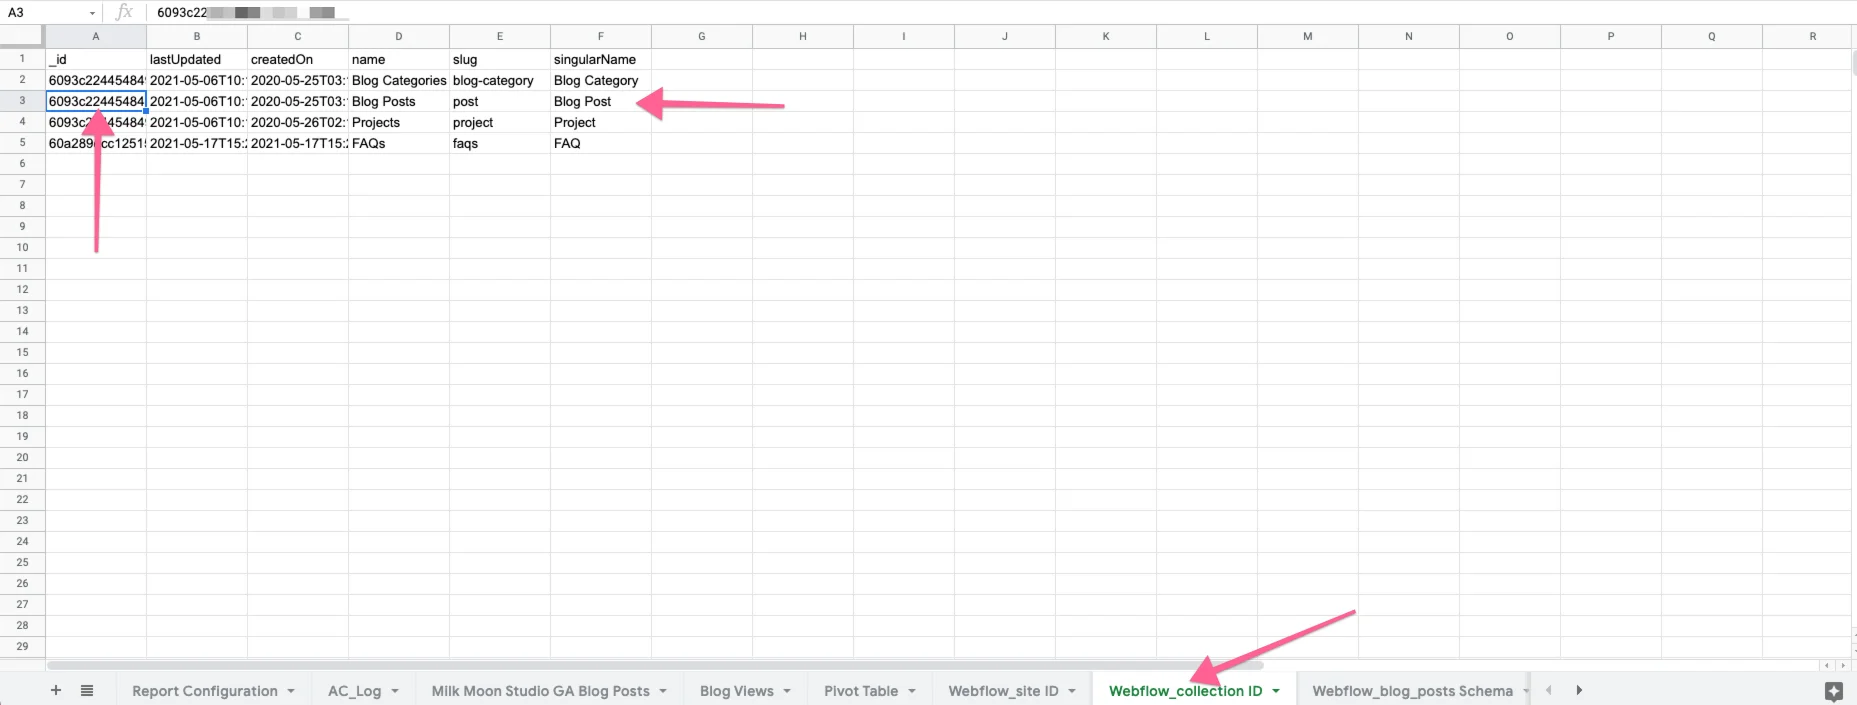
Next, you want to import all your collections so you can get the ID for your blog post collection list.
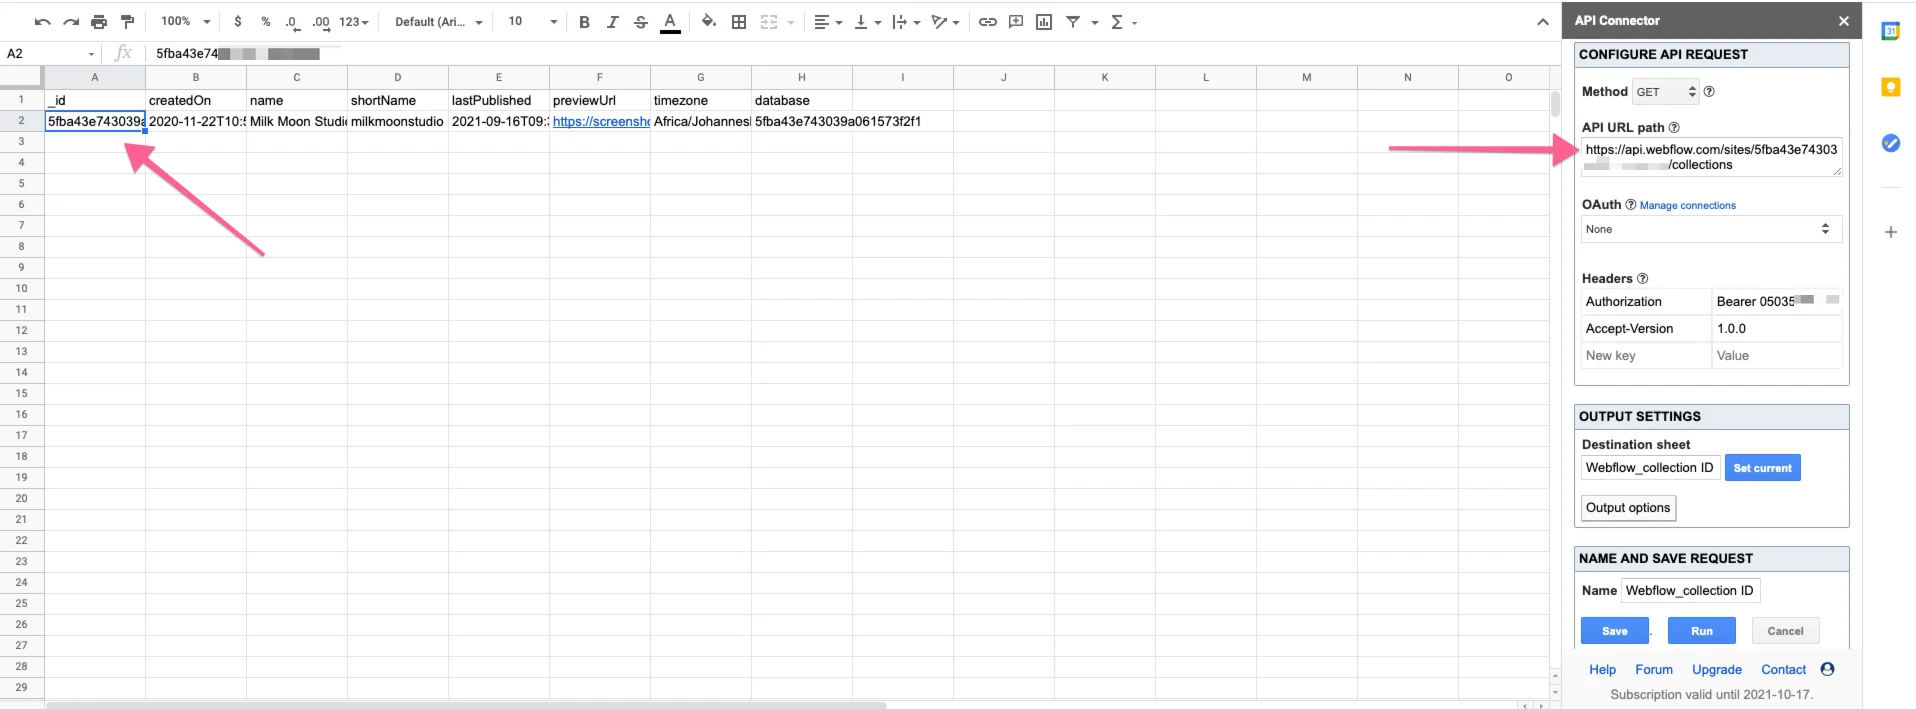
- Same process as before, just a different URL for the request:
https://api.webflow.com/sites/:site\\_id/collections - Copy the above API URL into the API Connector sidebar, being sure to fill in :site\_id with your corresponding site\_id from the previous step (in the new sheet that's called \_id in the first column), along with the key: value pairs as your headers, just like in the previous step.
The newly generated sheet will look like this:
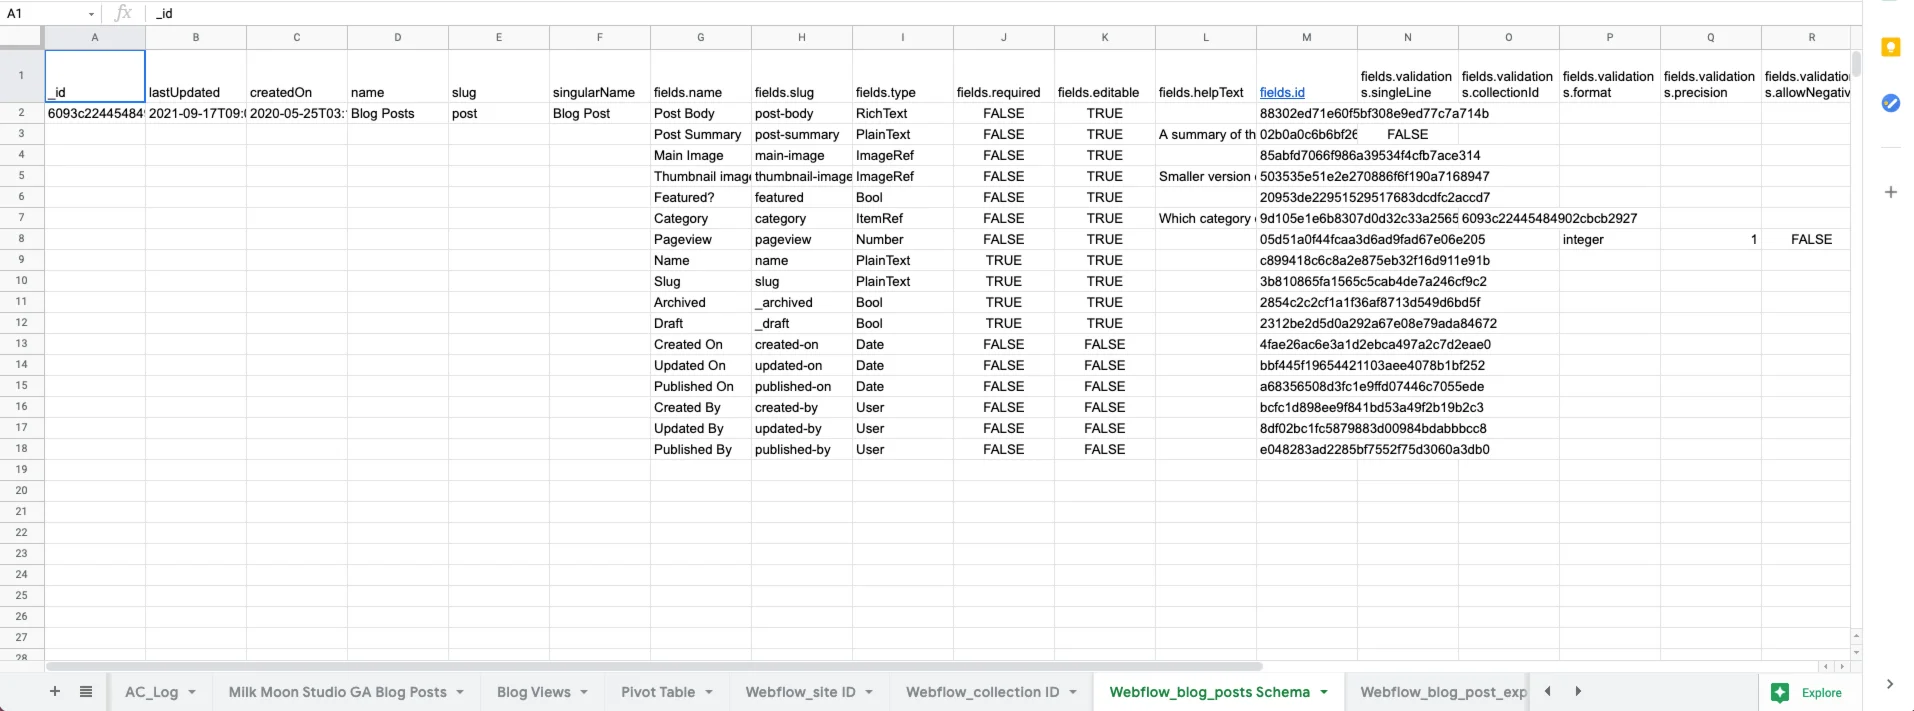
Now we want to pull in the collection list schema.
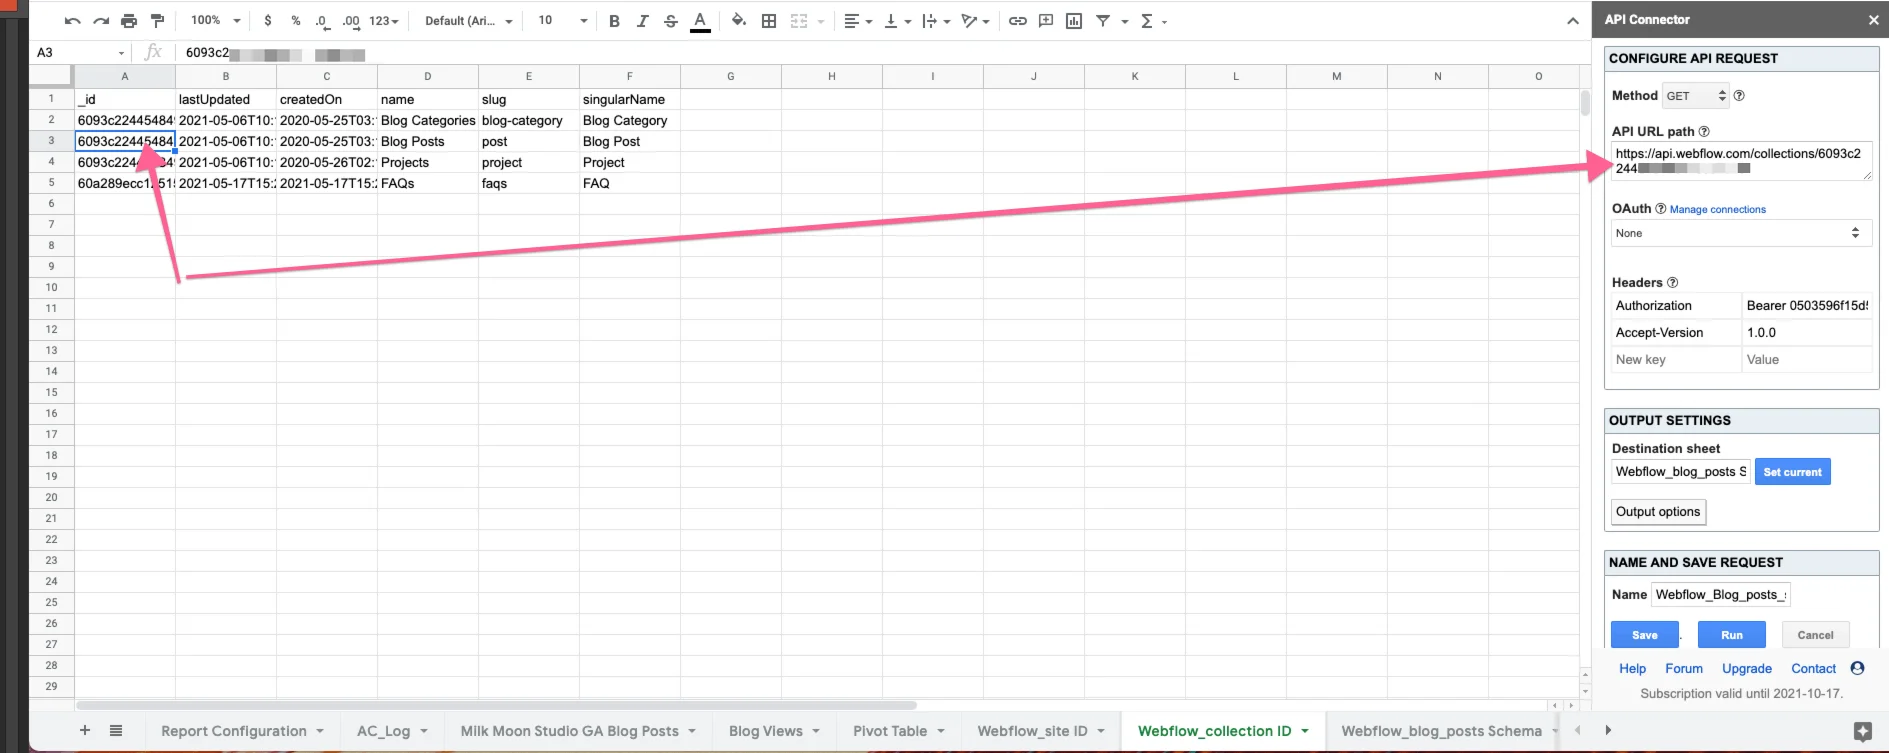
- Same process, just a different URL, and you're gonna use the new blog collection list ID. Your new API request URL is:
https://api.webflow.com/collections/:collection\\_id
Setup should look like this:
And here's our blog post schema:
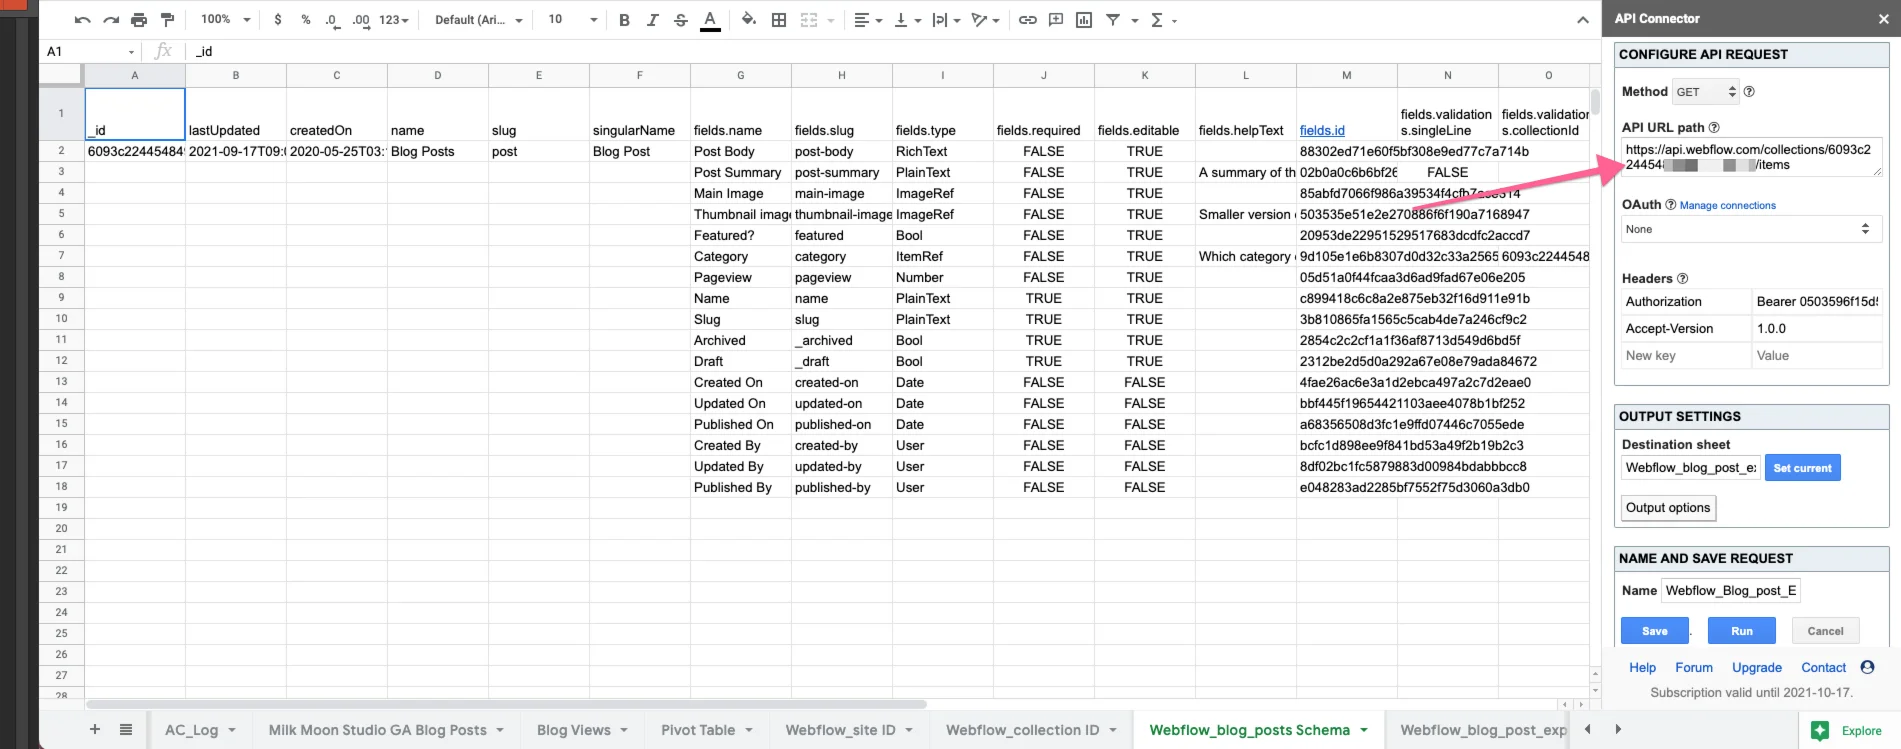
Last step: pull the actual blog posts and you're done. Same as before, here's your new URL:
https://api.webflow.com/collections/:collection\\_id/items
And the screenshot of the setup:
And the result:
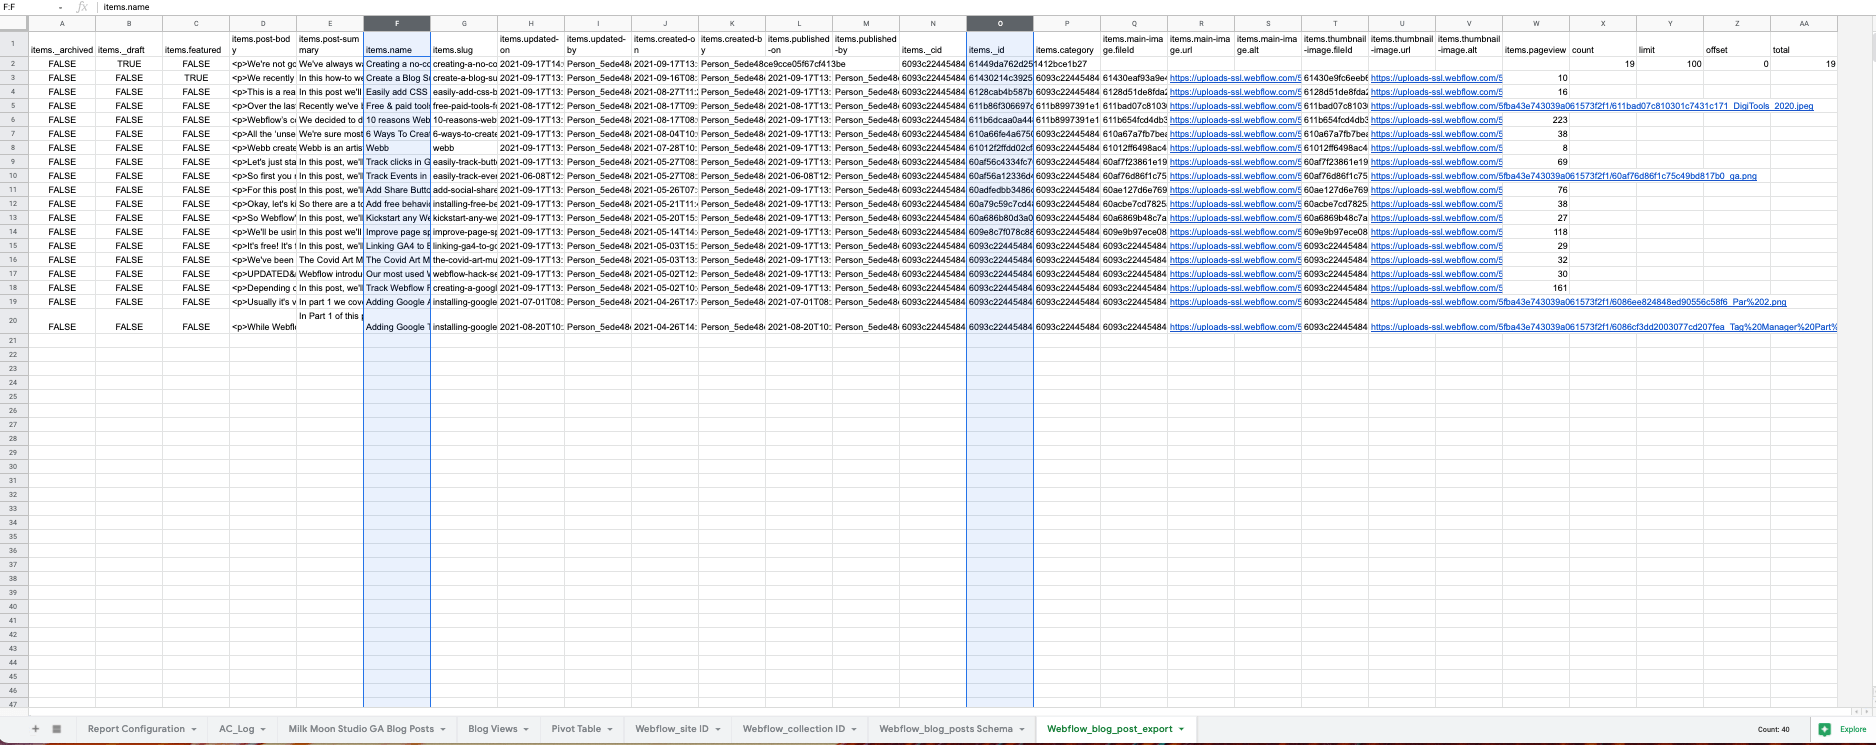
Now you have all your blog content in the Google Sheet and the two columns you will need for Zapier, items.name and item.id. That's the hard part done. Now it's just cleanup, formatting and pushing the pageviews to Webflow via Zapier. If all this worked, go ahead and schedule that last pull of the blog posts to run in the API add-on so that it'll update when you create new posts.
So from this point I'm not gonna go into tons of detail because, to be honest, we're crap at spreadsheets and it's not the best implementation. If you need the details, the formulas below are all you need. If I knew any regex this would have been much simpler, but I had to do things the long way. I'll give you the broad strokes and you can do a better job than me.
To work it backwards, you want to end up with a sheet that contains three columns: the post name, the post ID and the pageviews for the post. I used a pivot table for this, but before I did that I had to clean everything up and match up the Google Analytics Pageviews to the ID and Name from the API post export.
I created a sheet called Blog Views and matched up the two different sets of data using the URL slug from the Webflow page export to match to a cleaned-up slug from the page path in the Google Analytics export.
In the Blog Views sheet I queried the sheet that contained the stats from Google Analytics: =QUERY('Milk Moon Studio GA Blog Posts'!A15:D)
I got the slugs for the Google Analytics stats using an array and the little bit of regex I know to drop the /post/: =ArrayFormula(REGEXREPLACE(B2:B,"/post/",""))
There was all kinds of crap from some ads we ran at one stage on Facebook, but since I'm not great with regex I just used SPLIT to remove the Facebook ?fbclid string: =ArrayFormula(SPLIT(E2:E, "?"))
Then I used a VLOOKUP Array to match the Webflow IDs to the Google Stats: =(arrayformula(IFERROR(vlookup(F2:F,Webflow\_blog\_post\_export!G2:Z,16,FALSE))))
Then another to get the titles: =(arrayformula(IFERROR(vlookup(H2:H,J2:K,2,FALSE))))
Then another for items and names on that sheet: =QUERY(Webflow\_blog\_post\_export!V1:V) and =QUERY(Webflow\_blog\_post\_export!F1:F)
Then the pivot table to sum all the stripped slugs' pageviews together and to get the pageviews, name and ID on the one pivot table sheet.
From there it's easy.
Head to Zapier and set up a Zap that uses changes to the pageviews column on the pivot sheet as its trigger. Then add Webflow to the mix, select the Update Live Item action and use the pageviews, ID and name columns to update Webflow.
Now all you have to do is wait for data to filter into Webflow and sort the collection list by pageviews. (This is the same collection list sorting you would use for our blog summary trick, and you can pair it with our seamless pagination hack if the list gets long.)
Like we said before, if you have any tips on how to make this simpler, please please post in the comments. We really hope this works for you.
Update
So it's been running for like 12 hours and everything seems to be updating and working. One thing that did pop up was that when this post was being written, saving it as a draft did break one of the array formulas till it was published, as the number of columns in the sheet changed. So something you'll need to keep in mind, if you don't have any drafts in the beginning, is that a new column will be added, meaning your formulas will shift to the right.
For more how-to, check out the how-to section on the blog, or our post on creating text spans in dynamic CMS text elements in Webflow.