Webflow uses AWS and while it's adequate, we've found that with large projects, especially ones that are image heavy, Cloudflare has provided us with significant speed boosts, better uptime, and a host of optimisation options. But unlike some other platforms it's not easy switching your DNS to Cloudflare. Webflow and Cloudflare don't gel well when it comes to proxying your site and optimising it through Cloudflare. In this post we'll talk about the limitation and show you how to overcome them quickly and easily.
Important Update
The old approached below has been deprecated. The proxy, cache and optimise your images and other resources like your css and js please head directly to this post: Optimize Webflow with Cloudflare: Images, Assets & Caching in 2026.
Original Post
There are a few issues with Cloudflare and we'll start by listing them here, and then get into how to fix them and some more advanced options you should probably enable. But first, let's kick things off by listing a number of reasons we love Cloudflare.
- Greatly enhanced security options.
- CNAME Flattening, meaning your Webflow project can be milkmoonstudio.com and not www.milkmoonstudio.com
- Great caching on Cloudflare's data centres and edge network, we’re not kidding, they have a huge network. 80% of proxied sites use Cloudflare, that’s 20% of websites on the internet.
- Advanced Browser Caching settings.
- Always online and it saves versions of your site to The Internet Archive's Wayback Machine.
- Argo Smart Routing, which looks for networks nodes that might be down and optimises network traffic routing adding more speed.
- Great speed optimisation through minification, compression, image optimisation etc etc.
- Bot protection.
- The Cloudflare CDN with 310 cities in more than 120 countries including China. Just reiterating this one.
- Zaraz as an alternative to Google Tag Manager, we've tried it and while it's not as easy to use when you're used to Tag Manager for advanced triggers, it can pretty much do whatever you need, and yeah, in our tests there was a definite speed boost. Think Tag Manager Server-Side without needing the server or the cost. We've added a short post on how to use Zaraz here.
- Page Rules.
We could go on and on, there are just so many features that we're not going to list them all (we've added a brief list of recommended Cloudflare settings at the very end of the post).
So, if this is so great, why do so few Webflow users use Cloudflare, well this is where the issues come in. If you look at the DNS setup instructions for Cloudflare on Webflow, you'll notice one thing right off the bat, they want you to disable the Cloudflare Proxy (orange cloud).
This means that Cloudflare will just manage your DNS, just like Godaddy or whomever. Not great, Cloudflare has the fastest DNS out there, but that's it, you won't be able to take advantage of any of the performance enhancements.
As far as we can tell the 'disable the proxy issue' has to do with Webflow's SSL certificate renewal. If Cloudflare is proxying the content the user isn't connecting to your origin site on Webflow and Webflow's SSL renewal mechanism stops working. So things might be fine for a month and then everyone and their mother will start getting SSL errors. For this we have a quick and easy fix which we'll get to. Anyhow, with our workaround we've had zero issues for years now.
Issue two, the Webflow CDN. Webflow uses AWS to host their content, but as you can imagine, they're not going to provision a CDN for each project created on Webflow. So, everyone shares a bucket. If you inspect your site, you'll notice that everything that matters, from your CSS to your images and videos sits on website-files.com, or assets.wesite-files.com (there are a few domains that float around) and not your domain, i.e. our assets don't sit on milkmoonstudio.com. Not really a problem for everyday use, but when you're using Cloudflare the content that Cloudflare needs to optimise needs to sit on your domain. If we have a Cloudflare account for milkmoonstudio.com, but every image and CSS file sits in a folder on website-files.com Cloudflare can only apply optimisations and caching to your HTML files and nothing else. So, again no optimisation.
Let's talk about how to solve these issues from the perspective of a Webflow designer and not a full-stack developer.
Important Update
Before you jump into the below, this method will use a Cloudflare App to cache all your assets on Cloudflare. The current version of Cloudflare apps is currently being deprecated. Cloudflare has said that a new App Experience will replace it. In the meantime you can use a Cloudflare Worker to achieve the same results and we already have a post detailing that process here. Please take note that’s it’s a bit more technical than just adding an app. We created a Cloudflare Worker to optimise your images using the Cloudflare Image Resizer. Some might say that’s simpler, and while still advanced you can find that full post here. We will say you might have less issues if you’re struggling with Rocket Loader messing with the order scripts are loaded etc. Anyhow, follow this guide to the App Setup step for now, and then switch to the Image Optimisation Worker post for the rest. We’ll update this post once the new Cloudflare Apps experience is ready so you can go the app route if you want.
Webflow Cloudflare DNS Settings
You're going to be told to follow two sets of instructions here, the 2 A records and the CNAME record Webflow gives you when you've enabled SSL in your Webflow Hosting Tab in your project settings (things have changed a bit since we wrote this, so now there's a TXT record as well, which you can use as is in Cloudflare), and the instruction to switch of proxying on Cloudflare (disabling the orange cloud icon) as per Webflow's instructions. We're going to ask you to ignore both of those.
When you turn on SSL you'll get instructions that look something like this:
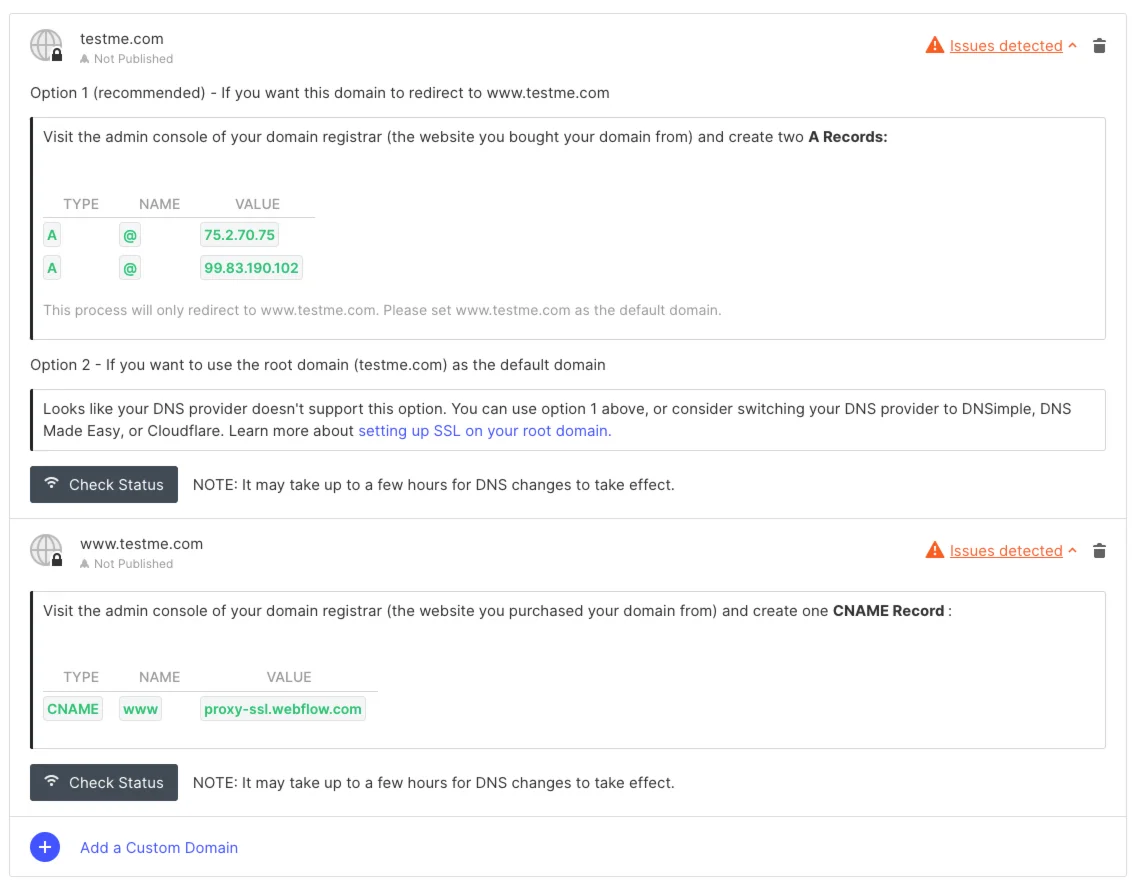
Webflow DNS settings
Ignore these!
Step 1, instead of using the SSL instructions, switch off SSL at the bottom of the hosting tab. Hit Save.
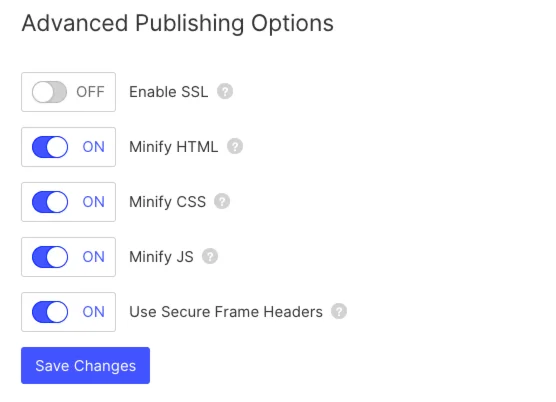
Disable SSL
- Copy the new A record addresses and the CNAME Settings:
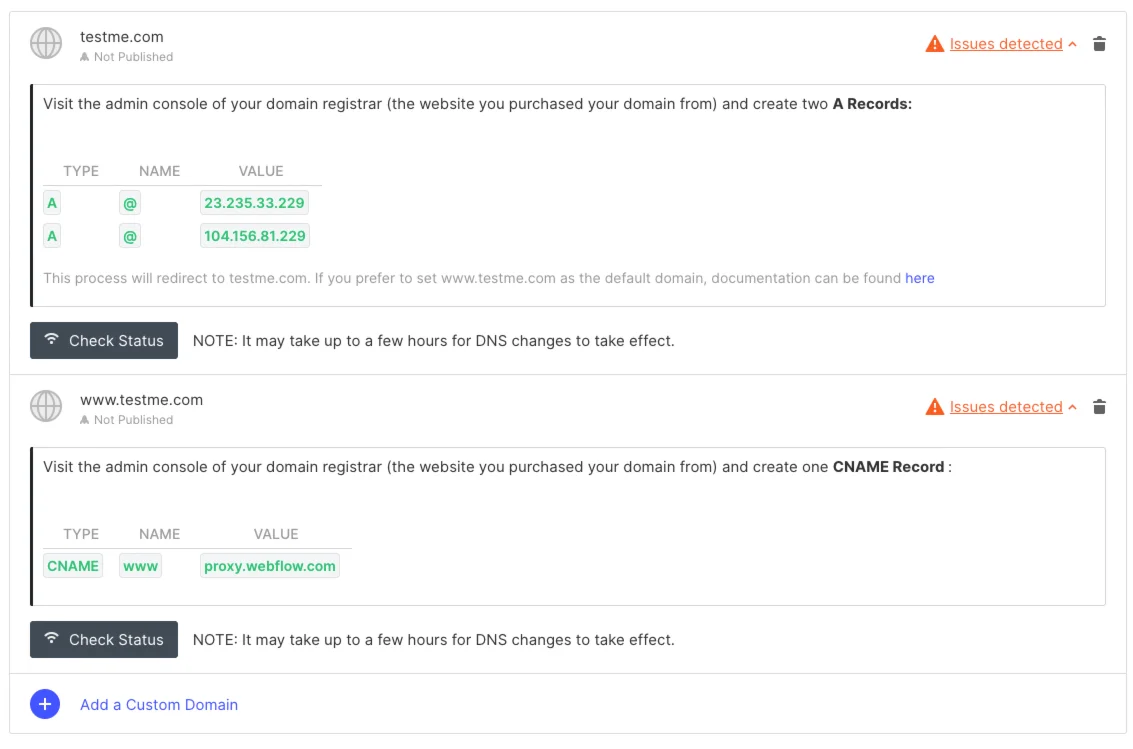
Save the non-ssl Webflow DNS settings
Save the non-SSL Settings, then turn on the SSL tick box again and save, you'll see the settings revert to the initial SSL settings again, don't worry, just ignore those.
(You could leave on the non-SSL settings, Cloudflare will handle the SSL certificate and redirect everything properly, but one thing will break, your sitemap.xml file will use http instead of https, which Cloudflare will still redirect correctly, but Google Search Console will complain).
So, turn on SSL again so the sitemap works, you won’t run into any issues.
- Head to Cloudflare and add the non-SSL DNS settings. It should look something like this:

Add Webflow DNS settings to Cloudflare
- Make sure the entries have Proxied turned on, contrary to the Webflow Cloudflare Instructions.
- Head to the SSL/TLS settings tab in Cloudflare, turn on Full:
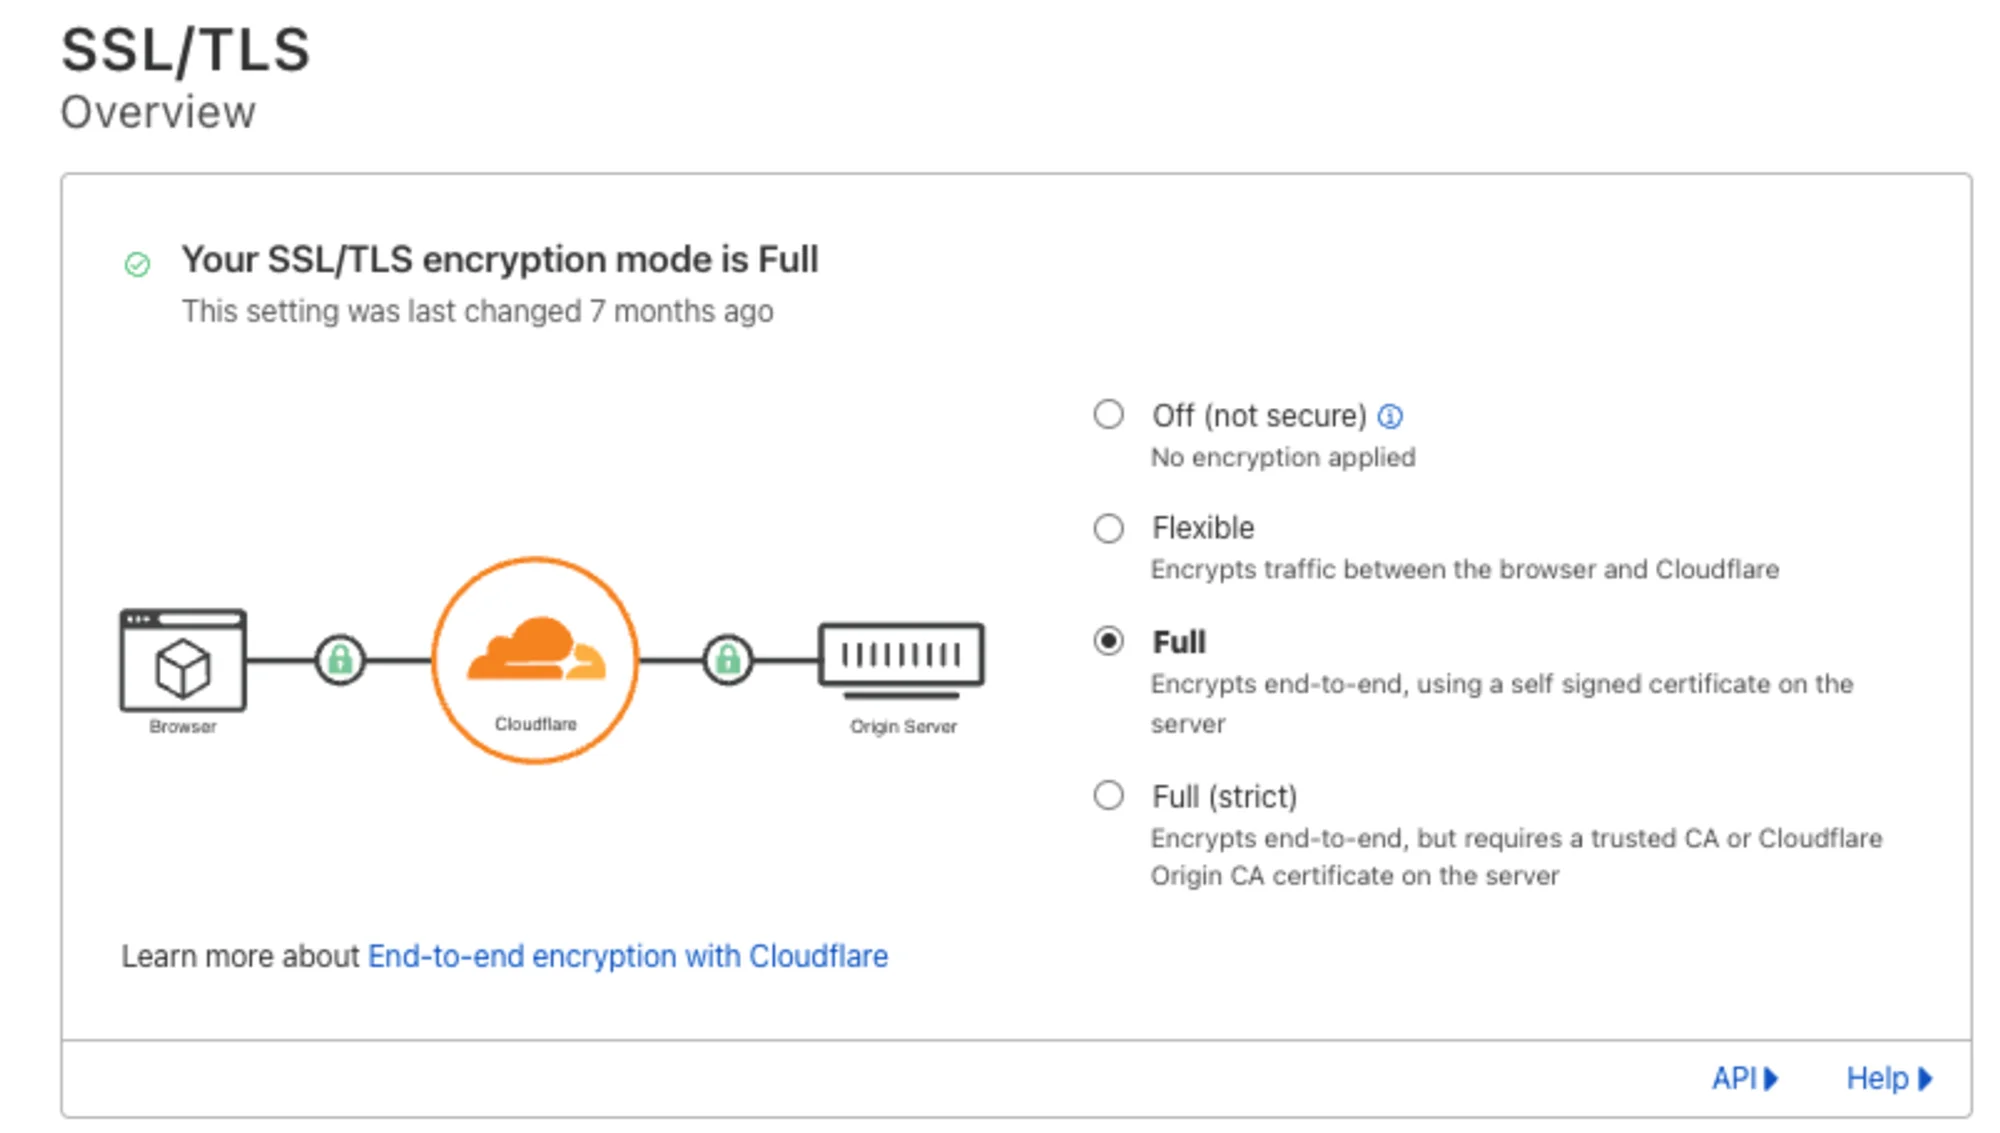
Set SSL to Full in Cloudflare
- Now, we want to purge the DNS settings so your Webflow settings propagate immediately. Start by going to https://1.1.1.1/purge-cache/, then and just in case:https://cachecheck.opendns.com/ & https://developers.google.com/speed/public-dns/cache
- On each one for these sites, enter your naked domain, purge the A record, and then the CNAME record. If you're using a www sub-domain like use, use the full domain as well, so www.milkmoonstudio.com and purge the records for that as well. Finally, purge the TXT record.
- After the great purge, head to Webflow's hosting Tab again.
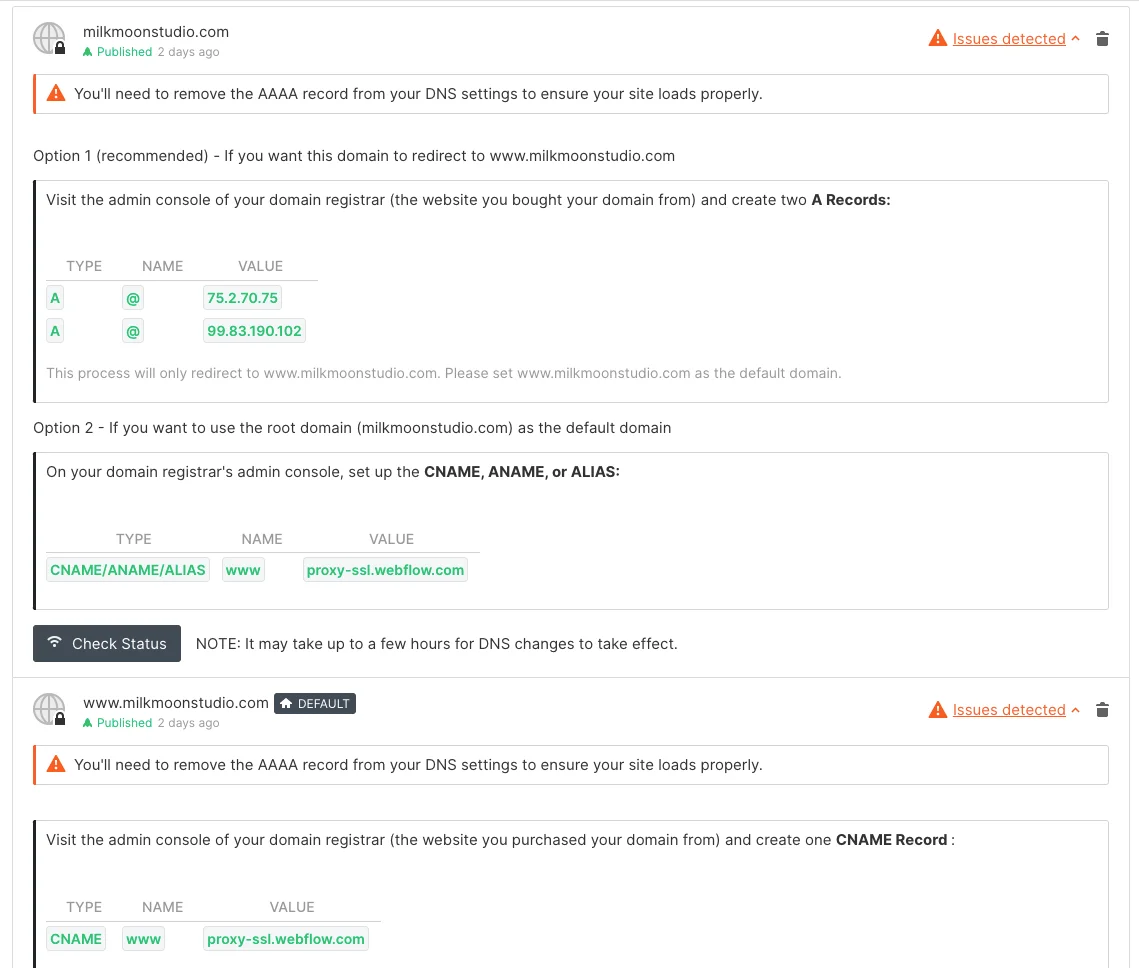
Ignore the Webflow DNS erros
Oh NO!- So many issues, who cares, ignore and publish the site.
- Head to your live site and check out the SSL settings by clicking the padlock:
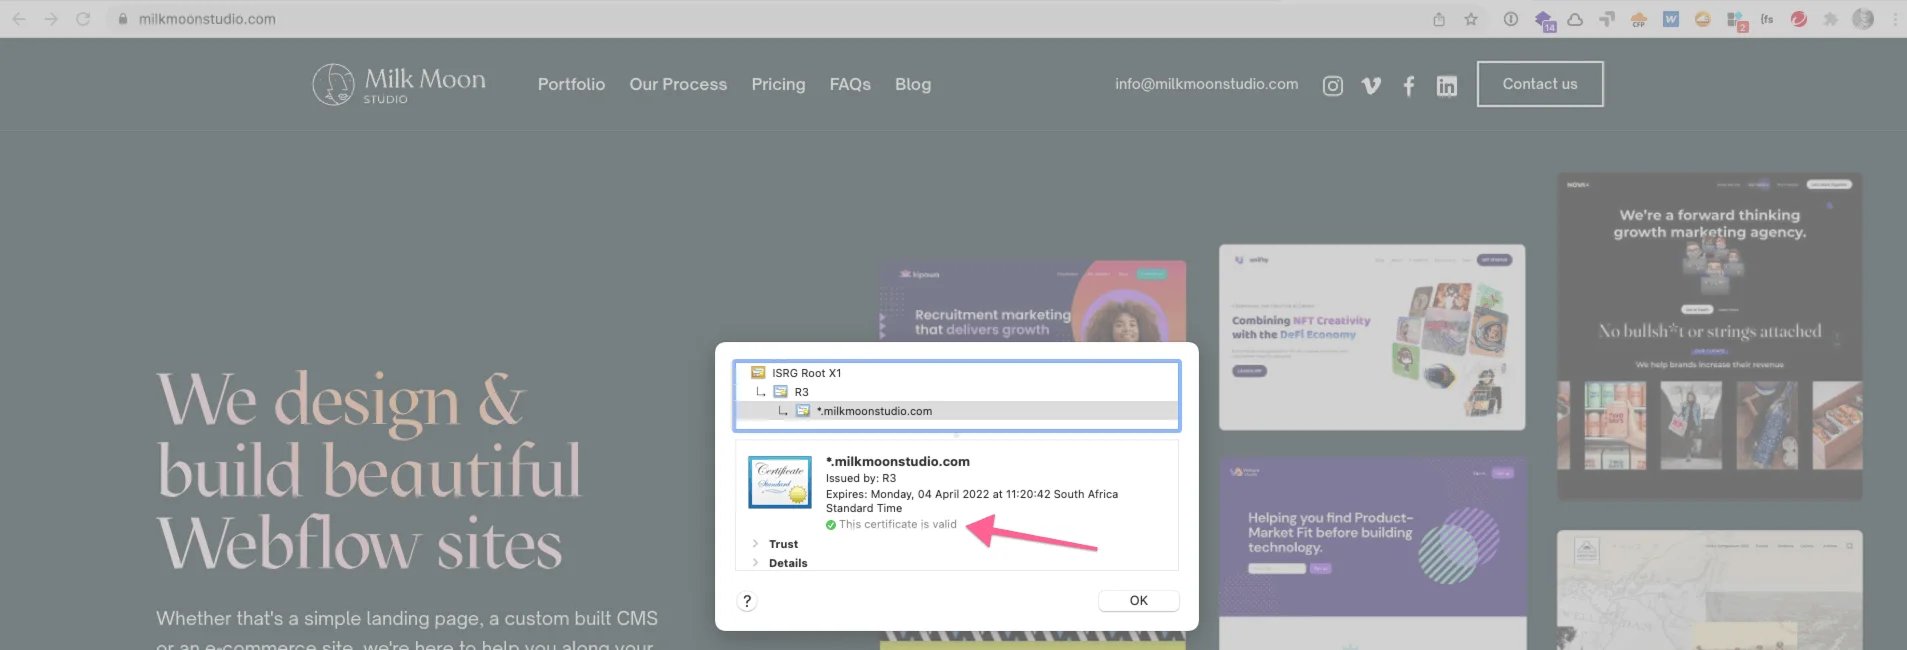
Check the SSL certificate
Boom, all good.
So, we've got Webflow running through Cloudflare, proxied, but oh no, we forgot about the fact that content needs to sit on your domain for Cloudflare to apply performance enhancements. At the moment everything is coming through website-files.com
If you'd like more help setting up performance enhancements, page rules etc. Please watch the How-To Video at the top of this post for a detailed look at what you can apply, or head straight to YouTube.
Issue two, get the Webflow CDN assets (images etc) to run through your domain name in Cloudflare so you can use all the nifty Cloudflare Performance Enhancements
So, two ways to approach this, if you know what you're doing you can write a Cloudflare Worker that watches Webflow's CDN, grabs the content, stores it on Cloudflare and then polishes it and whatnot. Milk Moon Studio is a small Webflow Studio and like many in the Webflow community we like to focus on design and picked Webflow because of its no-code, or at least low-code nature, so we'll go with option two, get someone to do that for you. Luckily for us someone has, and then they built a Cloudflare app, that you can just install on Cloudflare, and use for free. It's called Cassette by Network Chimp. Please note that the current app experience is in the process of being deprecated and will be replaced with a new app experience. In the meantime you can also use our Cloudflare Worker Script to achieve similar results.
- Head to the Apps Tab in Cloudflare and search for Cassette, this is a free one, as long as you're using one bucket, which is what we'll be doing so it's just fine. It's this guy:
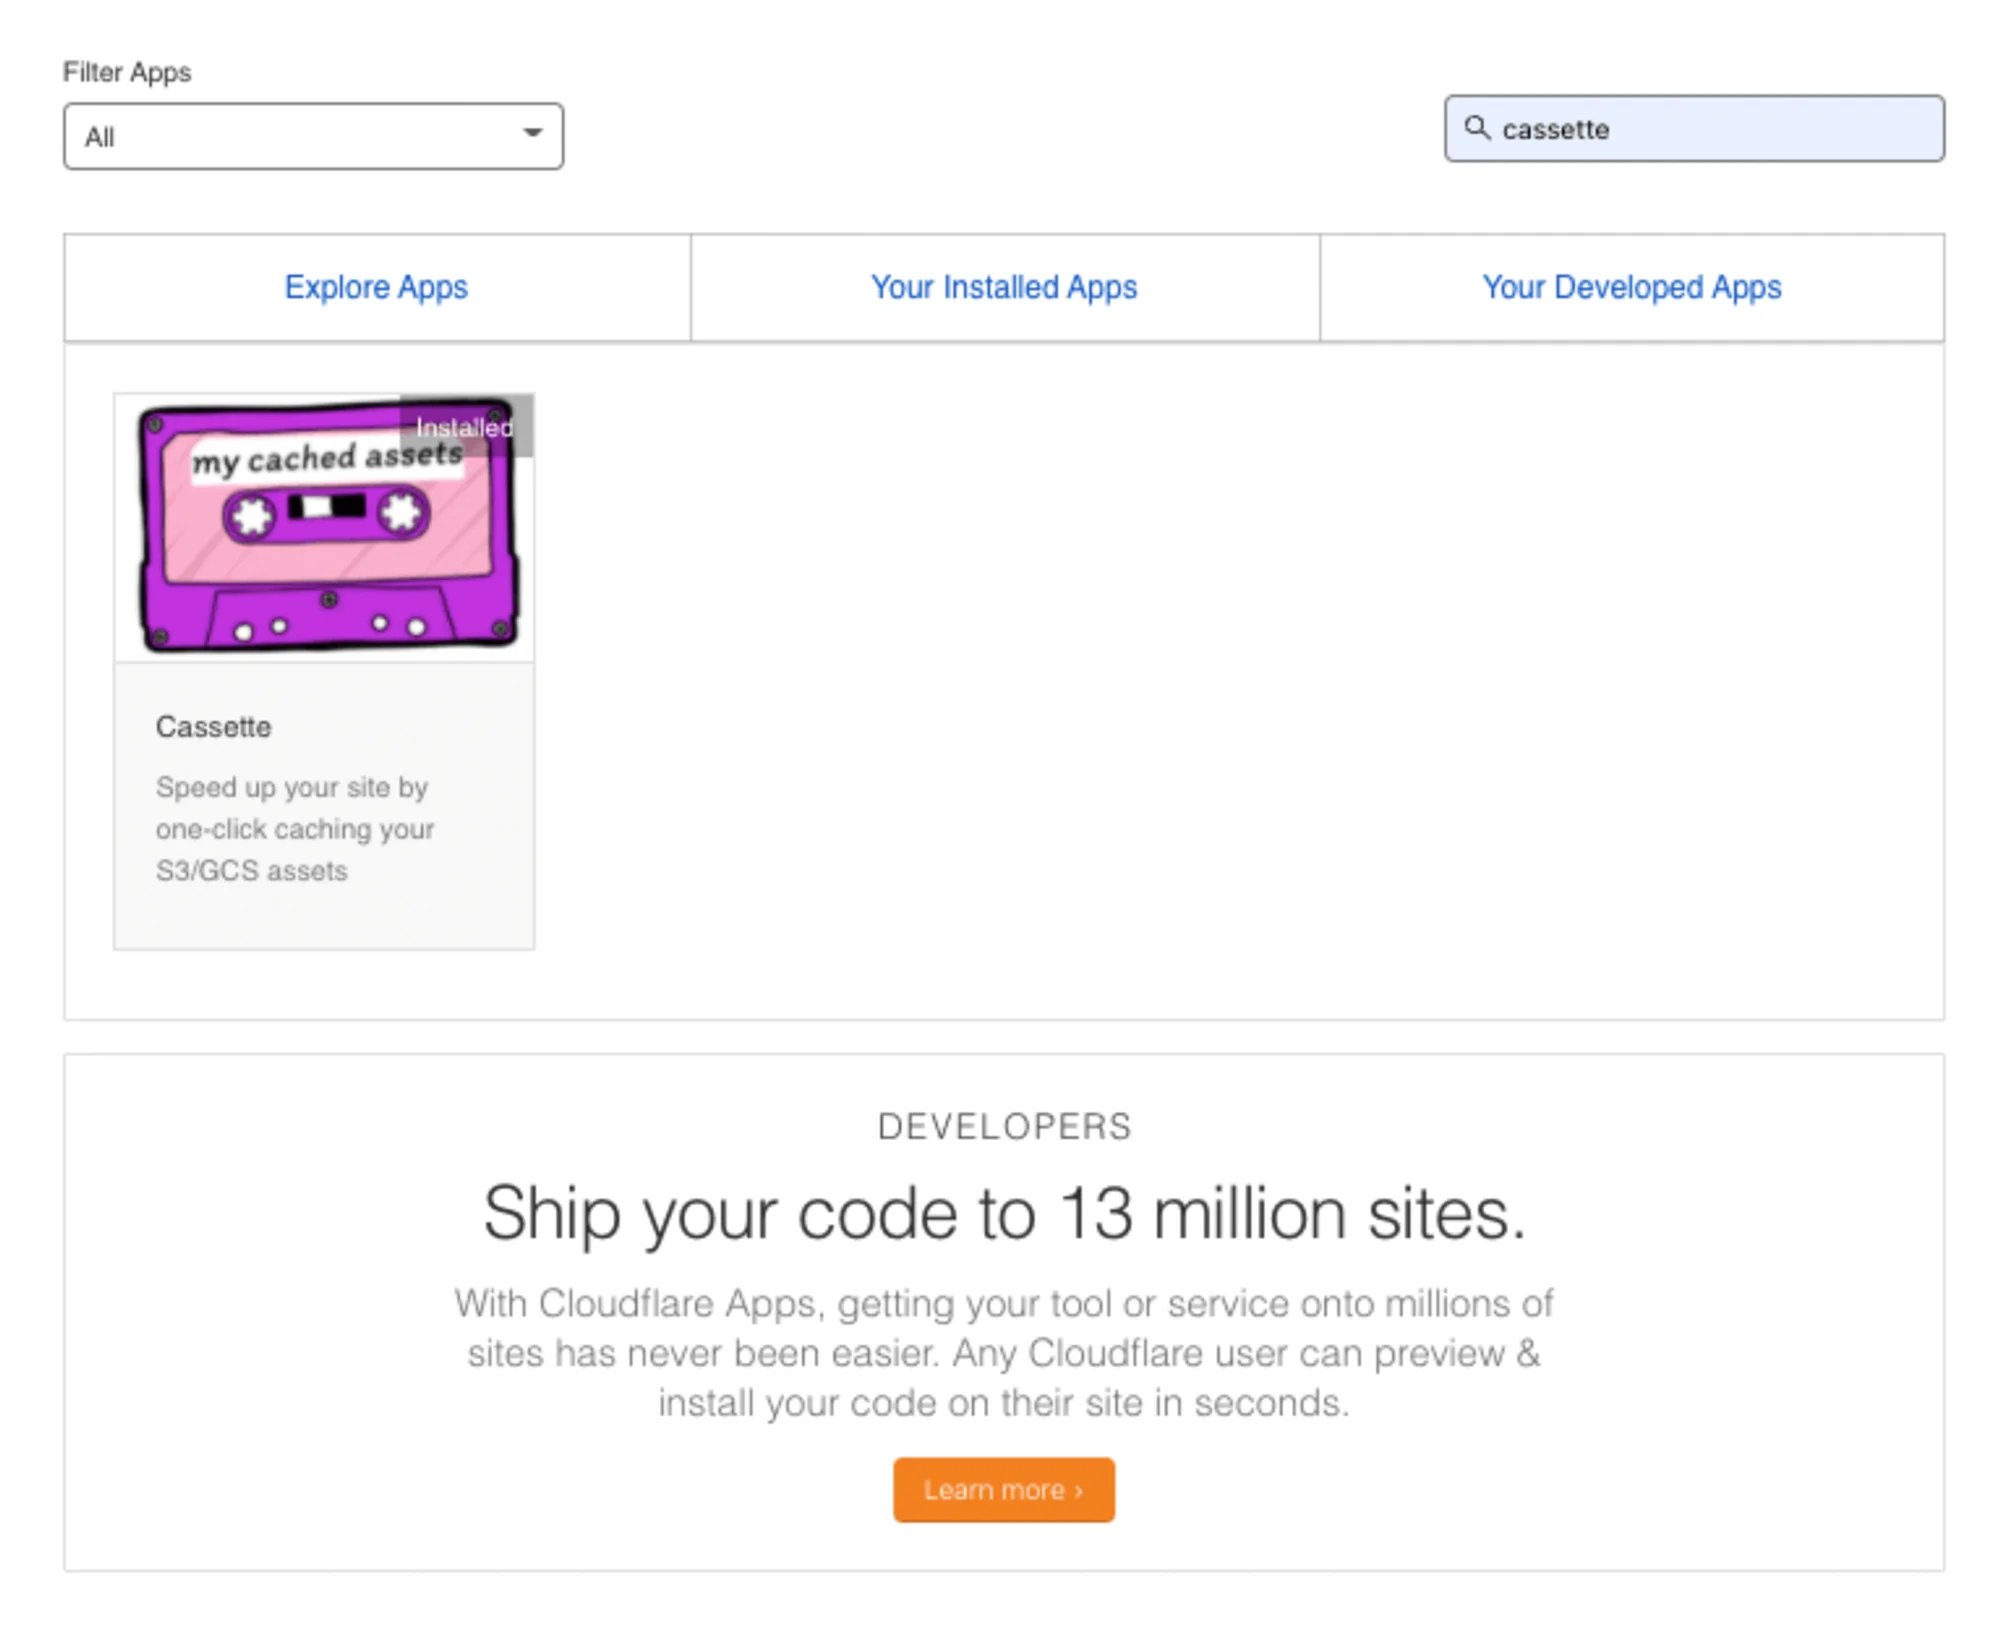
Add the Cassette App
- Apply the following settings in the app:
Set Up Cassette in Cloudflare
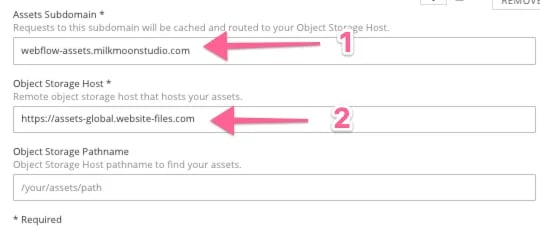
- Create a sub-domain on your domain where Cassette should put the files from Website-Files.com (or whatever Webflow is using for your files, just inspect the page or open an image in a new tab to check the URL), just type it in here, Cassette will ask for permission to create this when you apply the settings. Make sure the sub-domain does not already exist, Cassette needs to manage this bit.
- Tell Cassette where Webflow Stores the files.
That's it, every time a page on your site is loaded Cassette will check website-files.com and keep those files, if it finds new ones on the subdomain. The caveat here is that it can take a little time, but now that the files it loads in the browser are on your domain you can apply any Cloudflare settings and rules you create to the files. (Getting back the time caveat, if after a day or so you see Cassette is not caching and optimising some files which you can check using the Dr.Flare Chrome plugin, it's usually because Webflow publishes a src image set with optimised images sizes for different viewport widths. Sometimes Cassette misses an image or two in the src set, you can turn this off in Webflow, or use something like Cloudflare Image Resizing embeds to get around this. More on that down below, alternatively the Worker script method solves this as the worker we created looks for single images and src image sets).
We're not going to go into all the performance enhancements and page rules you can create in Cloudflare, go wild. One thing we will say is that if you decide to create rules that cache your site heavily, create a page rule for your sitemap.xml file that bypasses the cache entirely so that if you for example create a new blog post the latest version of the sitemap will always be there for Google and not some outdated sitemap file from 3 weeks ago if you have some heavy caching settings. You'll want the sitemap page rule above the other page rules with heavy caching as the rules cascade down. Same thing applies if you've enabled an RSS feed, bypass the cache on the feed url. Full caching will only happen when you set up Page Rules in Cloudflare, apply the optimisations in the rules and select Cache Everything.
As we said, the Cassette App will take a while to cache everything on your new sub-domain and might miss a file here and there, we guess you could speed things up and reload all pages a bunch of times if you want (We've updated this post at the bottom of the page to help you ensure those missed images are cached on Cloudflare. We're just gonna wait a few days and run a Lighthouse test to check out the site speed.
Okay, 2 seconds later... we've built a time-machine and waited 3 days and we've run a Lighthouse test, and come back in time, and then uploaded the test results:
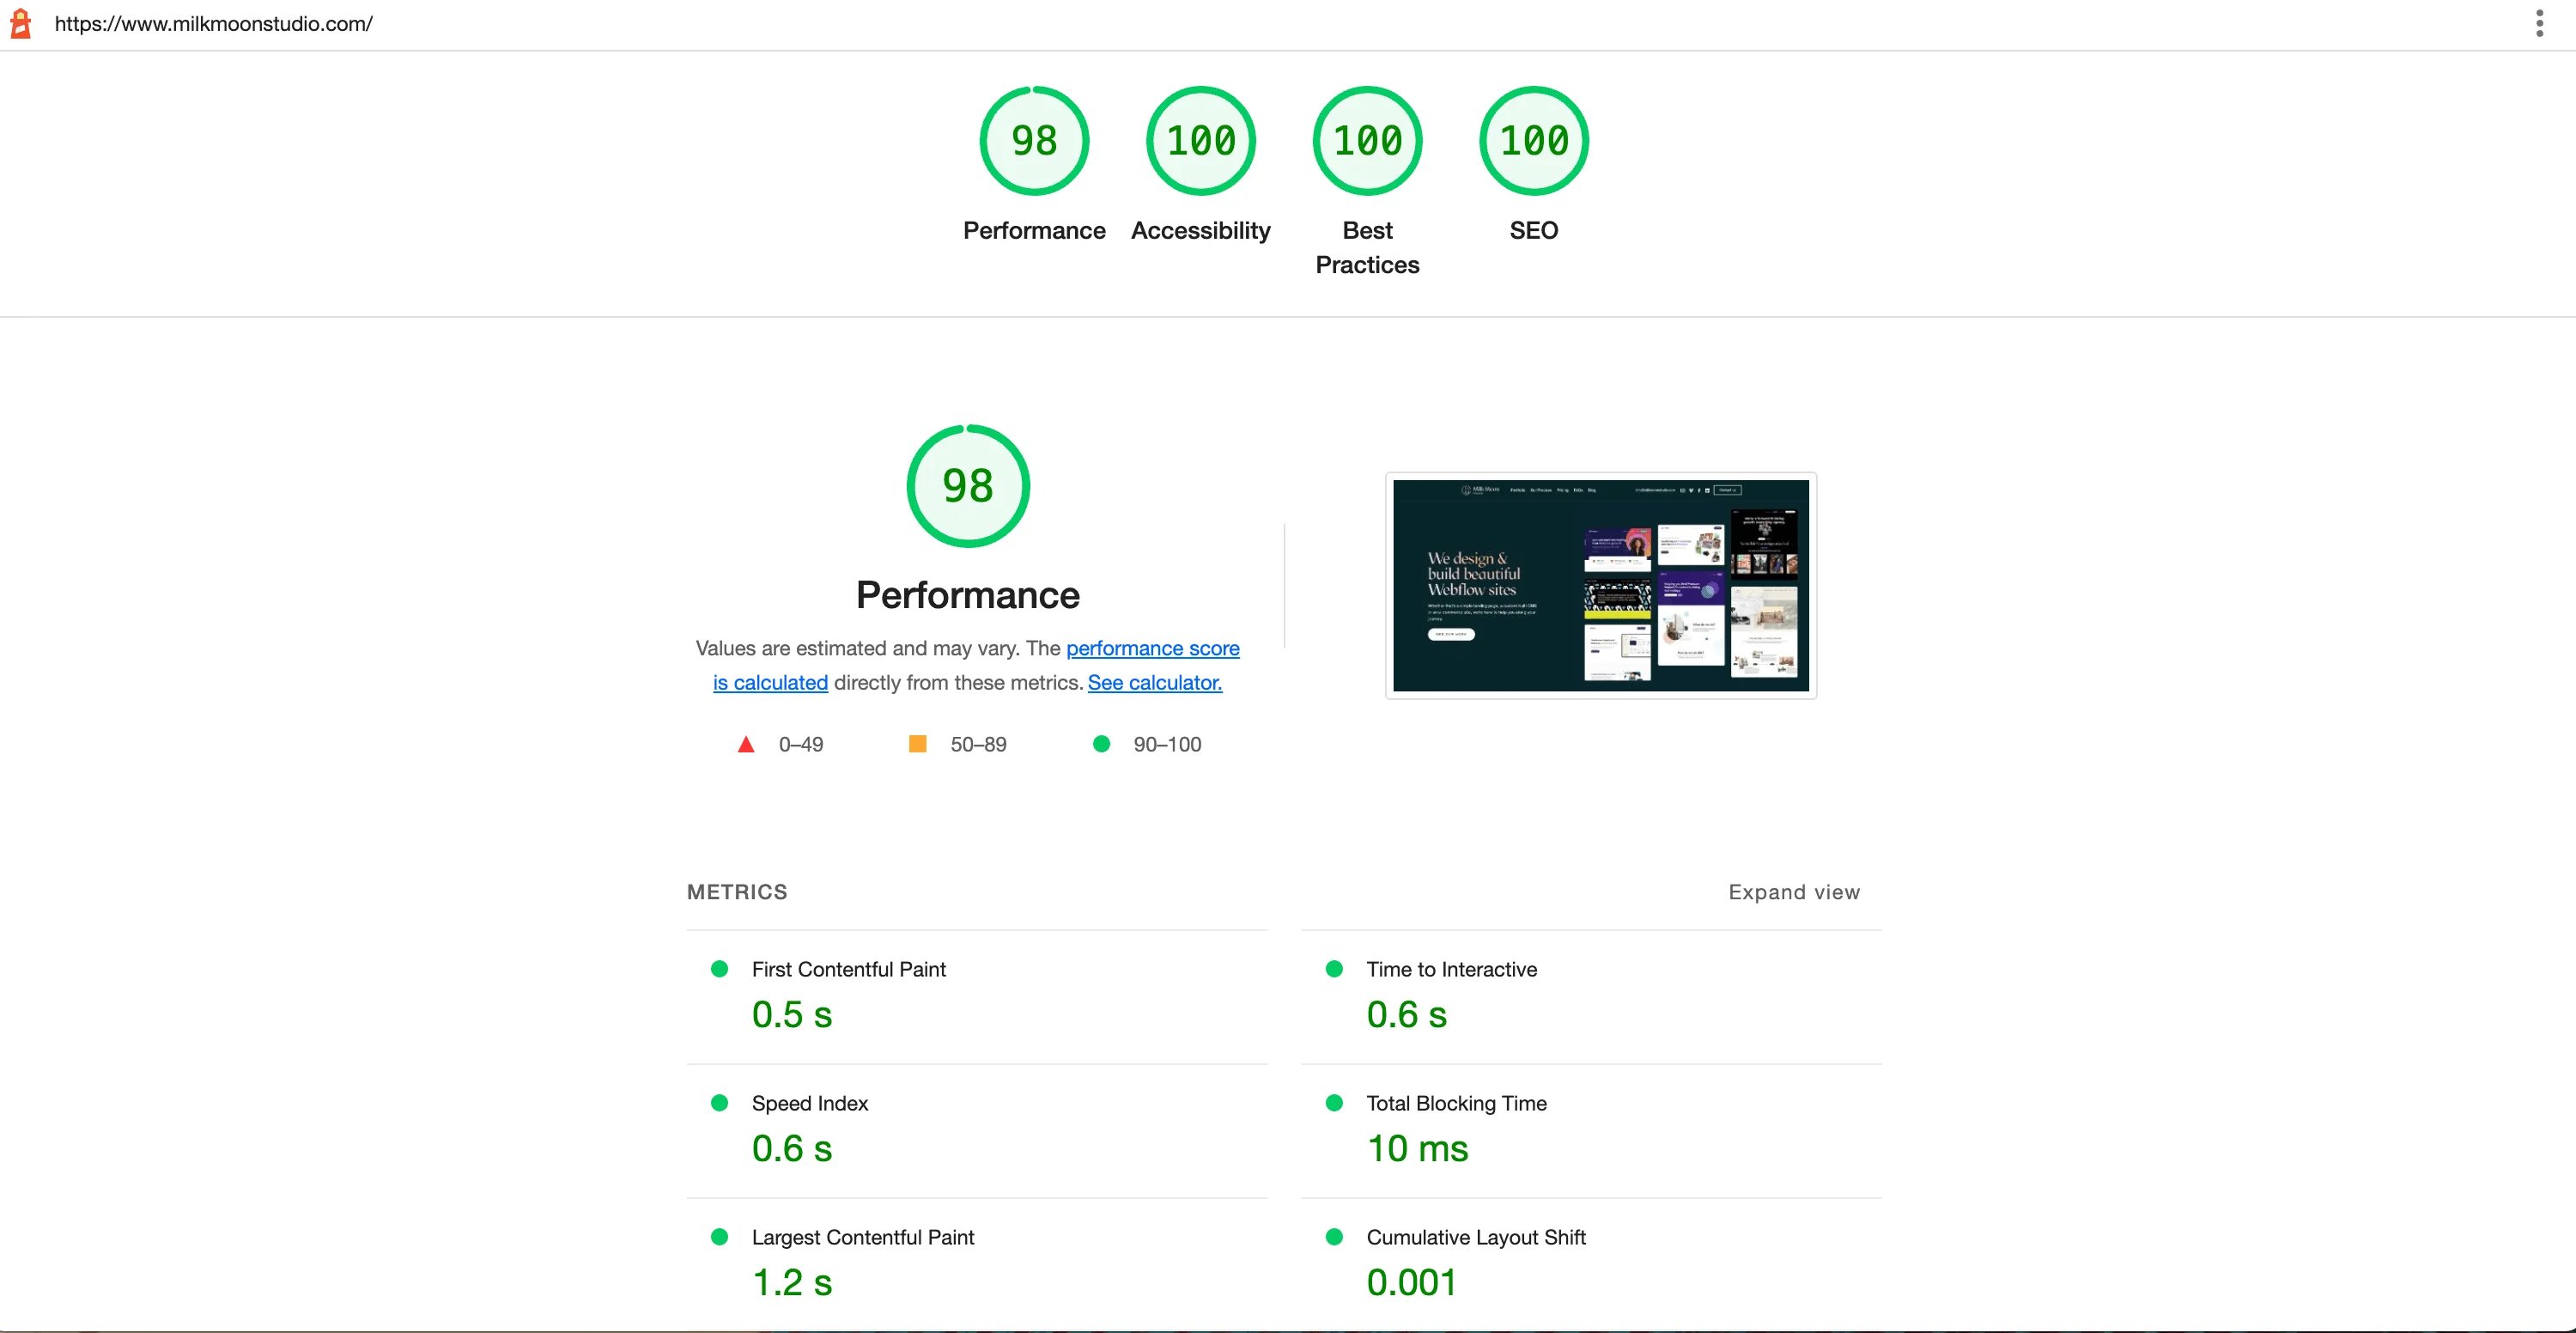
Google Pagespeed Scores after Cassette setup
Looking real good, why 98 precent, well we think it's pretty good, but yeah, we looked and there's an improperly sized image error in Lighthouse which we're to lazy to fix just to show off the results. Google Search Console is gonna love you.
If you have any question, please pop them in the comments. For more how-to's, check out these posts, and if you're using Tag Manager and wanna try and speed up things a bit more you could have a look at this post.
Update - Fixing Cassette not being able to create the required sub-domain
If you run into the above-mentioned error where Cassette says it can't create the sub-domain, you set in Cassette just follow these steps or watch the how-to video.
This issue is no longer appearing though so we're only leaving it here for reference purposes.
- When you get the error, jut ignore it and create the sub-domain manually.
- Cassette is still adding the worker. You won't see the worker and you might not even see the Cassette app installed.
- Head to DNS, add the CNAME for the sub-domain you had in the Cassette settings.
- In our case the CNAME is assets.
- The value for the CNAME is the Webflow CDN domain name from above where Webflow is hosting your content.
- In our case the value is assets-global.website-files.com
- Make sure you just use the naked domain name.
- The Cassette issue should now be resolved even though you can't see the app. Please check out the video for a visual guide.
Update - Forcing Cloudflare to cache any missed images
One final update. While using Dr.Flare and going through some of the sites in detail we have noticed that sometimes images are not cached on Cloudflare and still go to the external Webflow CDN. After inspecting the code, we realised this is due to Webflow generating responsive images for their src set. In this case, images for some breakpoints were cached on some went to the Webflow CDN. If you see this happening and want to bypass it, you can just disable responsive image generation on the culprit.
All you need to do is:
- Select the image on the Webflow canvas
- Type Command + Shift + O (on Mac) or Control + Shift + O (on Windows)
- Open Settings panel > Image settings
- Uncheck the Responsive image checkbox
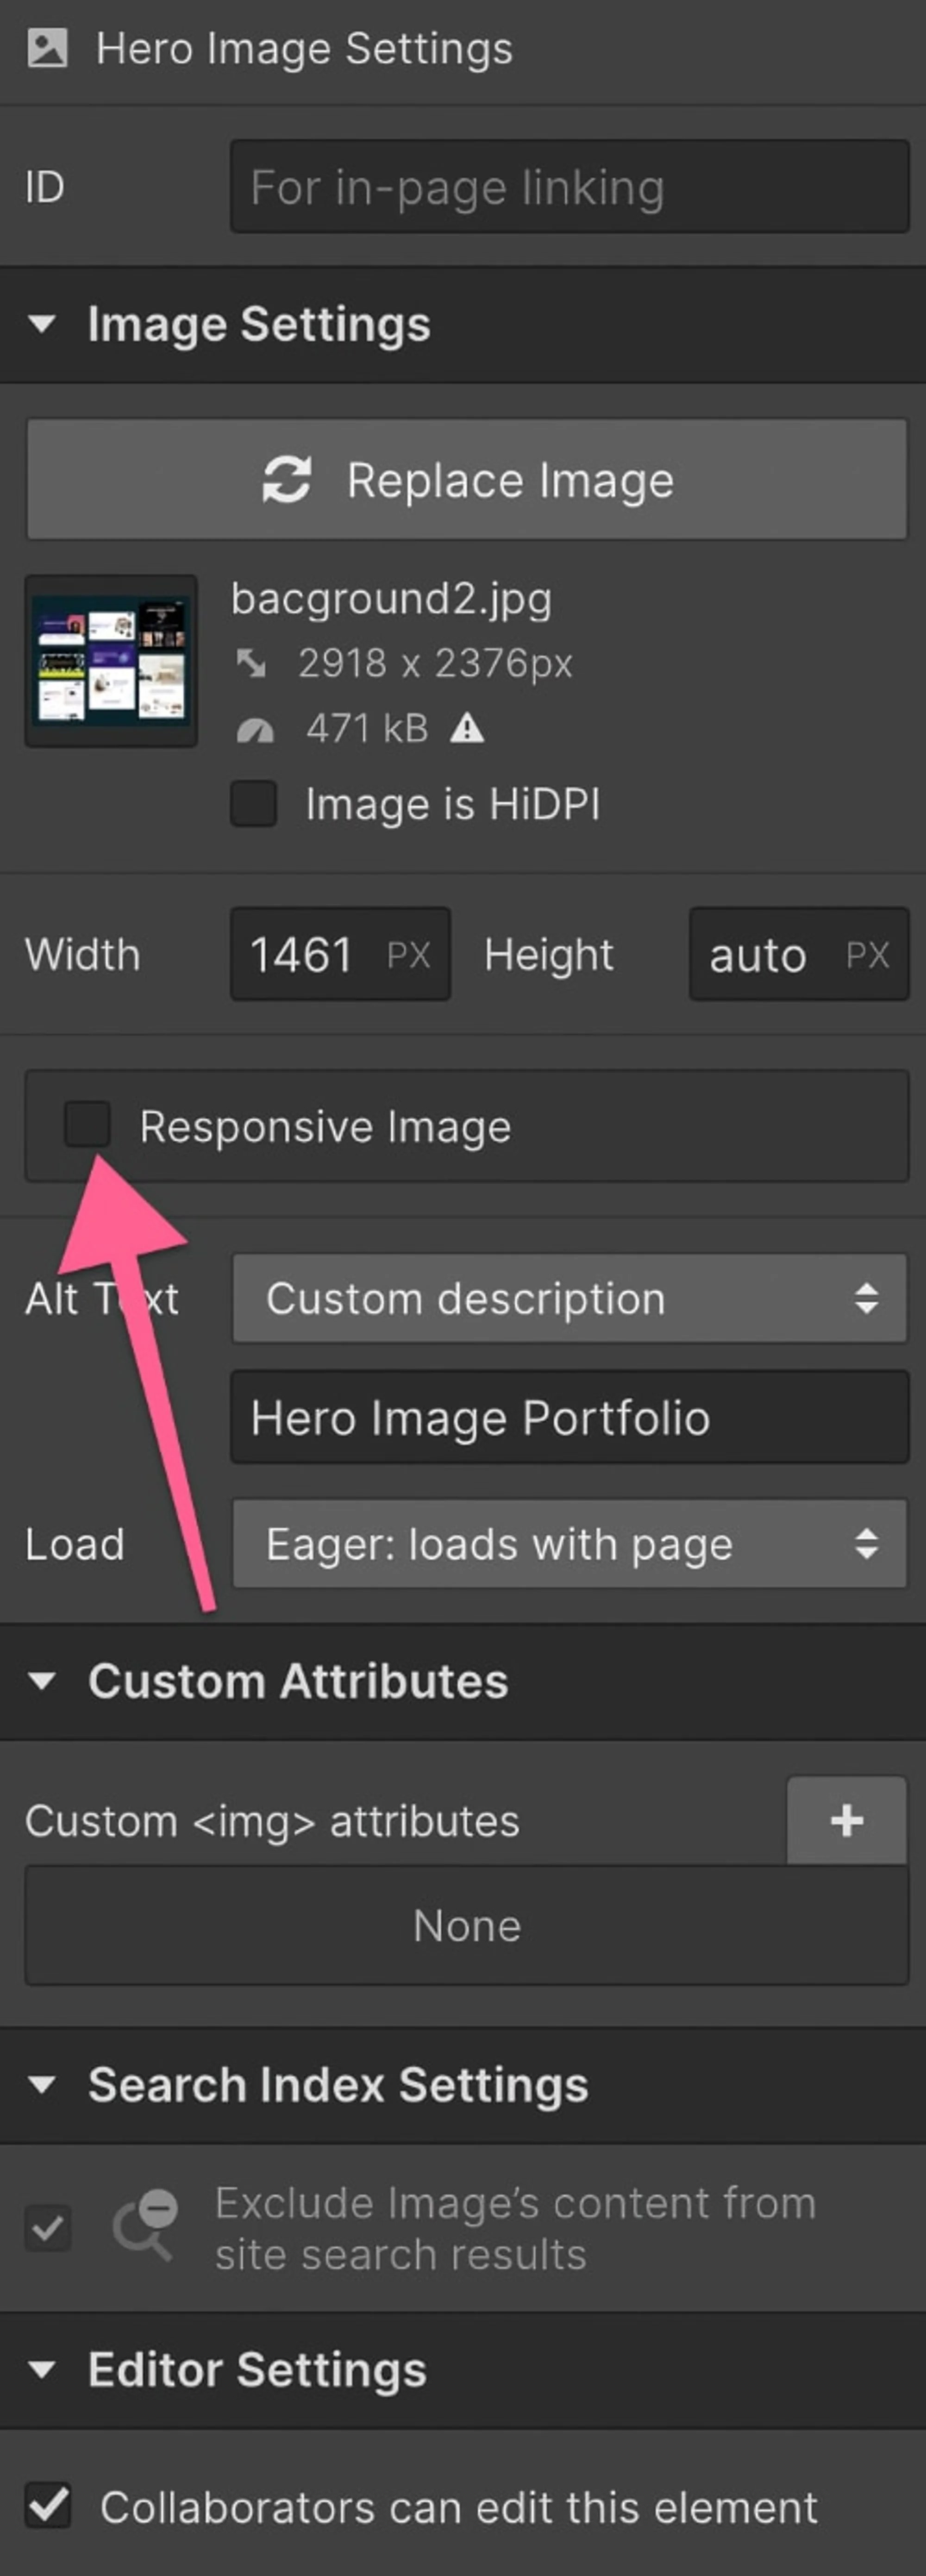
Turn off responsive images in Webflow
The caveat here is that Webflow is no longer generation responsive images, so you could use Cloudflare’s Image Resizing to do that on the fly, or create a Desktop and Mobile version of the assets on a page if Cloudflare and Cassette aren’t caching the images and you want a really small one on mobile and feel the non-responsive version is too big or tests poorly on Google PageSpeed. Don't worry about Cloudflare Image Resizing if you're happy with what Cassette, Page Rules and optimisations like Polish offers you.
Using Cloudflare Image Resizing
For this to work you have to enable Image Resizing under the speed tab in Cloudflare, please note additional costs could apply. Depending on what you're doing you can turn image resizing from Origin on or off. If it's on you'll be able to resize the images and apply things like WebP and Avif conversion directly from the Webflow CDN, uploads url without having to run it through Cloudflare first by using Cassette.
For image resizing you can write a worker (harder) or just use an embedded image in Webflow with the HTML Embed Element. You'll still see the images in the designer in the embedded element and it allows for a bunch of formatting and optimisation options on each image. The URL structure you have to use looks something like this
<!-- fs-richtext-ignore -->https://<ZONE>/cdn-cgi/image/<OPTIONS>/<SOURCE-IMAGE>
More on that and the options here and here for responsive image formatting.
A very rough responsive image embed for our hero image might look something like this if we have resize from Origin on and use our Webflow Upload URL from the Asset Manager:
<iframe height="300" style="width: 100%;" scrolling="no" title="Cloudflare Image Resizing Example - Webflow Asset Manager URL" src="https://codepen.io/milkmoonstudio/embed/XWBopPm?default-tab=html&theme-id=light" frameborder="no" loading="lazy" allowtransparency="true" allowfullscreen="true">
See the Pen <a href="https://codepen.io/milkmoonstudio/pen/XWBopPm">
Cloudflare Image Resizing Example - Webflow Asset Manager URL</a> by Jakes van Eeden (<a href="https://codepen.io/milkmoonstudio">@milkmoonstudio</a>)
on <a href="https://codepen.io">CodePen</a>.
</iframe>
Or like this if I use our Webflow CDN url:
<iframe height="300" style="width: 100%;" scrolling="no" title="Cloudflare Image Resizing Example - Webflow CDN " src="https://codepen.io/milkmoonstudio/embed/OJwrpMd?default-tab=html&theme-id=light" frameborder="no" loading="lazy" allowtransparency="true" allowfullscreen="true">
See the Pen <a href="https://codepen.io/milkmoonstudio/pen/OJwrpMd">
Cloudflare Image Resizing Example - Webflow CDN </a> by Jakes van Eeden (<a href="https://codepen.io/milkmoonstudio">@milkmoonstudio</a>)
on <a href="https://codepen.io">CodePen</a>.
</iframe>
Or like this if we use the CDN via the sub domain Cassette created:
<iframe height="300" style="width: 100%;" scrolling="no" title="Cloudflare Image Resizing Example - Cassette CDN on Assets" src="https://codepen.io/milkmoonstudio/embed/eYjbvvB?default-tab=html&theme-id=light" frameborder="no" loading="lazy" allowtransparency="true" allowfullscreen="true">
See the Pen <a href="https://codepen.io/milkmoonstudio/pen/eYjbvvB">
Cloudflare Image Resizing Example - Cassette CDN on Assets</a> by Jakes van Eeden (<a href="https://codepen.io/milkmoonstudio">@milkmoonstudio</a>)
on <a href="https://codepen.io">CodePen</a>.
</iframe>
How effective the last one will be at creating Avif files will depend on your page rules as caching settings and your rule order. So, if you have cached everything and polish on that subdomain a WebP image might have already have been created and this it probably won't use Avif, but you can experiment.
Sorry about the terrible formatting above and simplifying things a lot. The most important part for the resize is that the URL structure in the embed starts with the domain you have in Cloudflare, followed by /cdn-cgi/image/ your formatting and optimisation options / and then the url of the image. Just play around and remember that this is not needed if you're happy with what Cassette and the Polish option etc. does for you.
We've added some recommended Cloudflare settings and rules below. Please take into account this very much depends on your site and should be tested.
For more post on Cloudflare check out:
- Supercharge Your Webflow Project with Cloudflare: A Deep Dive into Our Image Optimization Script
- Boost Your Website's Performance with Cloudflare's Zaraz Tag Manager: A Step-by-Step Guide to Implementing Zaraz and Adding Google Analytics 4 on Webflow
Cloudflare Recommendations
Speed > Optimisation
Polish: On
Improve image load time by optimising images hosted on the domain and having WebP checked can convert image formats like PNG and JPG to WebP if there is a saving in terms of image size and Cloudflare detects support for WebP on the client browser.
Recommended setting: Lossy with WebP checked unless there is a drop in quality in which case it should be Lossless with WebP checked. Always tick on WebP and if on higher plans with AVIF that can be applied for greater savings.
Auto Minify: On
Reduce the file size of source code on your website.
Recommended setting: Always JavaScript, CSS and HTML ticked on.
Brotli: On
Cloudflare applies Brotli compression to help speed up page load times for your visitors. Cloudflare will select Brotli compression as the preferred content encoding method if multiple compression methods are supported by the client. If the client does not indicate that Brotli compression is supported, then gzip compression will be applied.
Recommended setting: Always on.
Early Hints: On
Cloudflare's edge will cache and send 103 Early Hints responses with Link headers from your HTML pages. Early Hints allows browsers to preload linked assets before they see a 200 OK or other final response from the origin.
Recommended setting: Always on.
Enhanced HTTP/2 Prioritization: On
Optimizes the order of resource delivery. With HTTP/2, by default, Cloudflare will follow the order requested by the browser. This ordering varies from browser to browser, causing a significant difference in performance. With Enhanced HTTP/2 Prioritization enabled, resources will be delivered in the optimal order for the fastest experience across all browsers.
Recommended setting: Always on.
TCP Turbo: On
Reduce latency and increase throughput with custom-tuned TCP optimizations.
Recommended setting: Should be on by default, might be off on older accounts.
Mirage: On
Mirage tailors image loading based on network connection and device type. Devices with small screens receive smaller images, and slower connections receive lower resolution images. Replaces images with low resolution placeholder images that have the same dimensions as the original (including third party images). Once the page renders completely, full resolution images are then lazy-loaded (prioritizing images in the browser viewport). This process allows pages to render quickly and minimizes browser reflow. Combines multiple individual network requests for images into a single request. Images do need to support progressive loading, but this setting is ideal in markets with lower end devices and slow mobile connection speeds.
Recommended setting: Always on.
Rocket Loader: On
Aside from image optimisation Rocket can provide the biggest speed gains, but they site needs to be tested with Rocket Loader on. Rocket Loader improves paint times for pages that include Javascript. Visitors will have a better experience by seeing content load faster and speed is also a factor in some search rankings. Rocket Loader improves paint times by asynchronously loading your Javascripts, including third party scripts, so that they do not block rendering the content of your pages. Issues can arise if scripts are required earlier, so the site needs to be tested. If there are issues with Rocket loader one can use page rules or adding data-cfasync="false" to a script to exclude the script for Rocket Loader: <!-- fs-richtext-ignore --><script data-cfasync="false" src="/javascript.js"></script>
Recommended setting: Always on unless it's causing issues on the site. Try to exclude problem scripts with: data-cfasync="false" or Page Rules.
Automatic Signed Exchanges (SXGs): On
Improve your website's performance by making cacheable resources available on Google’s Signed Exchanges.
Recommended setting: Always on.
Prefetch URLs: On
On if you have enterprise.
Caching > Configuration
Caching Level: Ignore Query String
Determines how much of your website’s static content you want Cloudflare to cache. Ignore query string delivers the same resources independent of query string. Best option to stop the site from creating different cache resources for all query strings that could be added.
Recommended setting: Ignore Query String.
Important to note that Cloudflare does not automatically cache HTML content. Can only be done by creating Page Rules. Page Rules offer amazing customizability and options but we can make recommendation there as Browser Cache TTL and Edge Cache TTL would need to be determined by the site's managers. A static about page can for example have very long cache times in both the Browser and on the Edge, but a blog feed would be shorter, depending on the frequency of new posts, and would have to sit above other wildcard rules as the ruleset cascades down.
Browser Cache TTL: No longer than a day.
Determines the length of time Cloudflare instructs a visitor’s browser to cache files. Short times like a day are fine as a default with more strict caching rules set in Page Rules that will override this. The Page Rules should be set by update frequency as mentioned above and grouped in sets, wildcards make this easy. Watch the Browser TTL, Edge Cache TTL can be cleared by purging the cache in Cloudflare, but Browser Cache TTL means that the page content will stay in the user's browser for that period and cannot be cleared once cached.
Recommended setting: A day, to be safe and then customised in Page Rules.
Crawler Hints: On
Cloudflare will notify search engines when there are changes on the site.
Always Online: On
If the Origin Serves goes down Cloudflare will keep the site alive with copies from the Wayback Machine. Cloudflare determines update frequency on the Wayback Machine.
Caching > Tiered Cache
Argo: On
Argo is a service that uses optimized routes across the Cloudflare network to deliver responses to your users more quickly, reliably, and securely. Usage costs apply.
Recommended setting: On.
Caching > Tiered Cache
Tiered Cache: Complicated
Increase cache lifetimes by automatically storing all cacheable files into Cloudflare's persistent object storage buckets.
When there's a cache miss Cloudflare will first check these storage buckets before going to your origin. Usage costs also apply here and works in conjunction with Argo so it should only be turned on if Argo is enabled.
Recommended setting: On if on Enterprise, can be hard to clear completely on lower plans. Enterprise can clear cache completely.
Network
HTTP/2: On
Accelerates your website with HTTP/2
Recommended setting: On.
HTTP/3 (with QUIC): On
Accelerates HTTP requests by using QUIC, which provides encryption and performance improvements compared to TCP and TLS.
Recommended setting: On.
0-RTT Connection Resumption: On
Improves performance for clients who have previously connected to your website. 0-RTT Connection Resumption allows the client’s first request to be sent before the TLS or QUIC connection is fully established.
Recommended setting: On.
gRPC: On
Allow gRPC connections to your origin server.
Recommended setting: On. If not needed it won't affect anything either way.
WebSockets: On
Allow WebSockets connections to your origin server. WebSockets are open connections sustained between the client and the origin server. Inside a WebSockets connection, the client and the origin can pass data back and forth without having to re-establish sessions
Recommended setting: On.
Onion Routing
Onion Routing allows routing traffic from legitimate users on the Tor network through Cloudflare’s onion services rather than exit nodes.
Recommended setting: On, improves speed for users on Tor.
Page Rule Order Example
Page rules should have the following, the Edge Cache TTL and Browser Cache TTL determine how long content is stored on the Cloudflare Edge and in the User's Browser. Those two should be determined by how often content on a page updates. Let's say most of the site never really changes. but the blog is updated often. The blog feed page should then have a shorter Edge and Browser TTL and the rest can have a catchall wildcard rule with longer Edge and Browser TTL caches. Page rules cascade down. So, if the generic rule for the site where the content doesn't change often has a wildcard like this www.milkmoonstudio.com/, and long cache lifetimes, it should sit below rules with shorter cache lifetimes, in my case www.milkmoonstudio.com/blog/. The blog is then the first rule and the rest of the site the next rule in the set. The second rule's wildcard also caches the blog, but because there is another rule affecting the blog pages, and it sits above the www.milkmoonstudio.com/ page rule, it overrides it.
Page Rule Example
- Polish: Lossy
- Auto Minify: HTML, CSS and JS
- Rocket Loader: On
- Mirage: On
- Cache Level: Cache Everything (to cache HTML content as well).
- Automatic HTTPS Rewrites: On
- Opportunistic Encryption: On
- Browser Cache TTL: 1 Day (Let's say this is for a blog feed where there's often new content, would be longer for static pages)
- Edge Cache TTL: 1 Day (Let's say this is for a blog feed where there's often new content, would be longer for static pages)