
Join us as we delve into the intricacies of our image optimization Cloudflare Worker script, revealing how it can enhance your website's performance.
Important Update
The old approached below has been deprecated. The proxy, cache and optimise your images and other resources like your css and js please head directly to this post: Optimize Webflow with Cloudflare: Images, Assets & Caching in 2026.
Original Post
Today, we're going to take a magical journey into the heart of a Cloudflare worker script we've been using to optimize images on our Webflow project. It's a bit like taking a peek under the hood of a sports car, except instead of oil and pistons, we're dealing with JavaScript and regular expressions.
We’ve already done an in-depth post on setting up Cloudflare, but here we’ll take a different approach. For the original post on getting Webflow cached on Cloudflare and using the Cassette App in Cloudflare to cache your assets that live on the Webflow CDN in Cloudflare, head to this post: Using Webflow with Cloudflare to cache and speed up your Webflow Project
The method used in the previous post relied on using Cassette to cache all Webflow assets on a subdomain of your choosing. It could become a bit complicated for small Webflow Agencies or freelancers who don’t have much experience with this kind of thing, and while the below isn’t as complicated, it still involves editing our code to make it work for you. With the method below we’ll be using a different approach.
The initial DNS setup process remains the same, and we’ll give a brief rundown at the end of this post, but the rest of the setup process branches off there. Instead of relying on Cloudflare’s Cassette App to cache your assets and then replace the links in your code, we only focus on images with this new approach and we won’t be caching and replacing CSS file links, Javascript files or fonts. Some folks experienced issues where Cloudflare’s Rocket Loader would load their code later on messing with interactions etc. so if you found it hard excluding the relevant js and css files, this method might work better for you.
Here, we use a Cloudflare worker to find all links to images that aren’t SVGs (and therefore already optimised, we do still cache the SVGs), it then optimises them using the Cloudflare Image Resizer by replacing all image links in your Webflow project with Cloudflare Image Resizer links, this allows Cloudflare to not only optimise images that aren’t on your domain name (the Webflow CDN domain), but also to cache them for future use.
Sounds fun, right? Just a reminder, just like our other post this is advanced, please read carefully. Let's dive in!
Our Webflow Cloudflare Image Resizer Worker Script
<iframe height="300" style="width: 100%;" scrolling="no" title="Cloudflare Image Resizer - Worker Script" src="https://codepen.io/milkmoonstudio/embed/LYXrvaW?default-tab=js" frameborder="no" loading="lazy" allowtransparency="true" allowfullscreen="true">
See the Pen <a href="https://codepen.io/milkmoonstudio/pen/LYXrvaW">
Cloudflare Image Resizer - Worker Script</a> by Jakes van Eeden (<a href="https://codepen.io/milkmoonstudio">@milkmoonstudio</a>)
on <a href="https://codepen.io">CodePen</a>.
</iframe>
The above script if what is running on Milk Moon Studio right now, therefore it’s setup for us. You would have to replace our domain, milkmoonstudio.com in two places in this script, and potentially update both regular expressions in the script if you images are not stored on https://assets.website-files.com or their prod domains like our assets are. More on that later.
Let’s see what the Cloudflare Worker’s doing
<iframe height="300" style="width: 100%;" scrolling="no" title="Cloudflare Image Resizer - Fetch Events" src="https://codepen.io/milkmoonstudio/embed/ZEmRNLW?default-tab=js" frameborder="no" loading="lazy" allowtransparency="true" allowfullscreen="true">
See the Pen <a href="https://codepen.io/milkmoonstudio/pen/ZEmRNLW">
Cloudflare Image Resizer - Fetch Events</a> by Jakes van Eeden (<a href="https://codepen.io/milkmoonstudio">@milkmoonstudio</a>)
on <a href="https://codepen.io">CodePen</a>.
</iframe>
Our script is always on the lookout for fetch events. When one comes in, it springs into action and calls our ‘handleRequest’ function.
<iframe height="300" style="width: 100%;" scrolling="no" title="Cloudflare Image Resizer - HandleRequest" src="https://codepen.io/milkmoonstudio/embed/bGQKygy?default-tab=js" frameborder="no" loading="lazy" allowtransparency="true" allowfullscreen="true">
See the Pen <a href="https://codepen.io/milkmoonstudio/pen/bGQKygy">
Cloudflare Image Resizer - HandleRequest</a> by Jakes van Eeden (<a href="https://codepen.io/milkmoonstudio">@milkmoonstudio</a>)
on <a href="https://codepen.io">CodePen</a>.
</iframe>
Our handleRequest function is like a personal assistant, fetching the request and checking its 'Content-Type'. If it can't find a 'Content-Type', it just assumes it's an empty string.
<iframe height="300" style="width: 100%;" scrolling="no" title="Cloudflare Image Resizer - Content Type" src="https://codepen.io/milkmoonstudio/embed/QWJxRvL?default-tab=js" frameborder="no" loading="lazy" allowtransparency="true" allowfullscreen="true">
See the Pen <a href="https://codepen.io/milkmoonstudio/pen/QWJxRvL">
Cloudflare Image Resizer - Content Type</a> by Jakes van Eeden (<a href="https://codepen.io/milkmoonstudio">@milkmoonstudio</a>)
on <a href="https://codepen.io">CodePen</a>.
</iframe>
If the 'Content-Type' tells us it's an HTML document, we get the text of the response. This is like opening up the package and checking out what's inside.
<iframe height="300" style="width: 100%;" scrolling="no" title="Cloudflare Image resizer - Find Images" src="https://codepen.io/milkmoonstudio/embed/YzRjKPY?default-tab=js" frameborder="no" loading="lazy" allowtransparency="true" allowfullscreen="true">
See the Pen <a href="https://codepen.io/milkmoonstudio/pen/YzRjKPY">
Cloudflare Image resizer - Find Images</a> by Jakes van Eeden (<a href="https://codepen.io/milkmoonstudio">@milkmoonstudio</a>)
on <a href="https://codepen.io">CodePen</a>.
</iframe>
Here's where we start optimizing. We find any image URLs that point to the Webflow CDN and replace them with URLs that point to our Cloudflare worker. This is like redirecting the mail to a more efficient post office.
<iframe height="300" style="width: 100%;" scrolling="no" title="Cloudflare Image Resizer - SRC Sets" src="https://codepen.io/milkmoonstudio/embed/ZEmjzQb?default-tab=js" frameborder="no" loading="lazy" allowtransparency="true" allowfullscreen="true">
See the Pen <a href="https://codepen.io/milkmoonstudio/pen/ZEmjzQb">
Cloudflare Image Resizer - SRC Sets</a> by Jakes van Eeden (<a href="https://codepen.io/milkmoonstudio">@milkmoonstudio</a>)
on <a href="https://codepen.io">CodePen</a>.
</iframe>
Next, we tackle the srcset attributes. These can contain multiple URLs, so we use a function to replace each one. It's like having a list of addresses and updating each one to a new location. This caused some issues in the previous Cloudflare Implementation with Cassette. Webflow generates SRC Sets. Essentially a list if different sizes of each image in the project resized for various screen widths. This optimisation on the Webflow side did however mean that Cassette only replaced one or two image links in an SRC Set, and then missed others. We tried for broad matches here and experimented a lot to try and catch the full set with this bit, while the code block above looked for images that don’t have SRC Sets, so covering our bases on all ends.
<iframe height="300" style="width: 100%;" scrolling="no" title="Cloudflare Image Resizer - Re-package" src="https://codepen.io/milkmoonstudio/embed/wvQxwWN?default-tab=js" frameborder="no" loading="lazy" allowtransparency="true" allowfullscreen="true">
See the Pen <a href="https://codepen.io/milkmoonstudio/pen/wvQxwWN">
Cloudflare Image Resizer - Re-package</a> by Jakes van Eeden (<a href="https://codepen.io/milkmoonstudio">@milkmoonstudio</a>)
on <a href="https://codepen.io">CodePen</a>.
</iframe>
Once we've done all our replacements, we pack everything back up into a new response and send it on its way. It's like repackaging our opened box and sending it off to its final destination.
<iframe height="300" style="width: 100%;" scrolling="no" title="Cloudflare Image Resizer - Error check and response" src="https://codepen.io/milkmoonstudio/embed/poQZzNv?default-tab=js" frameborder="no" loading="lazy" allowtransparency="true" allowfullscreen="true">
See the Pen <a href="https://codepen.io/milkmoonstudio/pen/poQZzNv">
Cloudflare Image Resizer - Error check and response</a> by Jakes van Eeden (<a href="https://codepen.io/milkmoonstudio">@milkmoonstudio</a>)
on <a href="https://codepen.io">CodePen</a>.
</iframe>
If our package isn't an HTML document, we just send it on its way without opening it. If something goes wrong, we log the error and return a 500 response. It's like saying, "Oops, something went wrong. We'll try again later."
And that's it! That's how our Cloudflare worker script optimizes images on our Webflow projects. It's a bit like a super-efficient post office, redirecting mail and making sure everything gets to where it needs to go as quickly and efficiently as possible.
Update: asset.website-files.com, assets-global.website-files.com and cdn.prod.website-files.com
We were actually recently randomly switched from assets to assets-global, so I’ve got an updated Worker Script below and we’ve also added the new https://cdn.prod.website-files.com. Just adapt with your custom domain:
<iframe height="300" style="width: 100%;" scrolling="no" title="Cloudflare Image Resizer Worker Script - For assets.website-files.com and assets-global.website-files.com" src="https://codepen.io/milkmoonstudio/embed/qBLGwjp?default-tab=js" frameborder="no" loading="lazy" allowtransparency="true" allowfullscreen="true">
See the Pen <a href="https://codepen.io/milkmoonstudio/pen/qBLGwjp">
Cloudflare Image Resizer Worker Script - For assets.website-files.com and assets-global.website-files.com</a> by Jakes van Eeden (<a href="https://codepen.io/milkmoonstudio">@milkmoonstudio</a>)
on <a href="https://codepen.io">CodePen</a>.
</iframe>
Steps to implement
So, aside from that, what do you need to do?
- Setup the required DNS settings in Cloudflare to allow caching.
- Update the code with you own domain instead of milkmoonstudio.com
- If your assets are not stored on assets.website-files.com like ours were, update both sets of regular expressions that look for the Webflow CDN urls. We’ve tried to add as many of the CDNs as we can, but might have missed some.
- Add the Cloudflare Worker! Paid Worker, remember that.
- Turn on Image Resizer / Image Transformations, it’s paid for.
1. Webflow DNS Settings in Cloudflare
Alright, folks, it's time to get our hands dirty with some DNS settings. Now, you might be thinking, "Wait a minute, didn't we cover this in a previous post?" And you'd be right! But we're going to shake things up and add it again for those who don’t have the time to read that post as well.
Now, Webflow is going to give you a couple of instructions here. They'll tell you to add two A records and a CNAME record when you enable SSL in your Webflow Hosting Tab (and these days, they'll also give you a TXT record). They'll also tell you to turn off proxying on Cloudflare (that's the orange cloud icon). But we're going to go rogue and ignore all that.
When you enable SSL, you'll see instructions that look something like this:
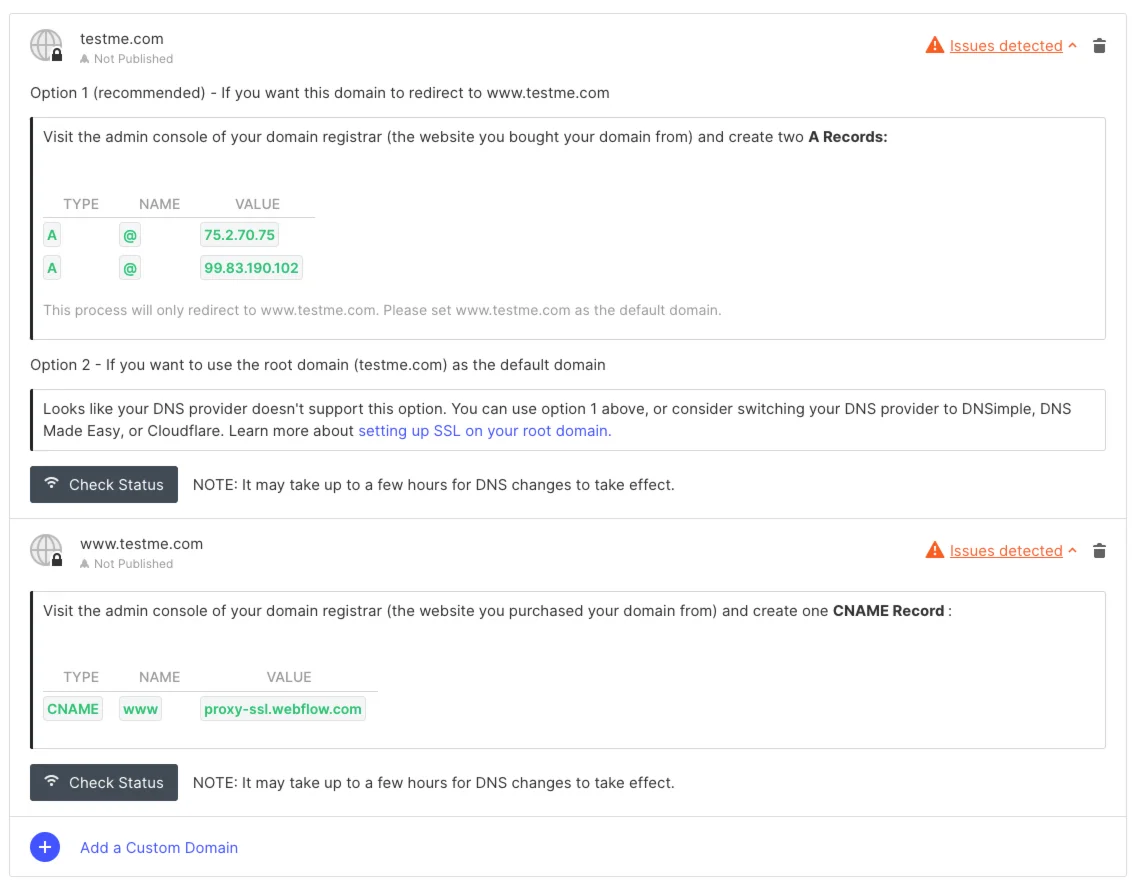
Webflow DNS settings
But we're going to say "Thanks, but no thanks!" to these instructions. Here's what you should do instead:
- First off, turn off SSL at the bottom of the hosting tab and hit Save.
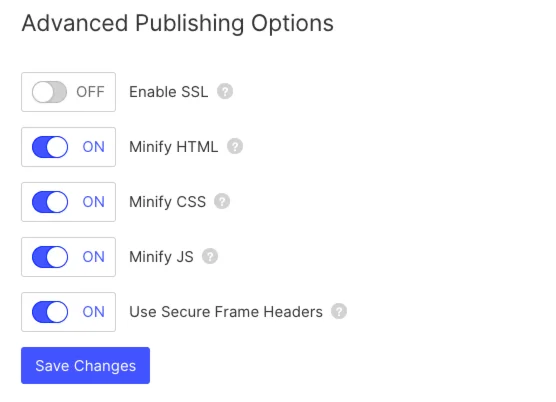
Disable SSL
- Next, copy the new A record addresses and the CNAME Settings:
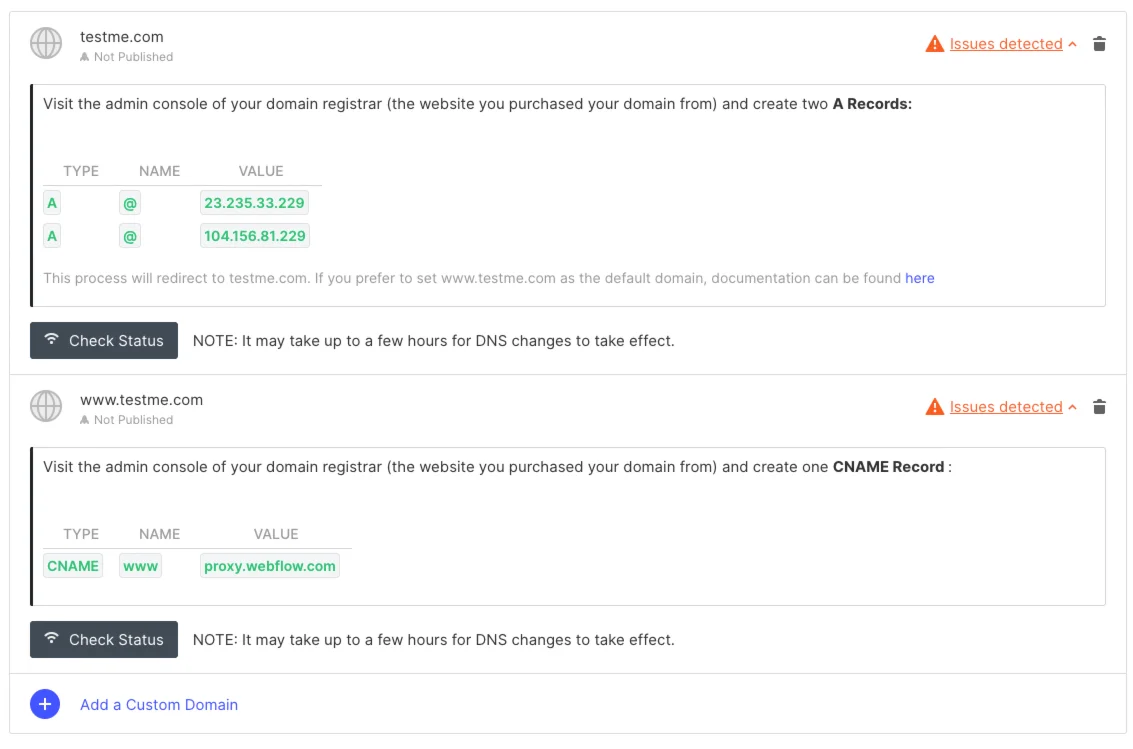
Save the non-ssl Webflow DNS settings
- Now, turn the SSL tick box back on and save. You'll see the settings revert to the initial SSL settings, but just ignore those.
- Head over to Cloudflare and add the non-SSL DNS settings. It should look something like this:

Add Webflow DNS settings to Cloudflare
- You can add the correct TXT record like Webflow asked: proxy-ssl.webflow.com.
- Make sure the entries have Proxied turned on, even though Webflow's Cloudflare Instructions tell you otherwise.
- Go to the SSL/TLS settings tab in Cloudflare and turn on Full:
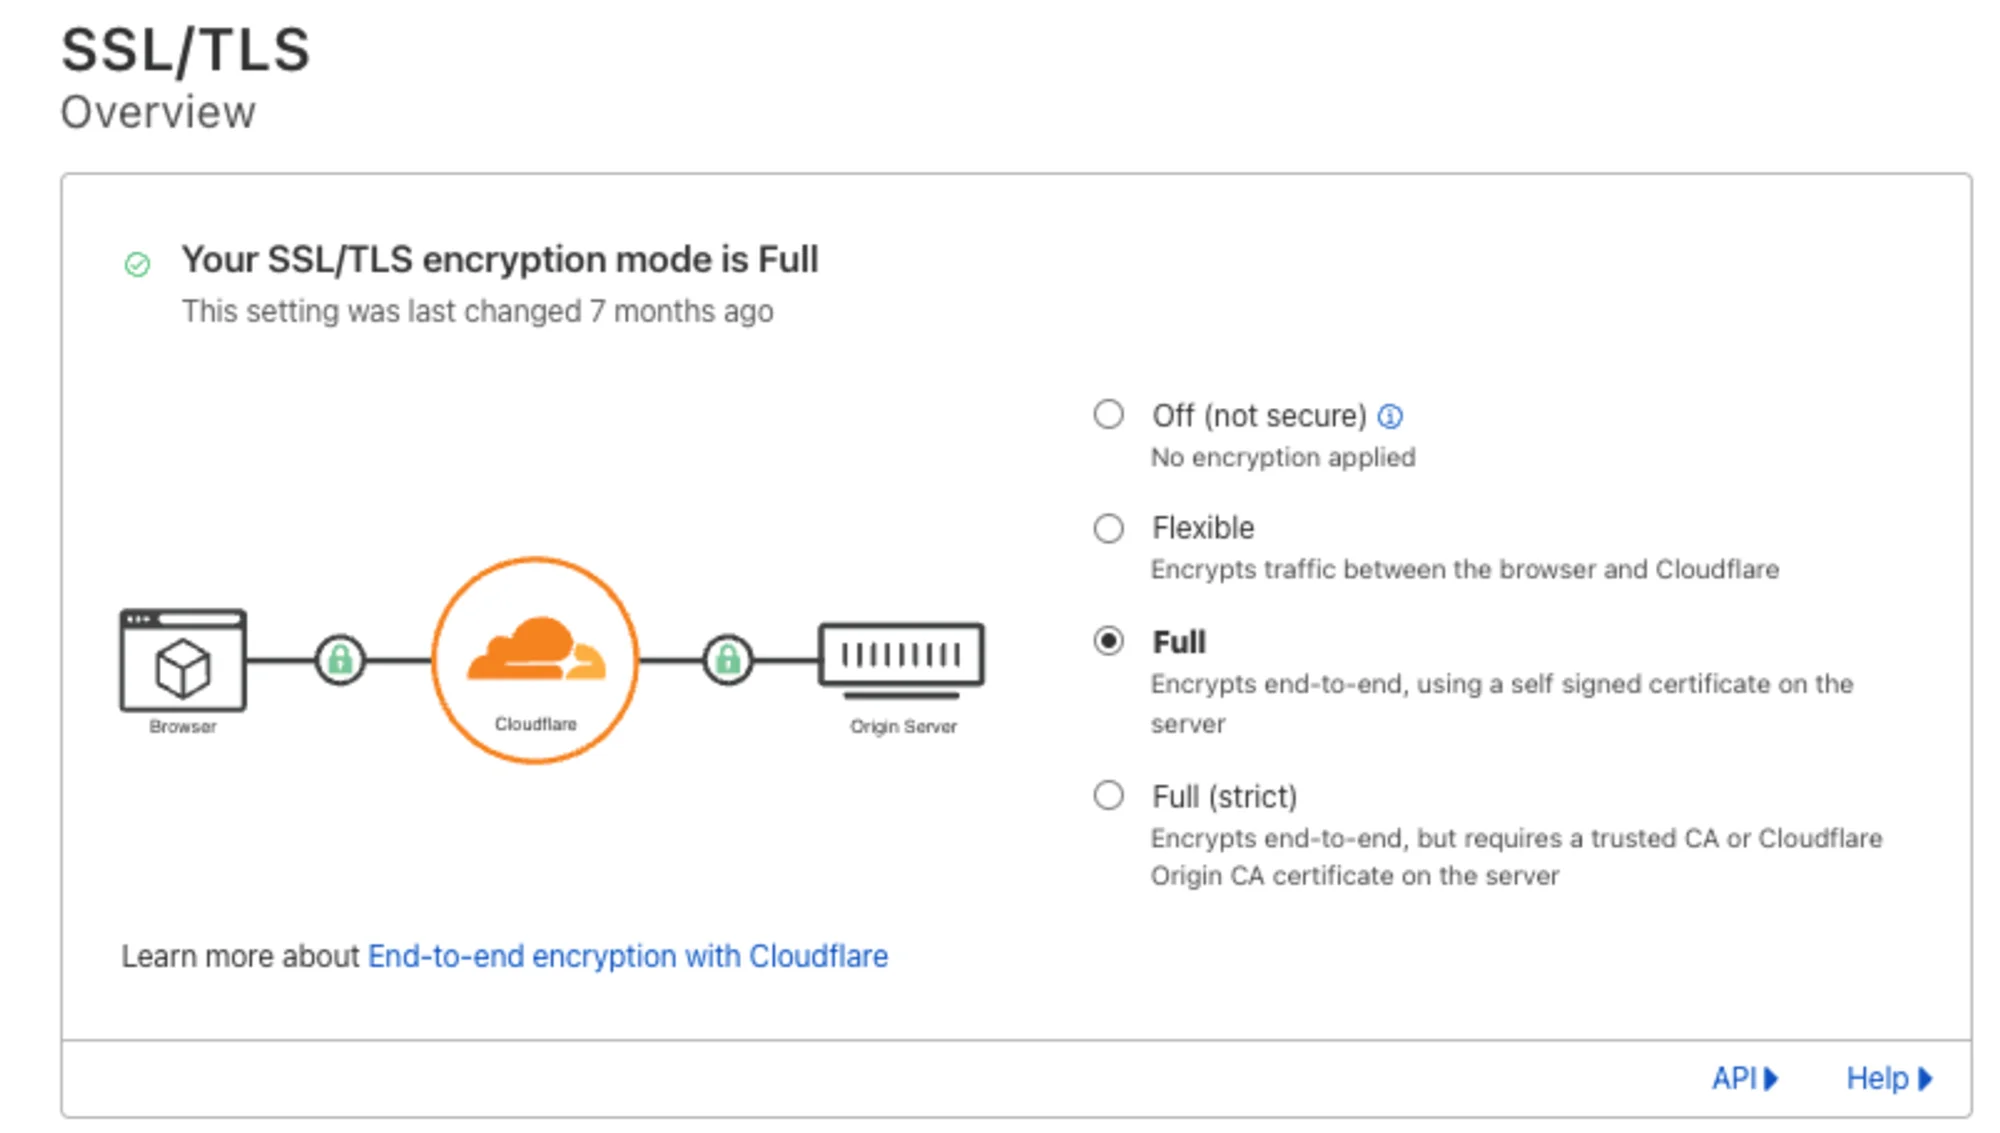
Set SSL to Full in Cloudflare
- Head back to Webflow's hosting Tab.
- Yikes, that's a lot of issues! But don't worry, just ignore them and publish the site.
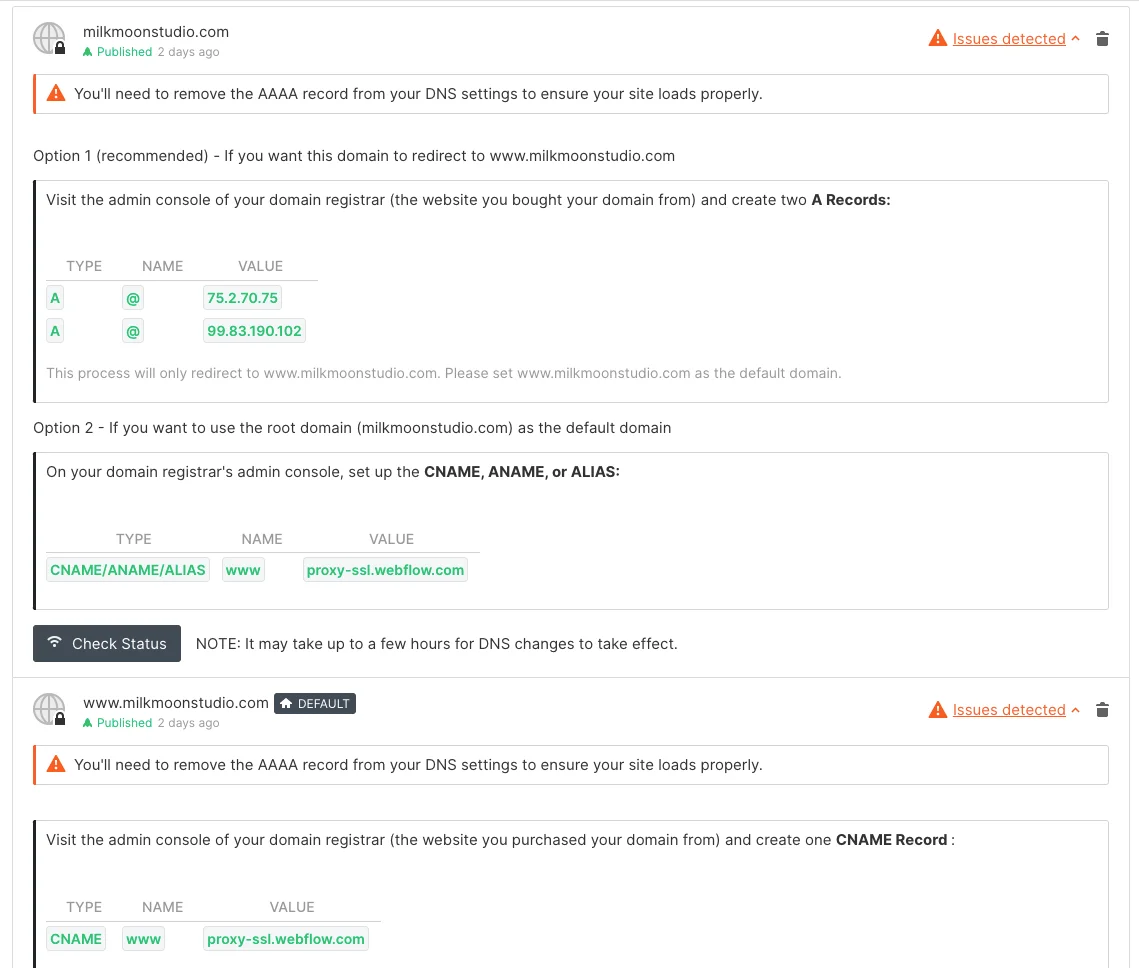
Ignore the Webflow DNS erros
And that's it! You've successfully navigated the wild world of Cloudflare DNS settings for Webflow. Give yourself a pat on the back, you’re now caching on Cloudflare, well apart from the assets.
2. Update the Cloudflare Worker Script with your own domain.
All you need to do here is find the milkmoonstudio.com bit, there’s two and change it to your domain name you have in Cloudflare. It’s right in the middle where the worker will look for the image urls and replace them. Here it is below:
<iframe height="300" style="width: 100%;" scrolling="no" title="Cloudflare Image Resizer - Replace your personal domain" src="https://codepen.io/milkmoonstudio/embed/gOQjYeq?default-tab=js" frameborder="no" loading="lazy" allowtransparency="true" allowfullscreen="true">
See the Pen <a href="https://codepen.io/milkmoonstudio/pen/gOQjYeq">
Cloudflare Image Resizer - Replace your personal domain</a> by Jakes van Eeden (<a href="https://codepen.io/milkmoonstudio">@milkmoonstudio</a>)
on <a href="https://codepen.io">CodePen</a>.
</iframe>
3. Update Both Sets of Regular Expressions
So this is very very important. In our case the Webflow CDN stored all assets for the project on https://assets.website-files.com, but this is not always the case and varies from project to project. So just like in our other Cloudflare post, you’ll have to change this based on the domain your images are stored on. You can inspect the code, or open an image in a new tab to check. Popular Webflow CDN domain are:
- https://assets.website-files.com
- https://website-files.com
- https://uploads-ssl.webflow.com
- https://global-uploads.webflow.com
- https://cdn.prod.website-files.com
We have no idea how many there are or how there’re chosen, but these are a few we’ve seen.
If you’re luck you know something about regular expressions and it’ll be easy to update. If not, look at some of the examples we’ve put together below, you should be able to figure it out. You’ll have to update both and this is basically what the Cloudflare Worker will be looking for:
Regular Expressions for https://assets.website-files.com
<iframe height="300" style="width: 100%;" scrolling="no" title="Cloudflare Image Resizer - Regex Example 1" src="https://codepen.io/milkmoonstudio/embed/zYMLOMd?default-tab=js" frameborder="no" loading="lazy" allowtransparency="true" allowfullscreen="true">
See the Pen <a href="https://codepen.io/milkmoonstudio/pen/zYMLOMd">
Cloudflare Image Resizer - Regex Example 1</a> by Jakes van Eeden (<a href="https://codepen.io/milkmoonstudio">@milkmoonstudio</a>)
on <a href="https://codepen.io">CodePen</a>.
</iframe>
Regular Expressions for https://assets.website-files.com
<iframe height="300" style="width: 100%;" scrolling="no" title="Cloudflare Image Resizer - Regex Example 2" src="https://codepen.io/milkmoonstudio/embed/jOQpNdq?default-tab=js" frameborder="no" loading="lazy" allowtransparency="true" allowfullscreen="true">
See the Pen <a href="https://codepen.io/milkmoonstudio/pen/jOQpNdq">
Cloudflare Image Resizer - Regex Example 2</a> by Jakes van Eeden (<a href="https://codepen.io/milkmoonstudio">@milkmoonstudio</a>)
on <a href="https://codepen.io">CodePen</a>.
</iframe>
Regular Expressions for https://global-uploads.webflow.com
<iframe height="300" style="width: 100%;" scrolling="no" title="Cloudflare Image Resizer - Regex Example 3" src="https://codepen.io/milkmoonstudio/embed/mdQjbvo?default-tab=js" frameborder="no" loading="lazy" allowtransparency="true" allowfullscreen="true">
See the Pen <a href="https://codepen.io/milkmoonstudio/pen/mdQjbvo">
Cloudflare Image Resizer - Regex Example 3</a> by Jakes van Eeden (<a href="https://codepen.io/milkmoonstudio">@milkmoonstudio</a>)
on <a href="https://codepen.io">CodePen</a>.
</iframe>
Depending on your CDN asset domain you might have to mess around a bit, and yeah, we also suck at this, I mean \/[^\s"']+\ 🤮
4. Adding the Cloudflare Worker and Worker Route
So, you’ve made the DNS changes, you’ve updated the script and should have something like this:
<iframe height="300" style="width: 100%;" scrolling="no" title="Cloudflare Image Resizer - Worker Script" src="https://codepen.io/milkmoonstudio/embed/LYXrvaW?default-tab=js" frameborder="no" loading="lazy" allowtransparency="true" allowfullscreen="true">
See the Pen <a href="https://codepen.io/milkmoonstudio/pen/LYXrvaW">
Cloudflare Image Resizer - Worker Script</a> by Jakes van Eeden (<a href="https://codepen.io/milkmoonstudio">@milkmoonstudio</a>)
on <a href="https://codepen.io">CodePen</a>.
</iframe>
What now? You’ll have to do 4 things. Add a Cloudflare Worker plan, Enable Image Resizing, Create the Worker and Add the Worker Route.
Head to Workers & Pages, click Plans and add a Plan. There is a free tier, no idea if this’ll work, we have a plan, you can try the free tier and let us know.
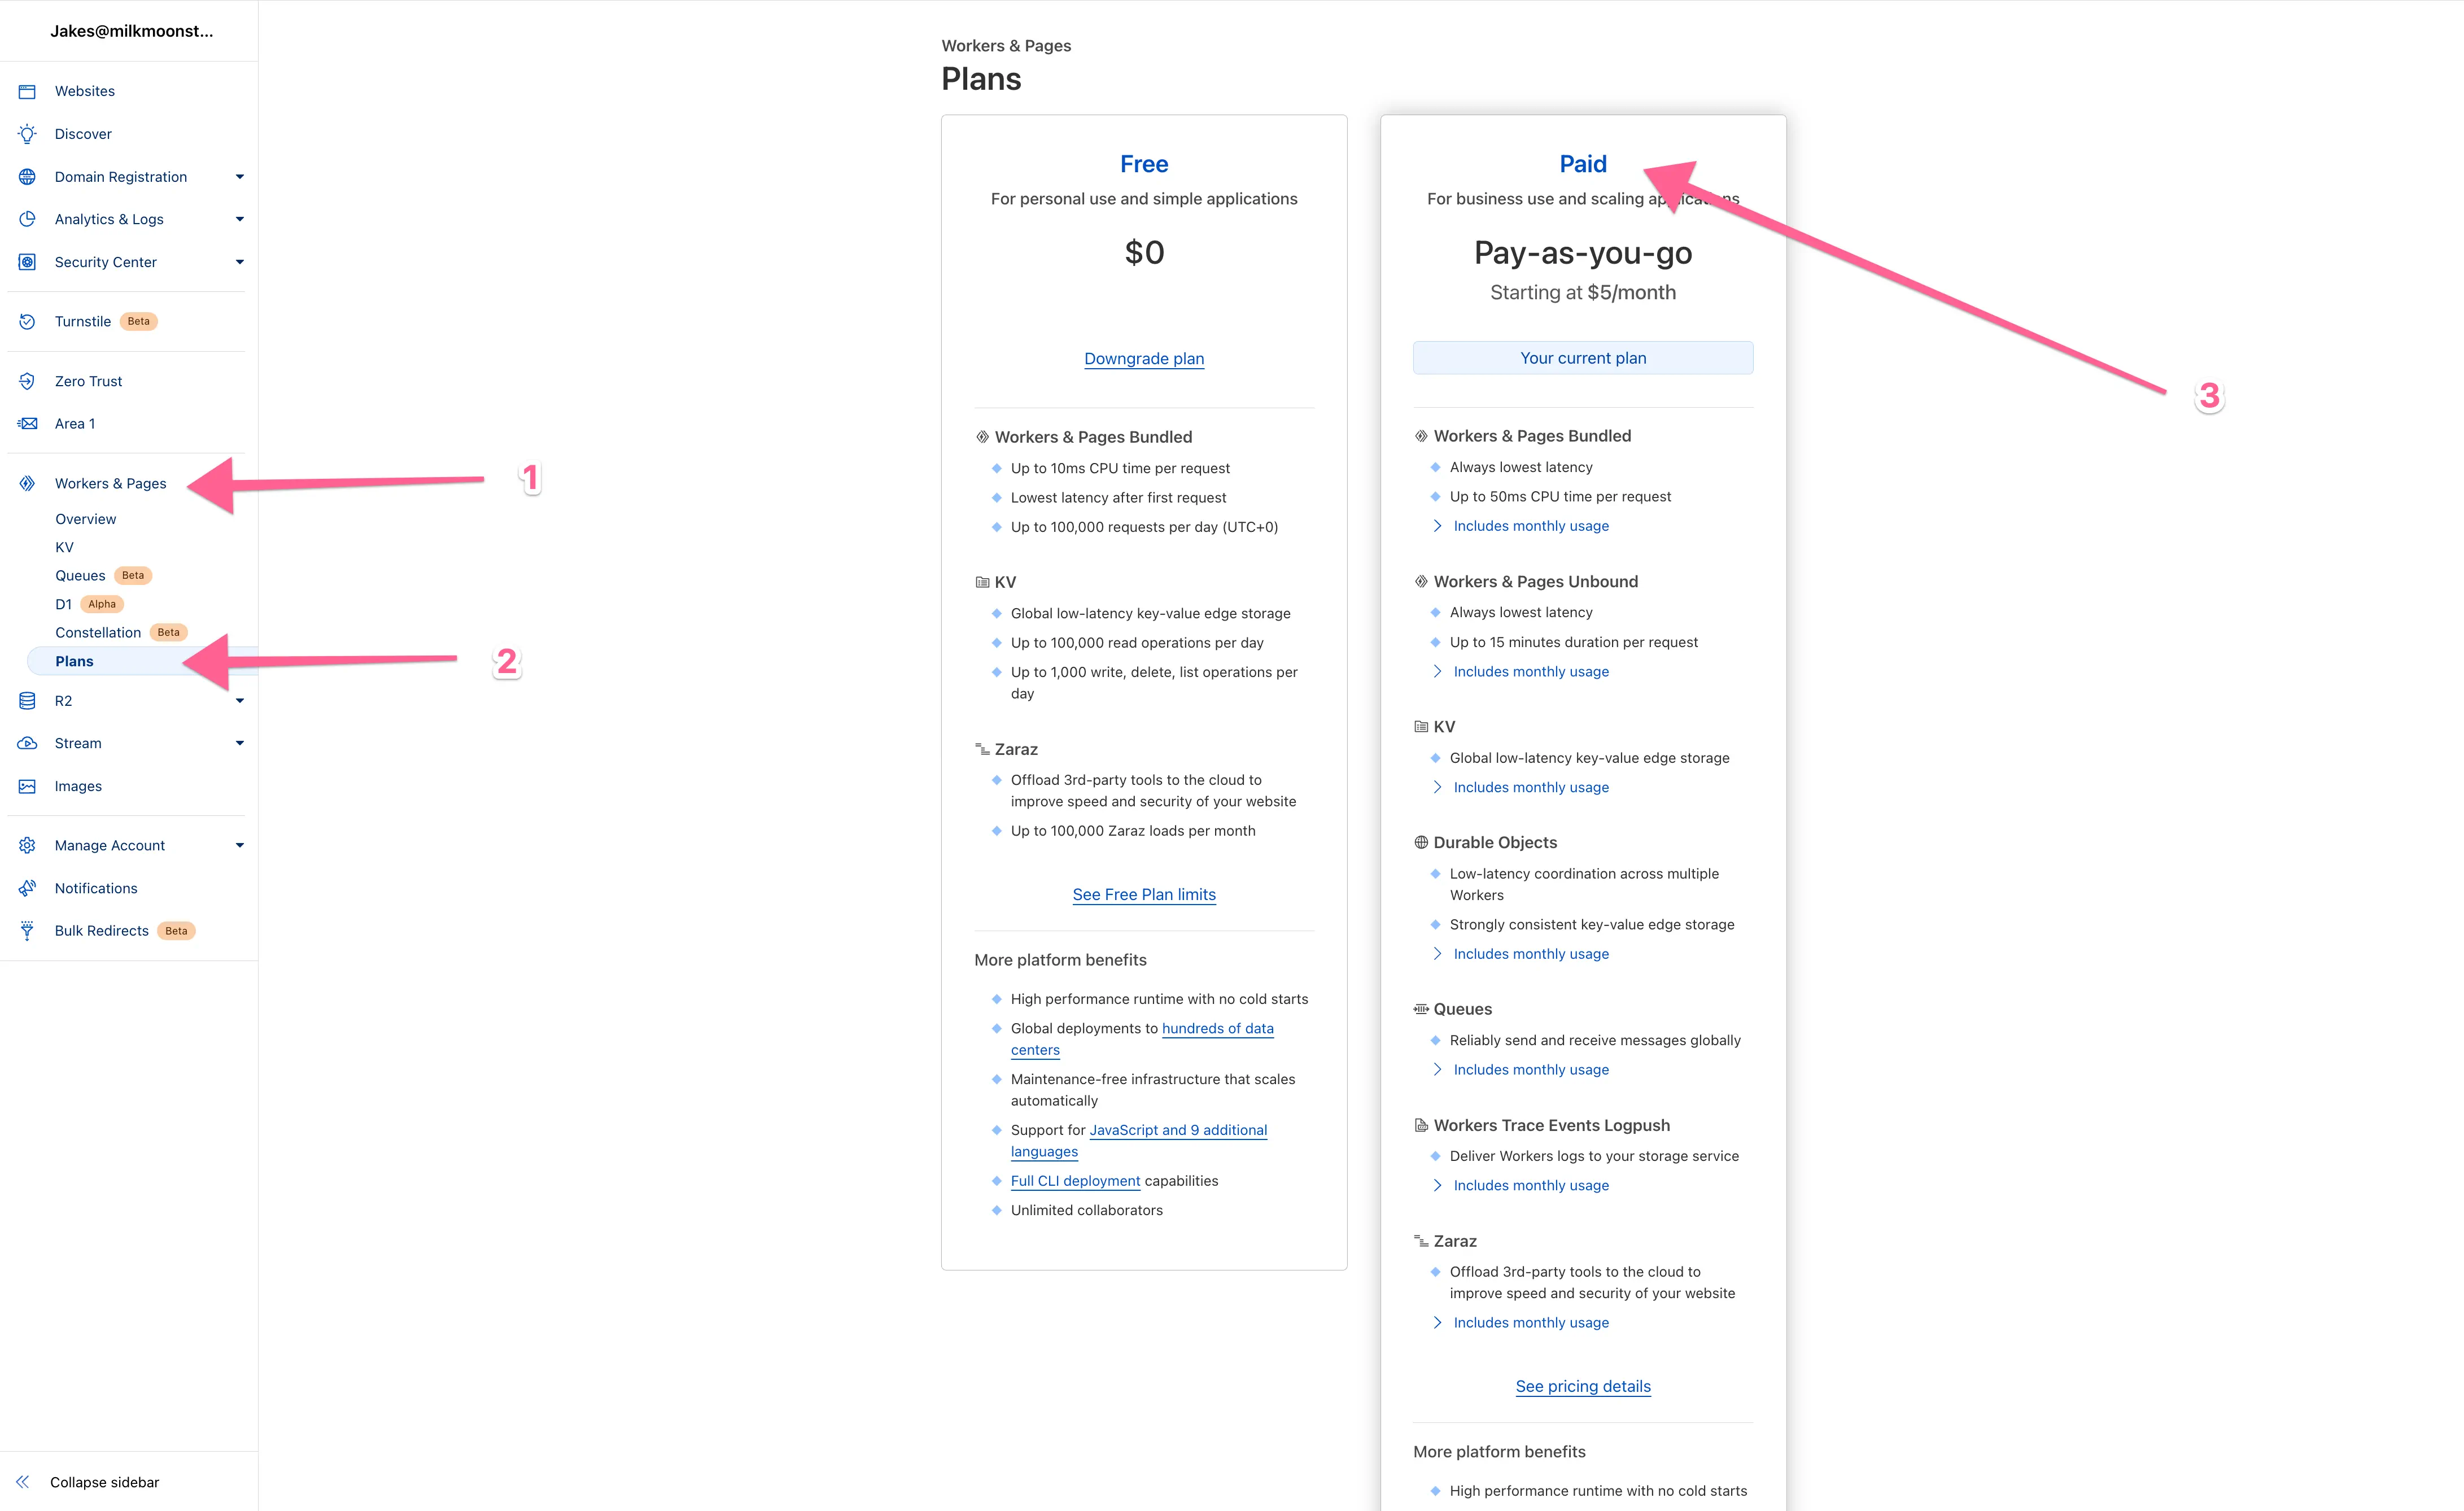
Cloudflare Worker Plan Selection
Next, open your domain settings, go to Speed, Optimization and then Image Optimization and enable Image Resizing:
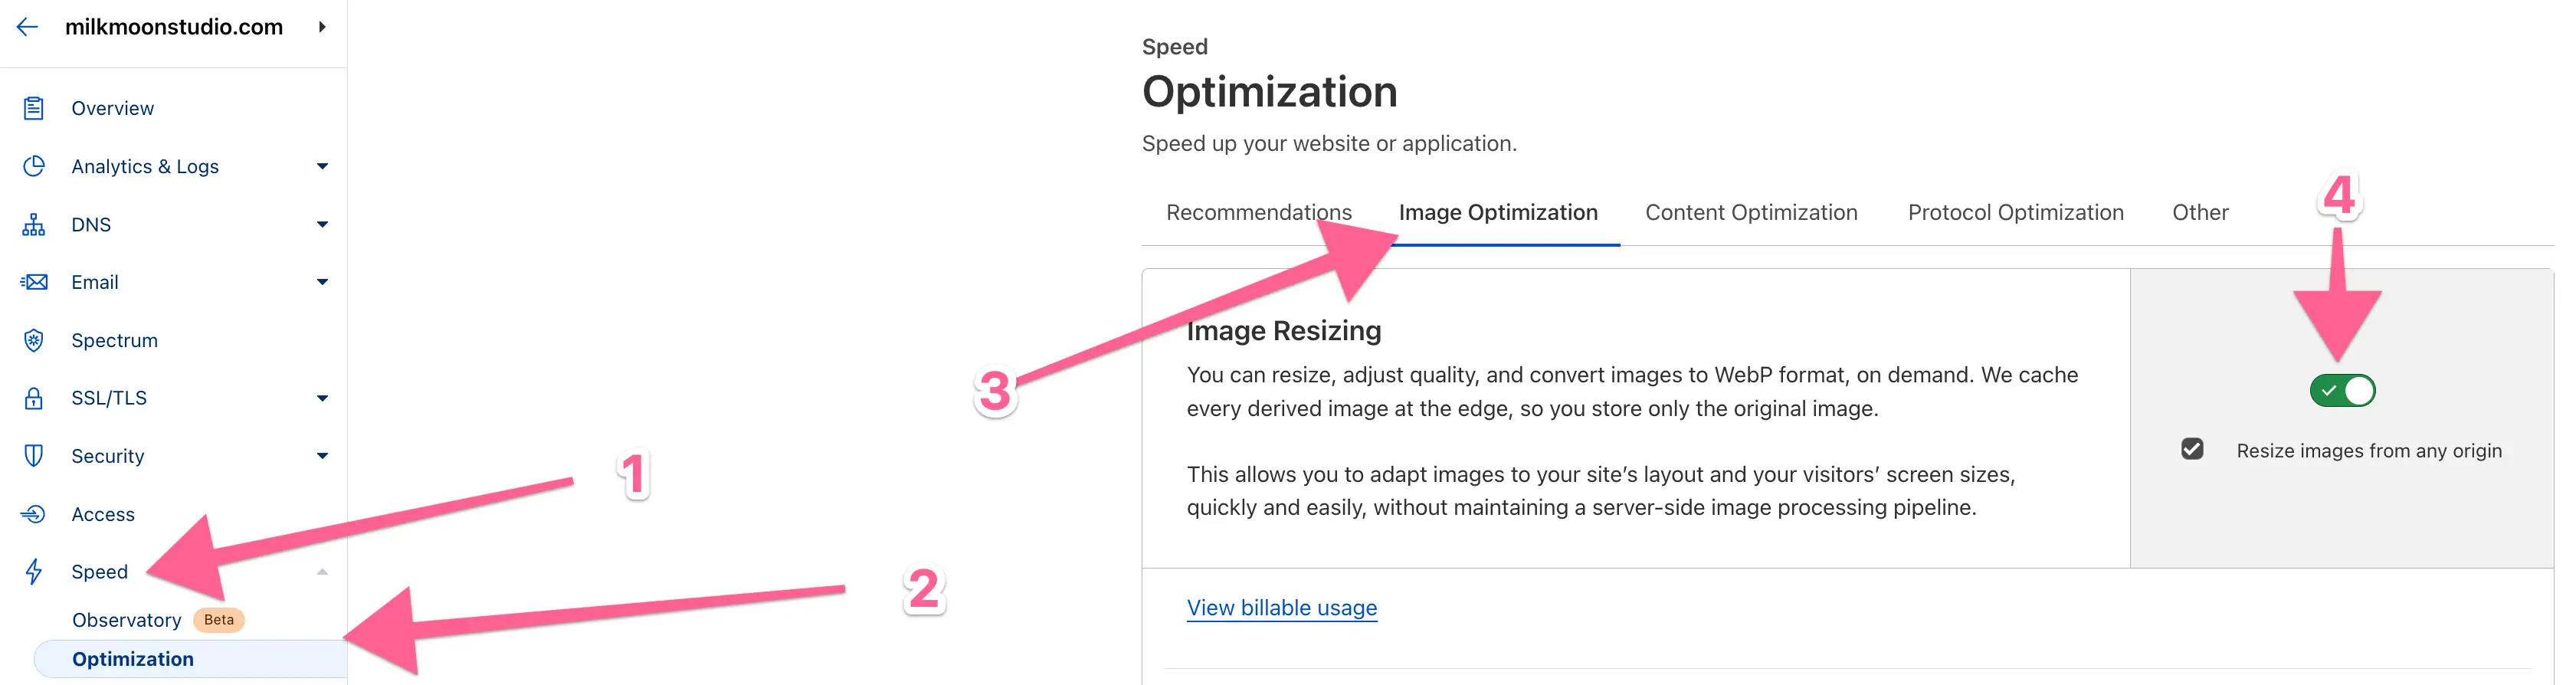
Enable Image Resizing
The next step is creating the Worker and adding the script. Go back to the main menu, and then Workers & Pages. Click Create Application, then click Create Worker.
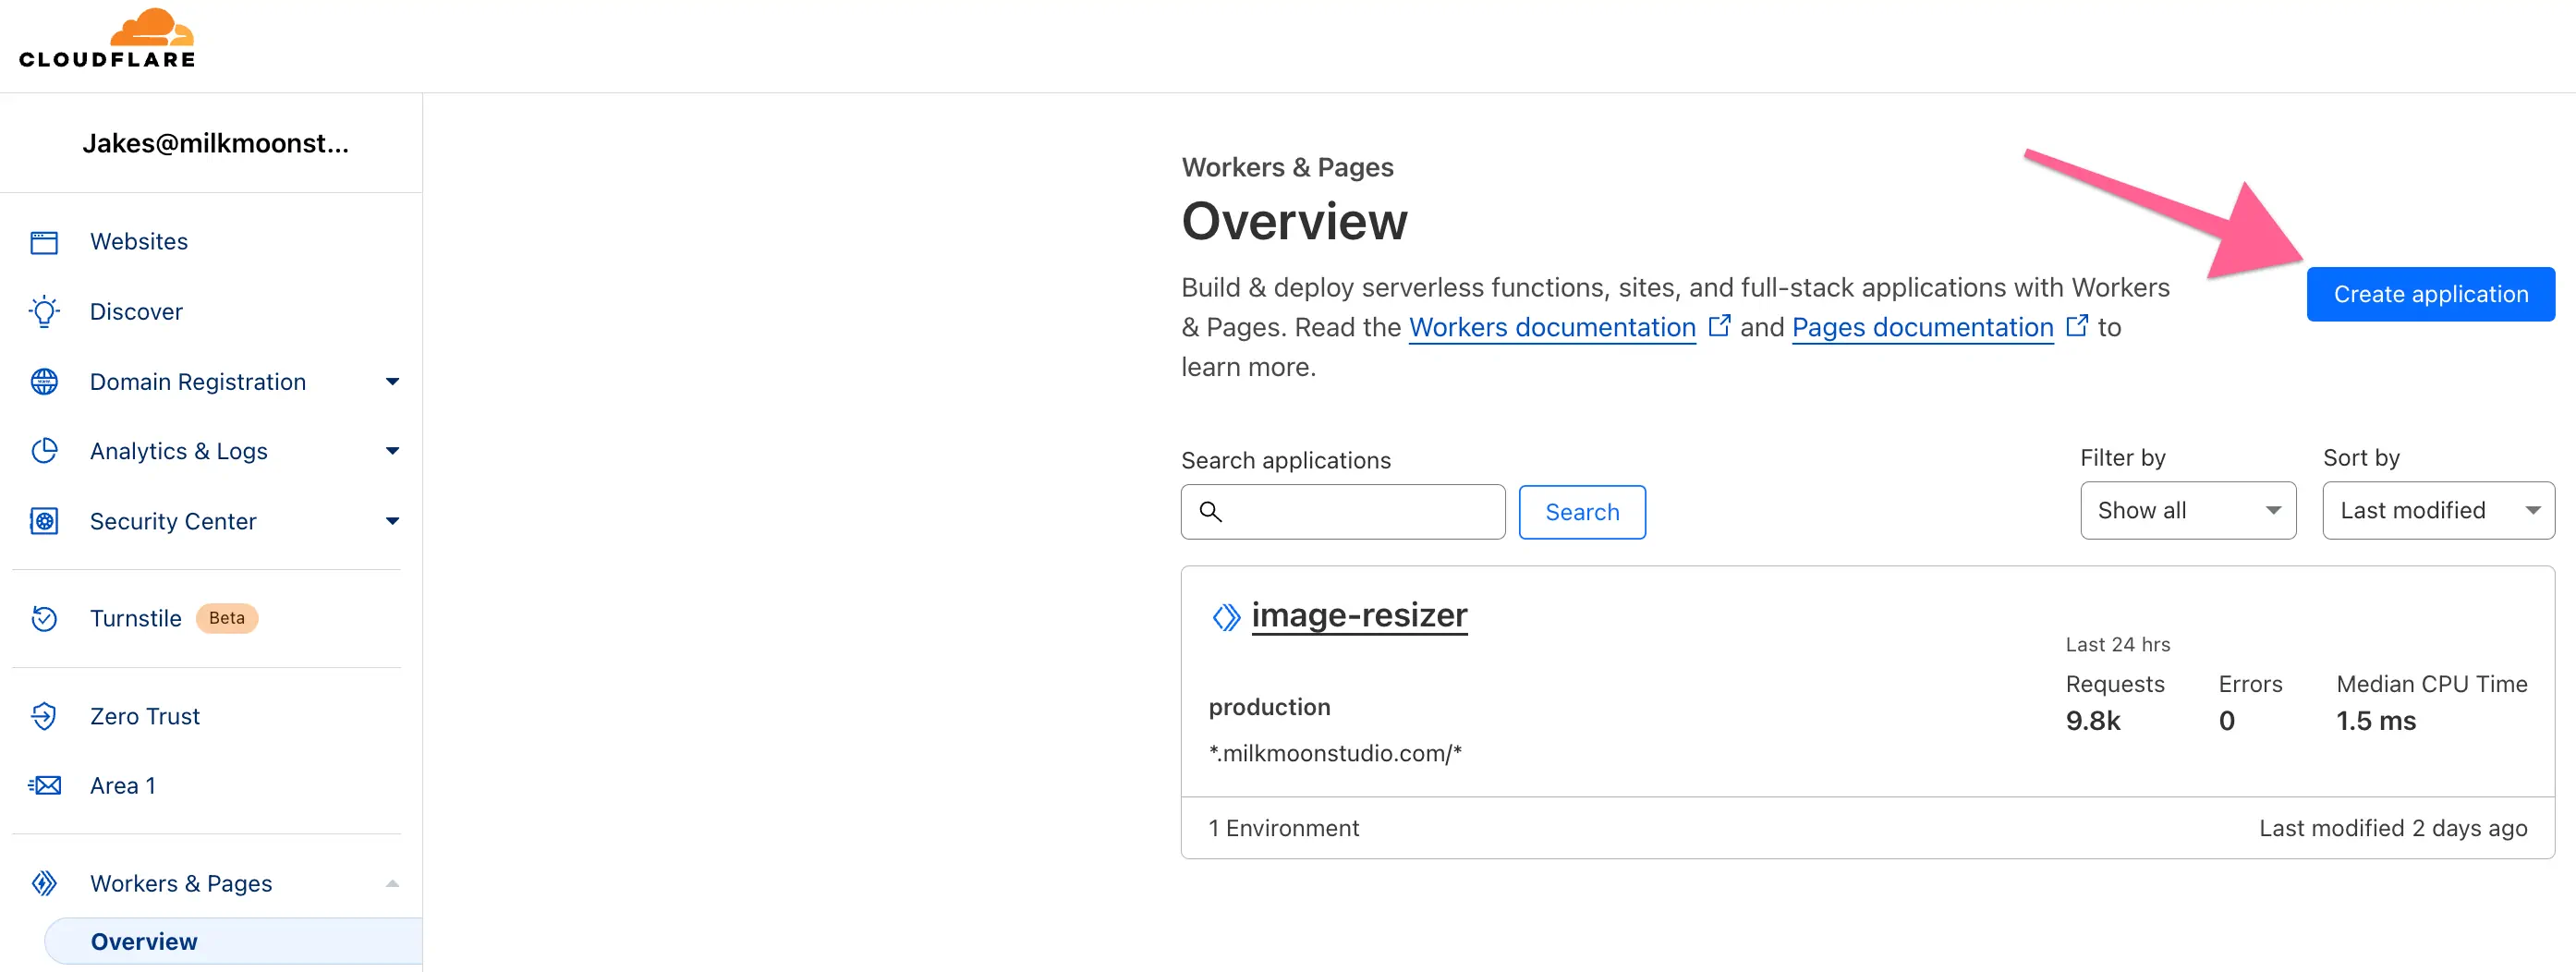
Create a Worker Application
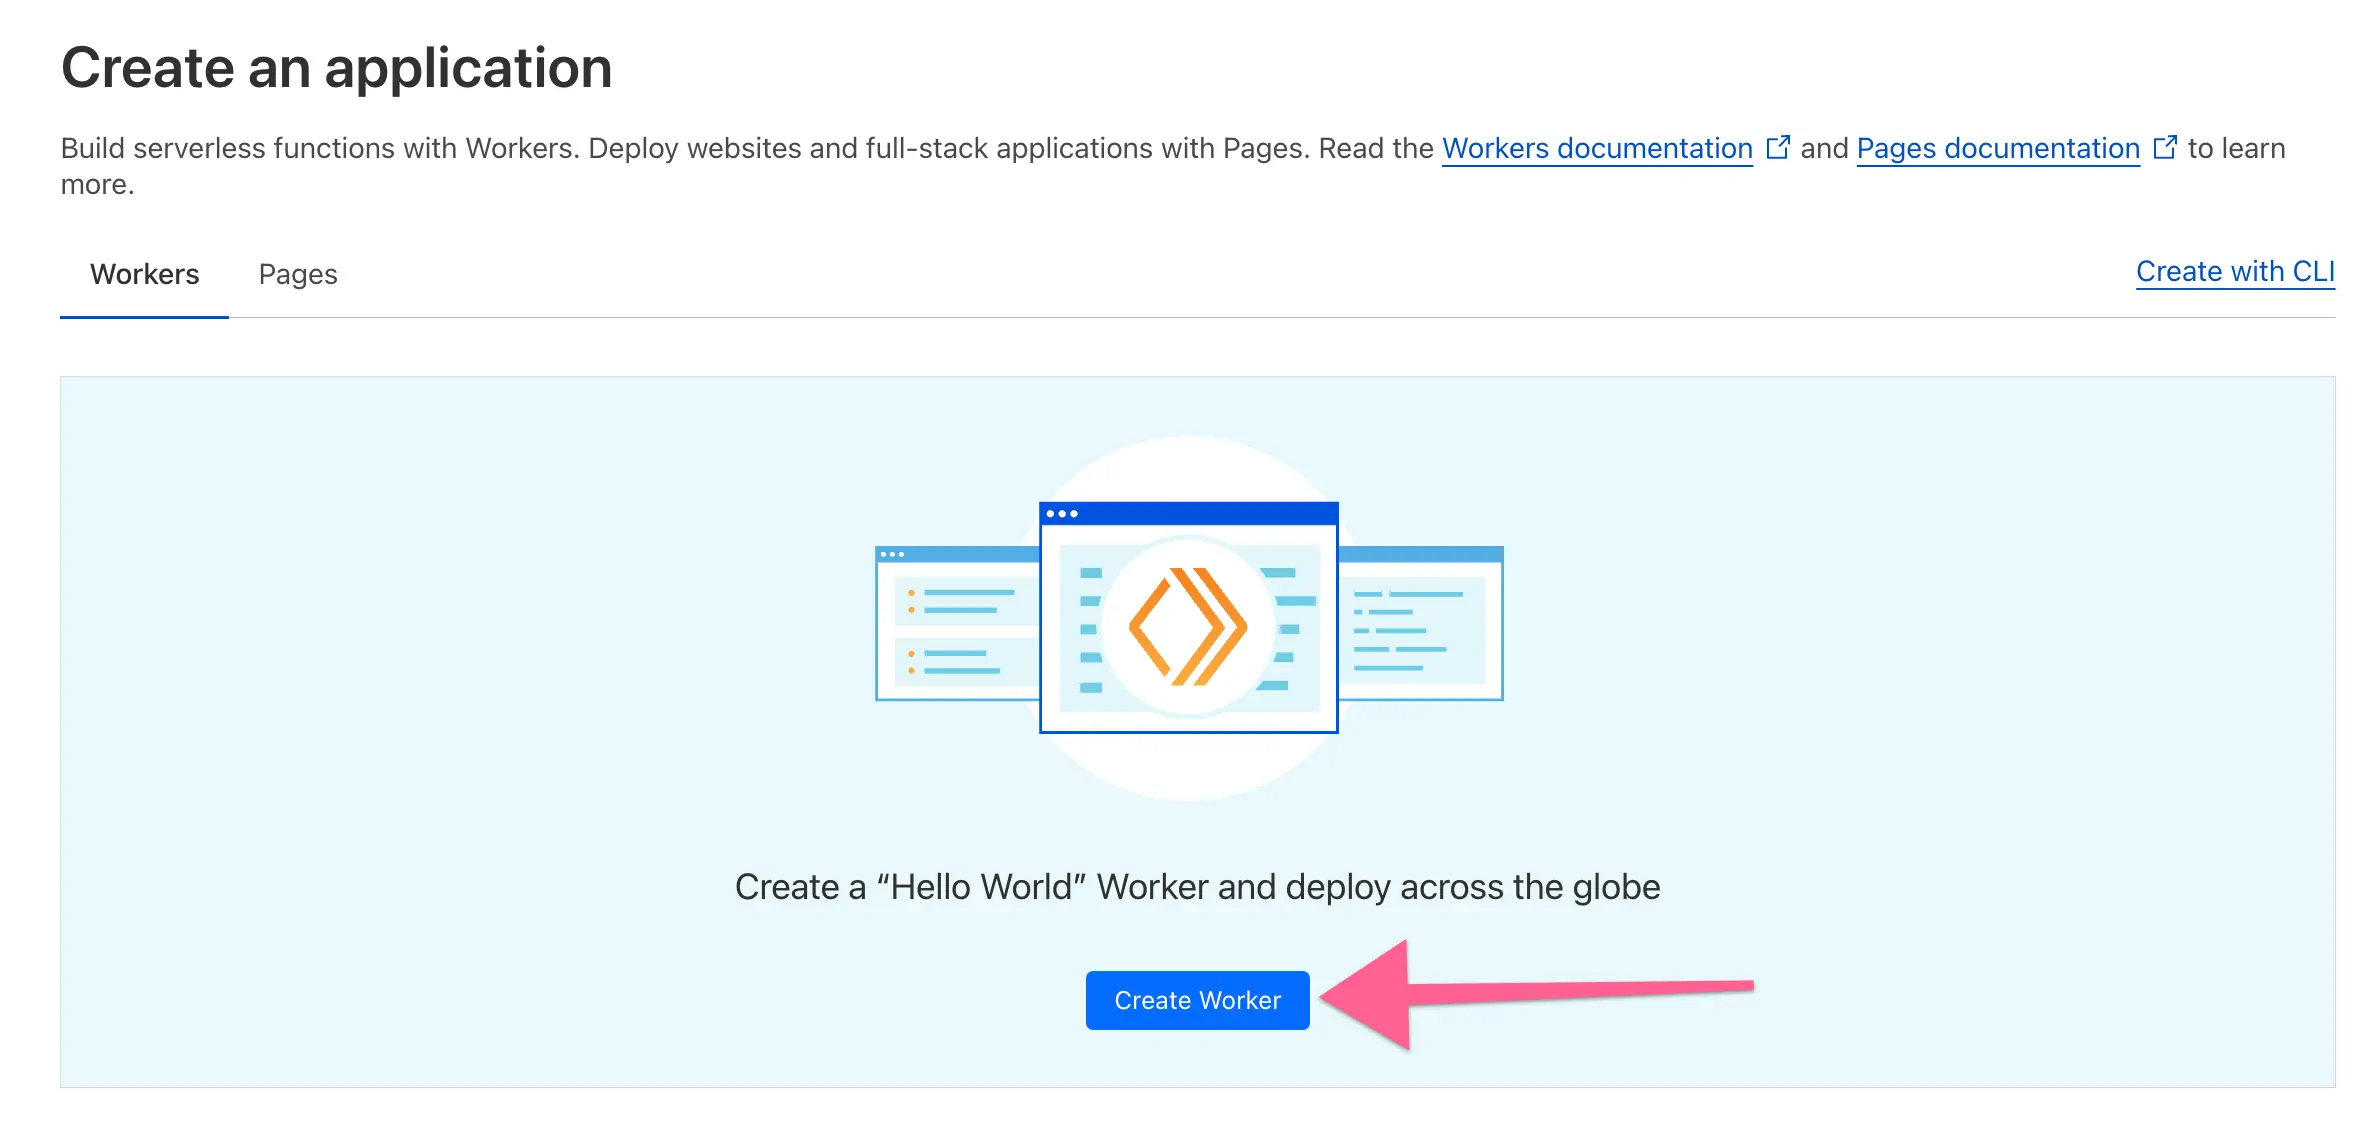
Create a Cloudflare Worker
Give it a name and Deploy.
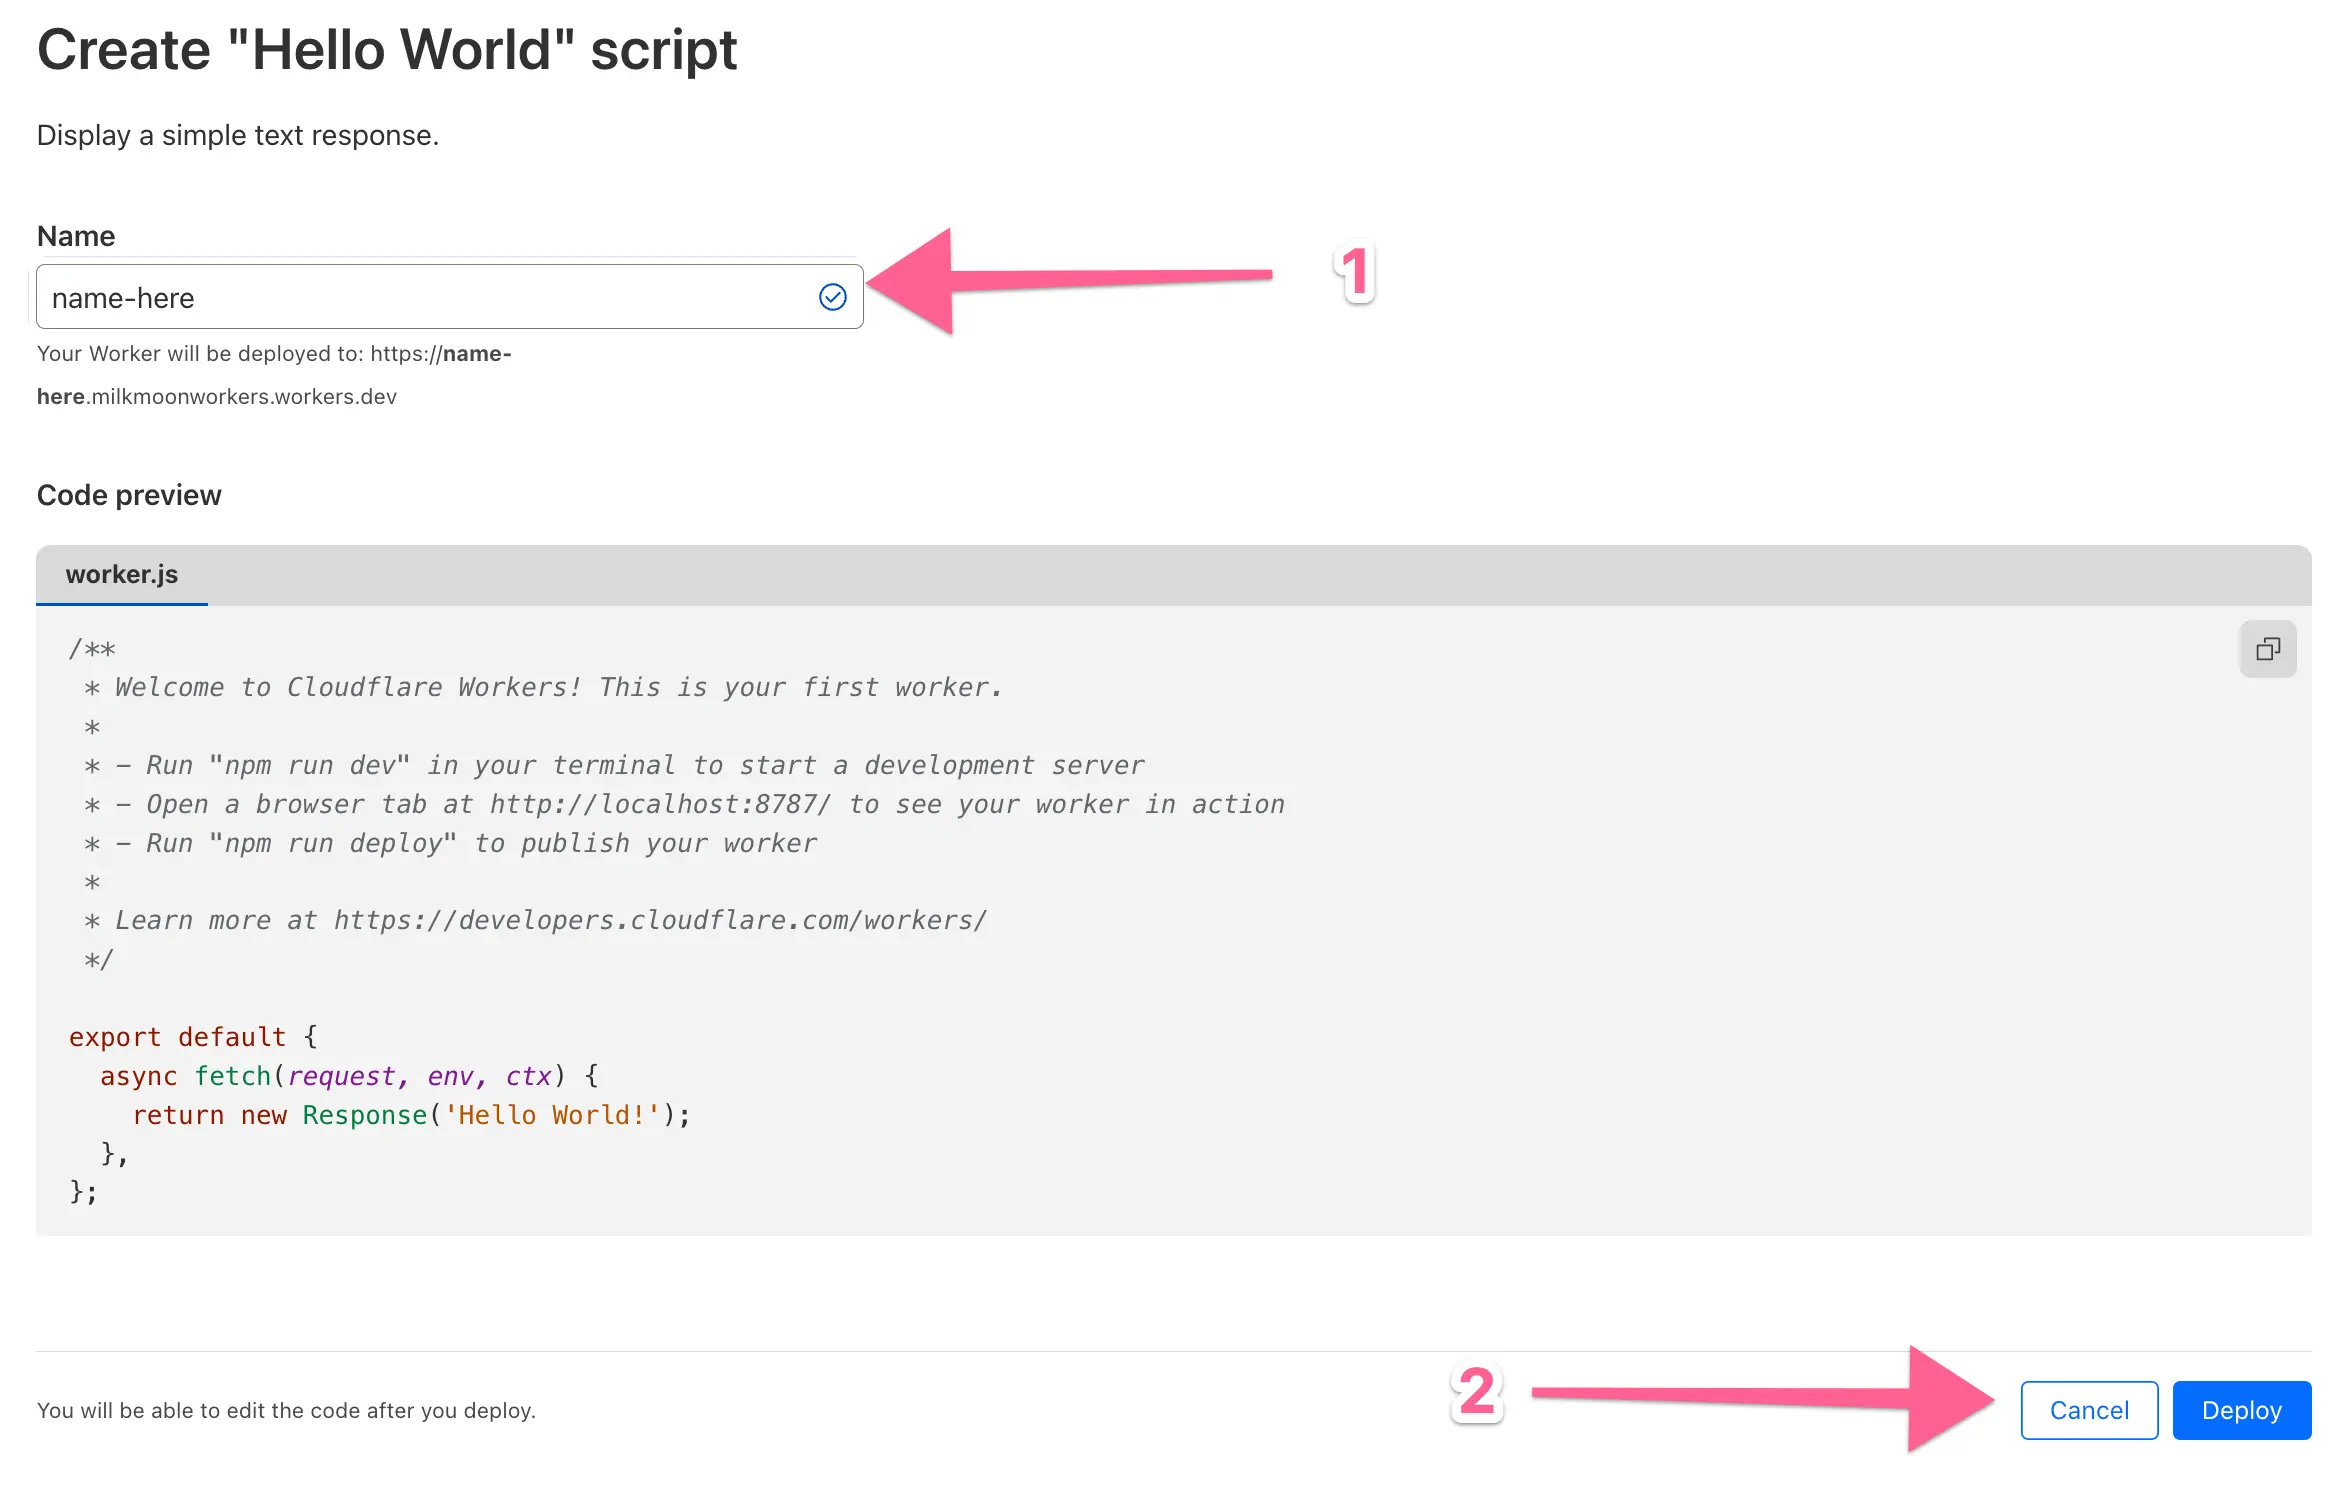
Name the Cloudflare Worker
Edit the code and remove what was in there and paste in your script, and then hit Save and Deploy.
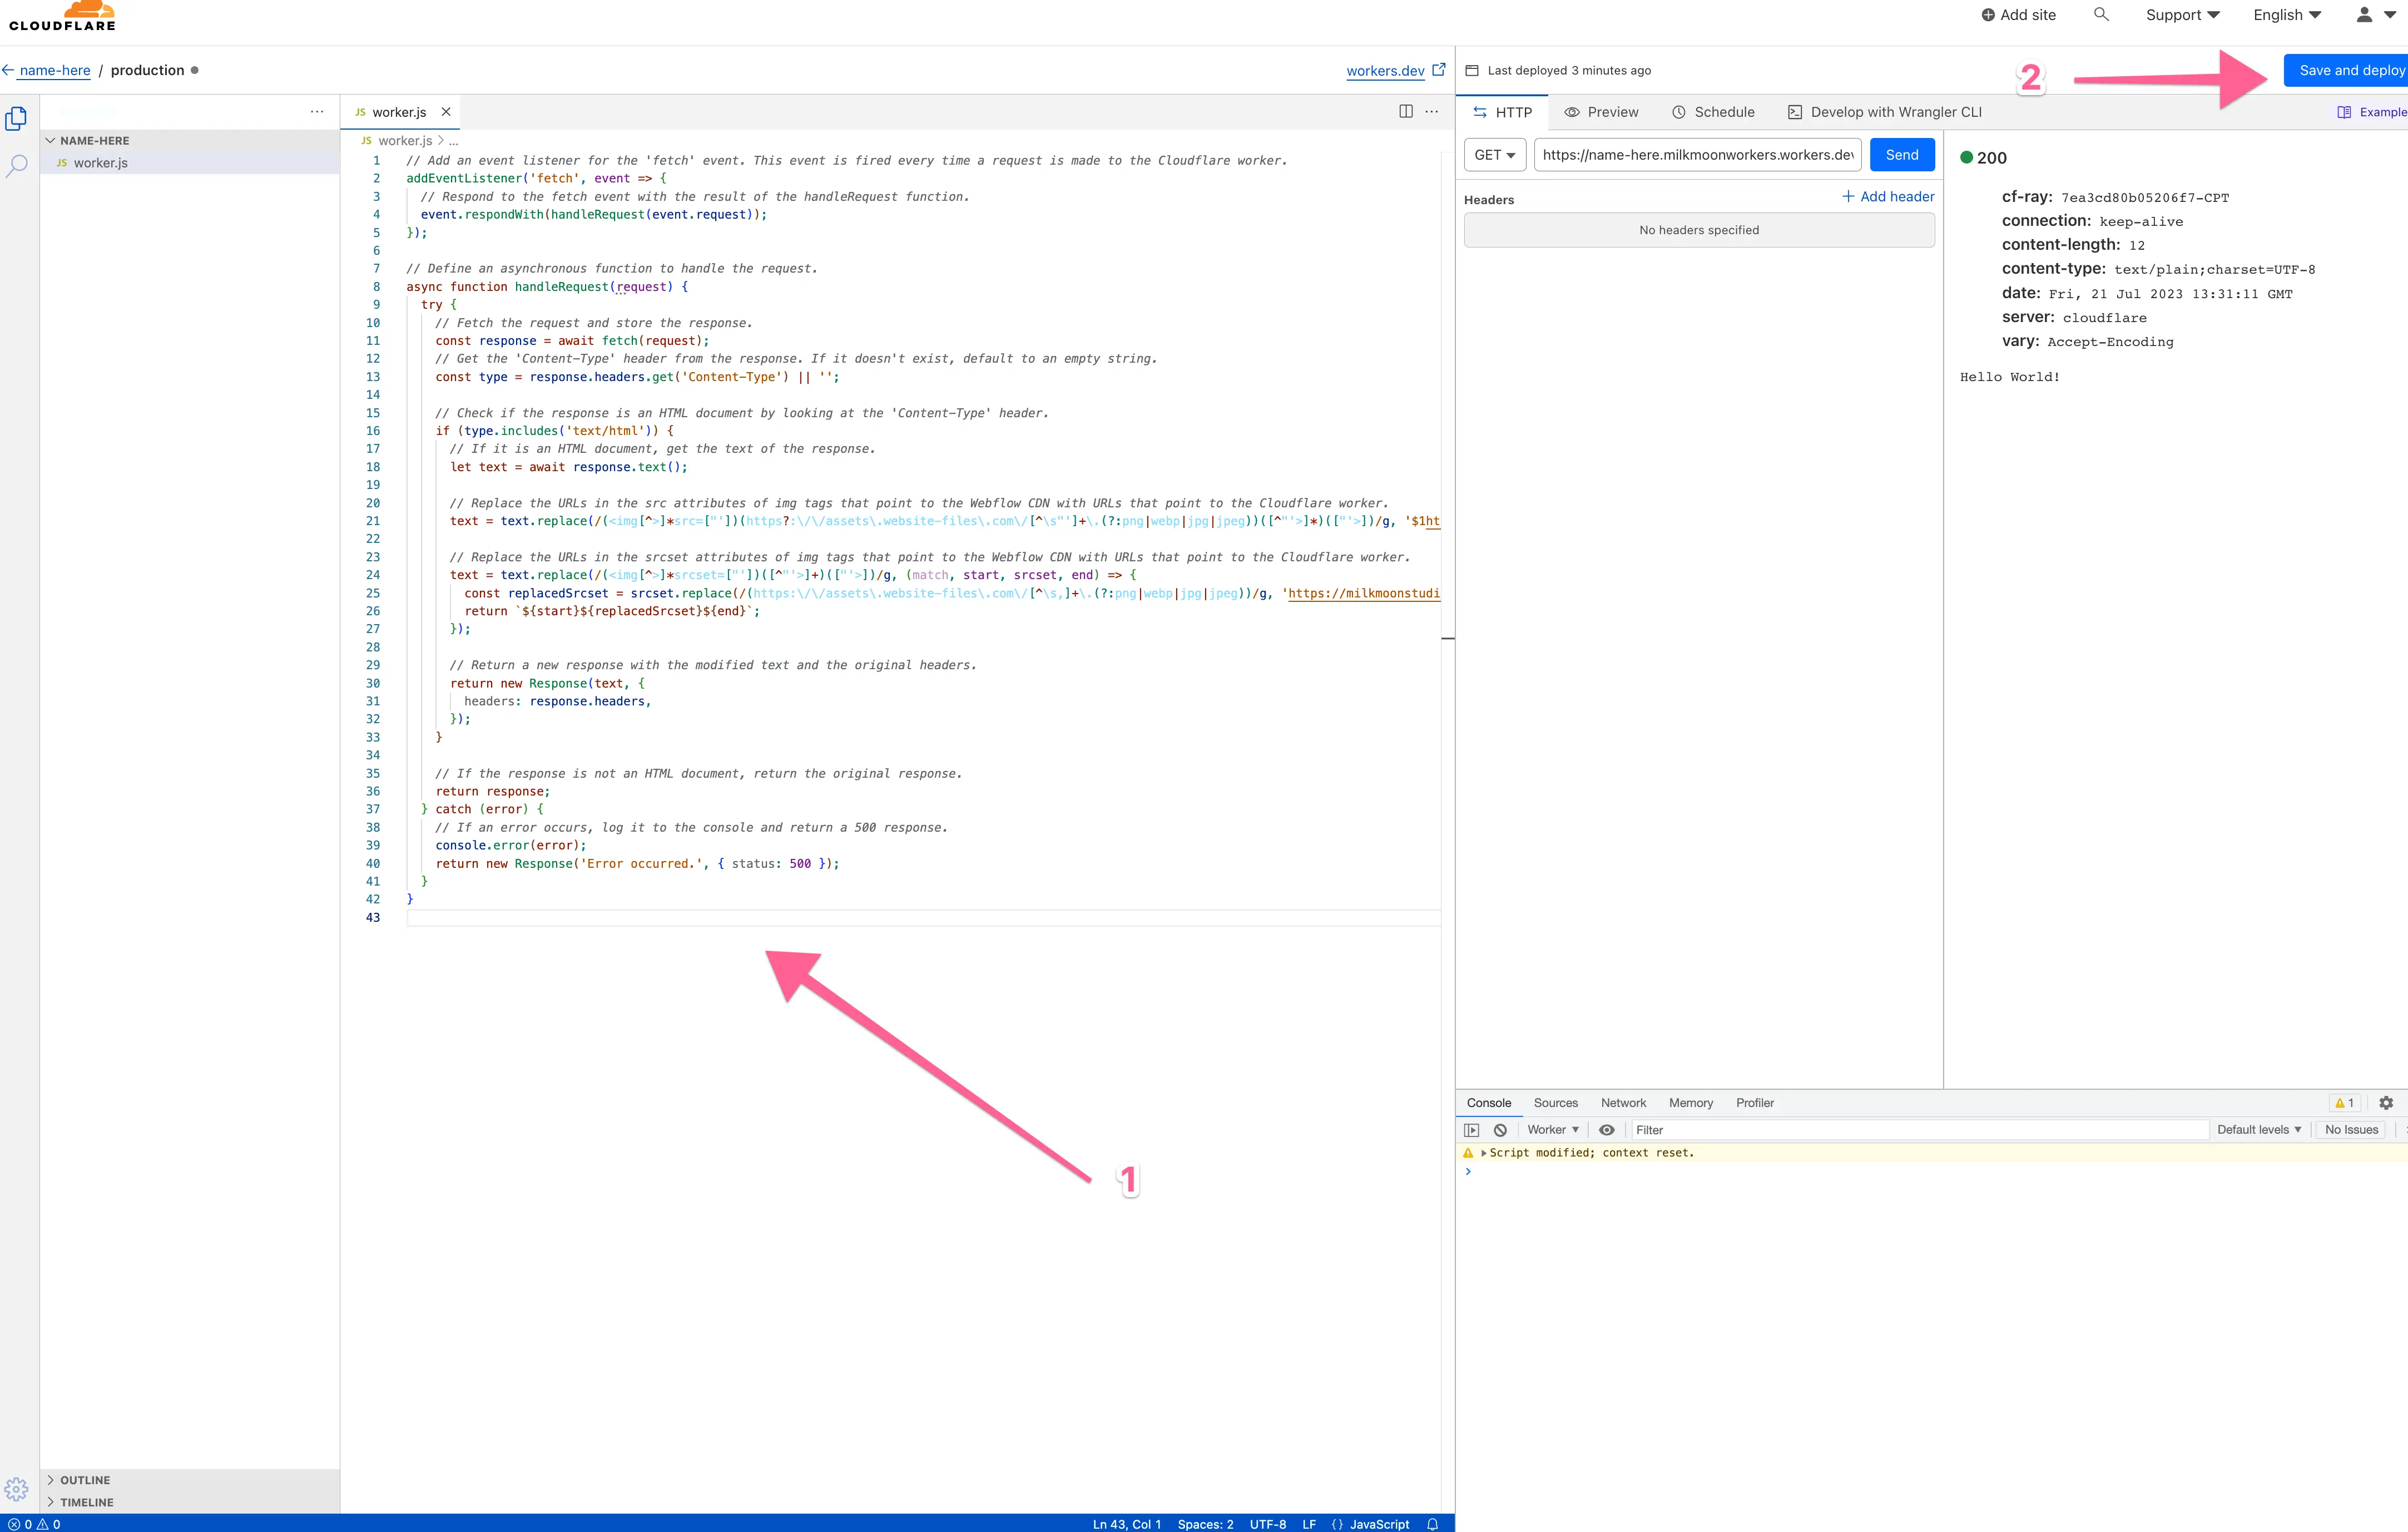
Add the script to the Worker
Finally, go back to your website settings page, select the Workers Routes tab and add a route. Select the worker and give it the route, I want it running everywhere, so it’s got wildcards: *.milkmoonstudio.com/*
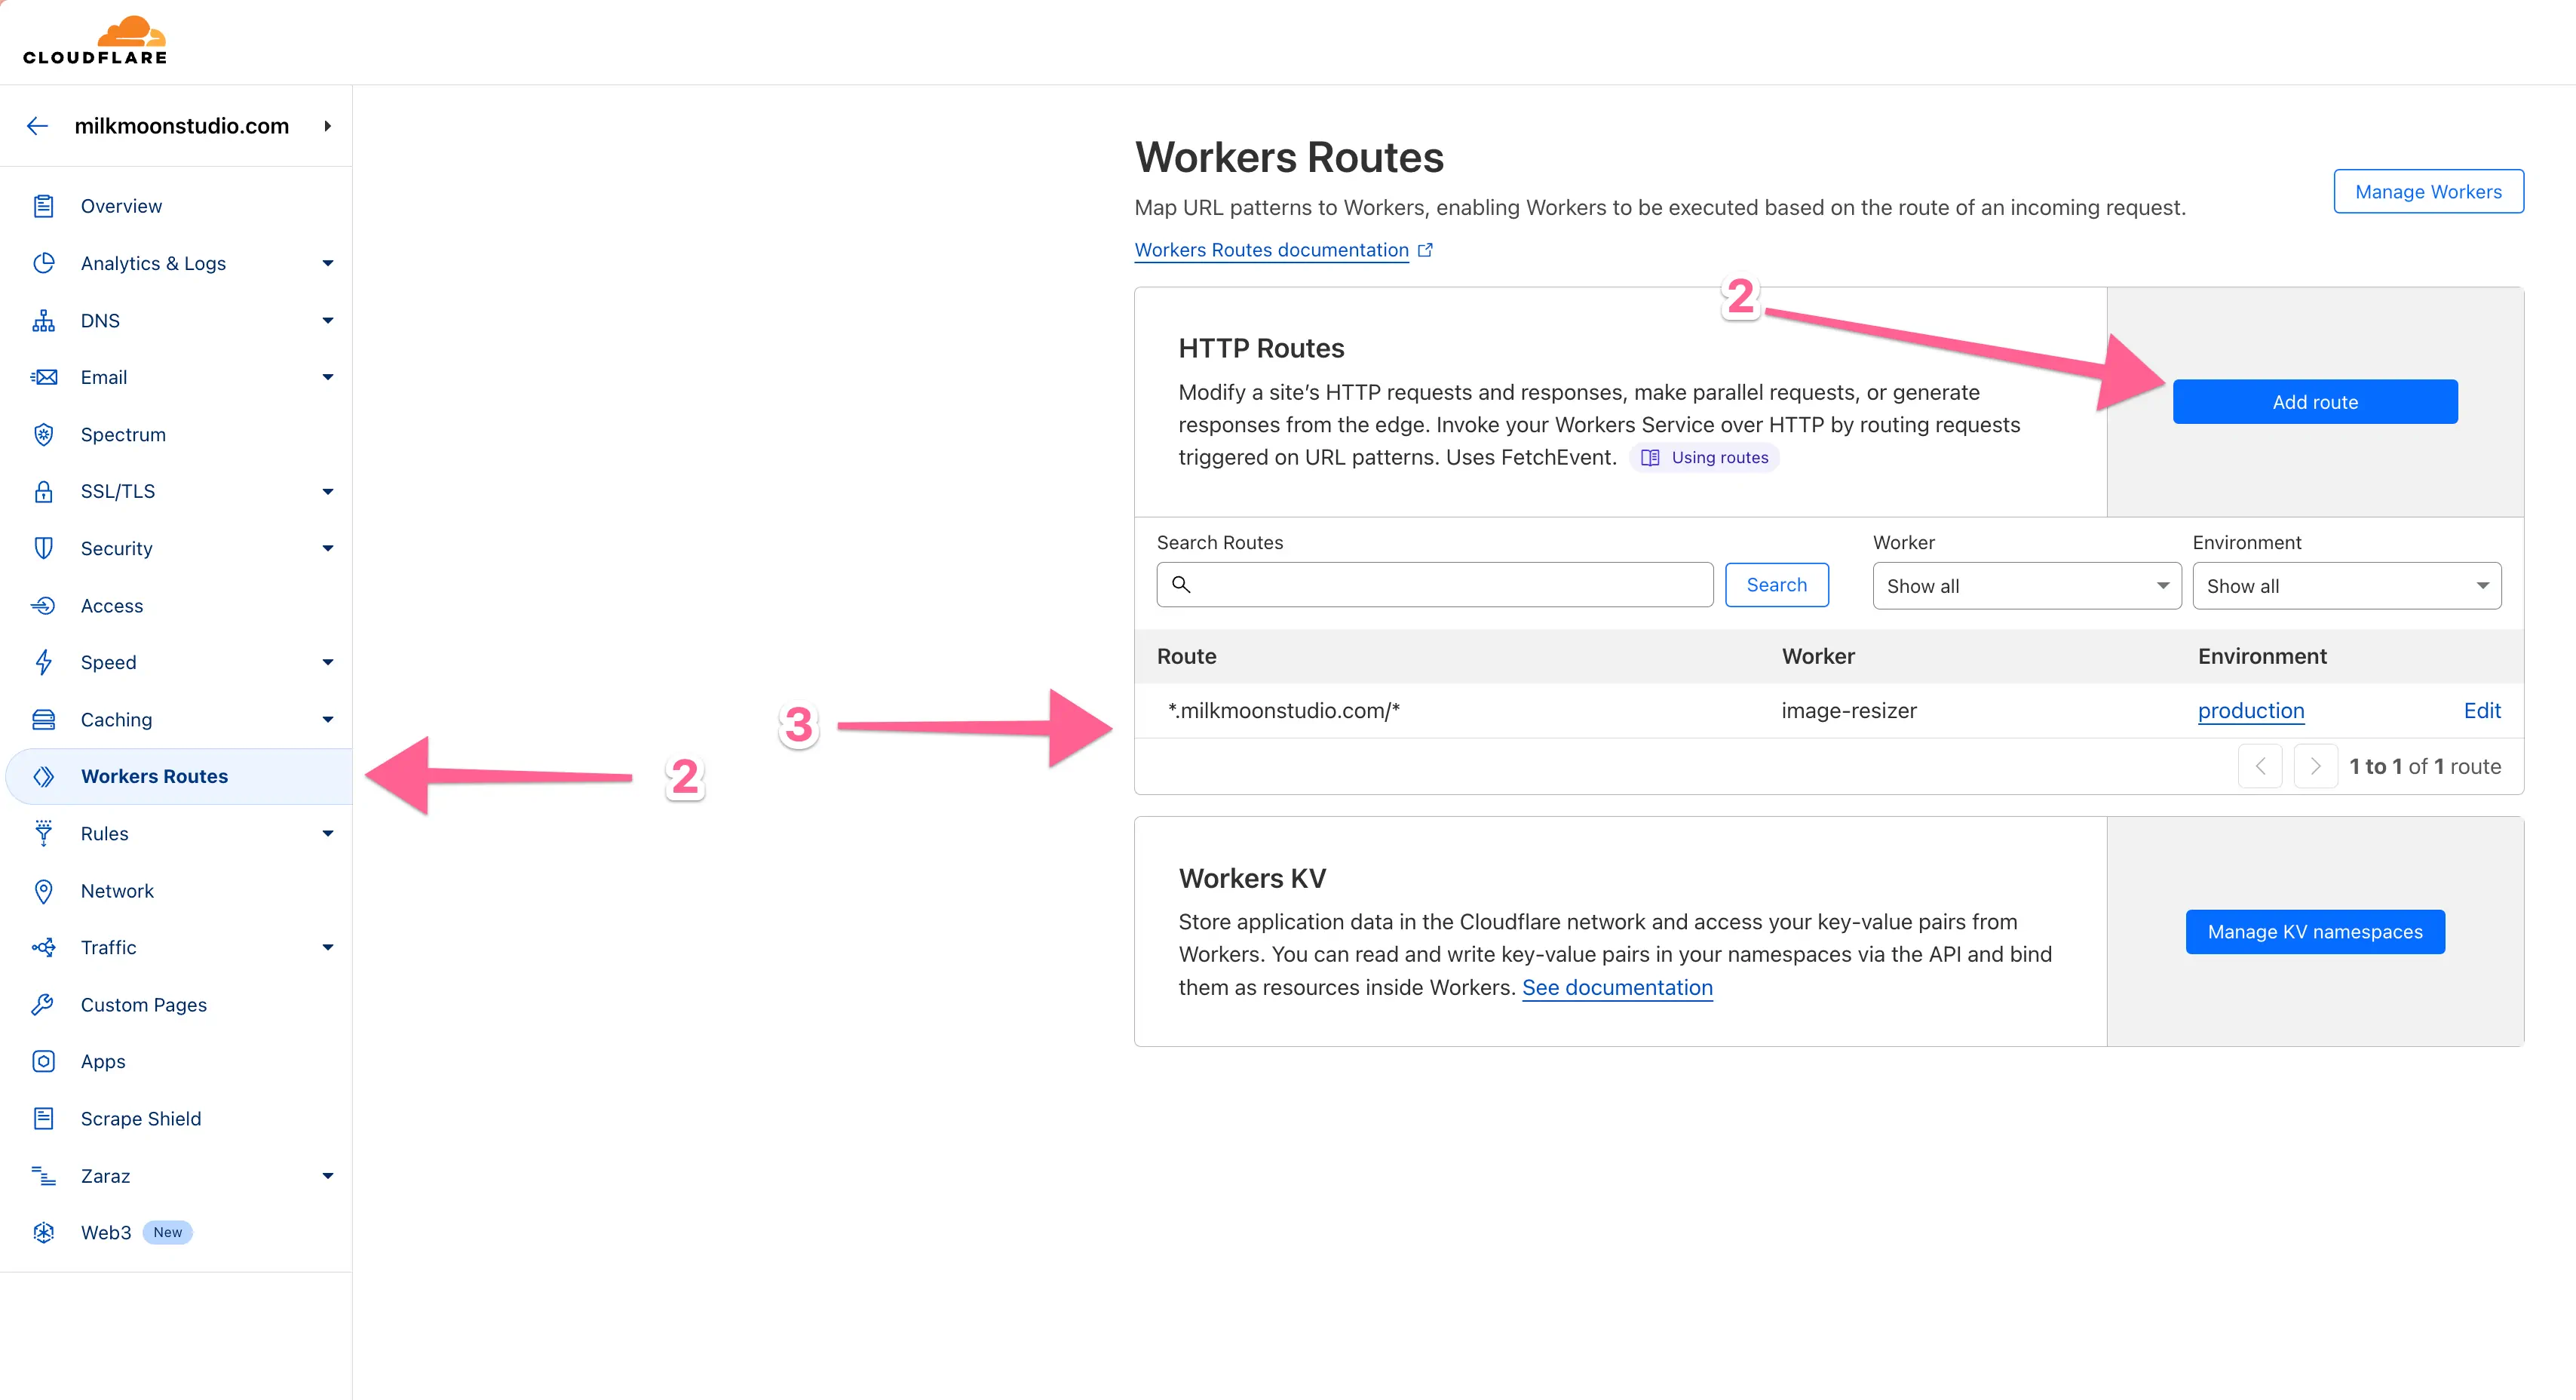
Add the Worker route
Now you’re done and can test the site to see if it’s working.
Change the Image Resizer Settings - Optional
If you look at the actual Image Resizer URL in the worker script we’re using to replace the Webflow Image in the page code we’re using fairly basic settings:
https://milkmoonstudio.com/cdn-cgi/image/f=auto,quality=90/
F is for format and we have Auto, so it’ll check the browser, device, connection etc and decide on a format. Avif is done on a best effort basis, otherwise WebP etc. if there’s support. There are also restrictions on Image Size and Dimension when it comes to conversion for Avif etc. You’ll also see we made the images lossy at 80% quality. There are many many more options that you can find here and add. Just remember when looking at the option you want to implement the URL format as you’re placing the given option in a url.
You can now use Page Rules to cache everything. More on that in our other Cloudflare post, so check it out if you need help.
Feel free to drop a comment below and check out our other Cloudflare related posts:
Speed Up Webflow with Cloudflare: Cache & Optimise
Boost Page Speed: Cloudflare Zaraz & Google Analytics
We’re planning on doing a video how-to so stay tuned.
The easiest way to test your setup is using the DrFlare Extension. Launch DrFlare from Dev Tools and refresh the page. You’ll see detailed stats and can hover hover images etc for on site analysis.