


Google Tag Manager holds all your tracking tags in one container, so Webflow loads a single snippet. Why we use it on every project, our setup and the pitfalls to dodge.
So, you’ve built your dream site in Webflow. Clean, sexy, fast. You go to plug in Google Analytics and Webflow hands you a nice little box in the settings panel that says “paste your tracking code here.” You do it. Done, right?
Wrong. Well, not wrong, but let’s just say there’s a much better way.
Let me introduce you to Google Tag Manager, a.k.a. your new best friend for Webflow analytics. It’s the unsung hero that keeps your tracking setup tidy, scalable, and way more future-proof than just pasting scripts into every nook and cranny of your site.
So what even is Google Tag Manager?
If GTM were a person, it’d be the ultra-organised mate who labels their spice rack alphabetically and has a folder structure so clean it makes Notion users cry tears of joy.
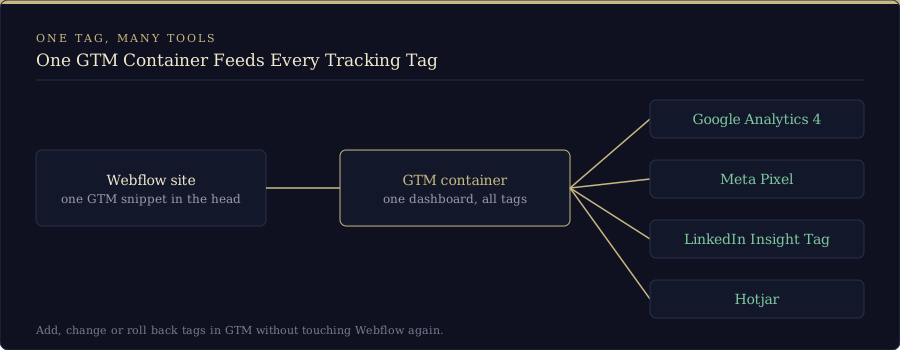
In more practical terms, Google Tag Manager (GTM) is a free tool that lets you manage all your tracking tags (Google Analytics, Meta Pixel, LinkedIn Insight Tag, Hotjar, you name it) from a single dashboard. Instead of sprinkling random code snippets all over your Webflow project, you drop one GTM container snippet into your site and control the rest from the GTM interface. Think of it like a mission control for all your analytics and marketing tools.
Why GTM > Webflow’s built-in code slots
Webflow’s custom code areas are fine in a pinch, but they’re a bit like duct tape. Quick, dirty, and eventually messy.
Cleanliness & scalability
With GTM, your Webflow site only loads one set of script tags (the GTM container) and GTM takes care of loading everything else. That means fewer scripts clogging up your codebase, and way less chance of breaking things when someone pastes something in the wrong spot.
Plus, when you need to update or add a tag? You don’t have to touch Webflow. Just pop into GTM, make the change, publish, and voilà, it’s live.
Speed & performance
You’d think adding a middleman like GTM would slow things down, but in our experience the opposite is often true. GTM loads scripts asynchronously, meaning they don’t block your page from rendering. You can even tell it to fire certain tags only when needed (like scroll or form submission), so you’re not loading everything all the time. Less bloat, faster pages, better Core Web Vitals. (Every tag you add still has a cost, so keep your container lean. We cover that in our post on delaying Tag Manager tags with delayed triggers.)
Versioning & debugging
Ever broken something live because you added the wrong tag? With GTM, you get built-in version control and a magical Preview mode that lets you test everything before hitting publish. See which tags fire, when they fire, what data gets passed… before your clients do.
If something goes wrong, just roll back to a previous version like a time-travelling analytics ninja. No code dives. No panic.
Marketers love it (no dev required)
Once GTM is installed on your Webflow site, marketers can handle the rest, no need to bug the dev team every time someone wants to run a Facebook ad or install a heatmap.
You can:
- Add Google Analytics 4
- Drop in Meta Pixel, LinkedIn Insight Tag, TikTok Pixel, you name it
- Track form submissions, CTA clicks, scroll depth, video views
- Fire tags only on specific URLs or page types
- Run A/B testing tools like Google Optimize (which Google shut down on 30 September 2023, so pick one of the others that aren't dead)
All from the GTM dashboard. No code. No republish.
Developers love it (less chaos, more coffee)
Look, we love Webflow, but once a project has 20+ pages and five different marketing tools shoved into the custom code panel, it gets messy. GTM keeps that mess out of your site entirely.
- No more hunting down rogue <script> tags
- No more worrying about tag firing order
- Cleaner codebase = fewer bugs
- Less back-and-forth with marketing = more time for dev work (or Mario Kart)
Advanced magic: data layer & event tracking
If you’re a power user (or just like playing one on the internet), the data layer in GTM is where things get spicy.
The data layer is a JavaScript object you can use to pass info from your Webflow site to GTM. Think user actions, product names, form data, etc. It lets you do enhanced eCommerce tracking, custom events, dynamic remarketing, and other sexy stuff that would otherwise require loads of spaghetti code.
We’ve used it to:
- Track form submissions more reliably (Webflow’s native form events can be a bit… fickle)
- Pass product info into Google Analytics for custom reports
- Track which pricing plan a user selects and build audiences off that
And once it’s set up, it’s all managed through GTM. No more cracking open Webflow to tweak tiny scripts.
Real-world setup: how we do it at Milk Moon Studio
Here’s what our typical GTM setup for a Webflow client looks like:
- Install GTM container code in the Webflow site’s <head> (via Site Settings > Custom Code), with the <noscript> part in the footer code box
- Remove any old GA/FB/LinkedIn code from Webflow’s settings
- Add GA4 and Meta Pixel tags in GTM
- Create triggers for:
- CTA button clicks
- Form submissions (via click or class selectors)
- Outbound link clicks
- Scroll depth
- PDF downloads
- Use GTM’s Preview mode to test everything
- Publish and let the magic happen
We’ve written up the click triggers step by step in our post on tracking button clicks in Google Analytics using Tag Manager.
Update, October 2026: Webflow now has a native Google tag field under Site Settings > Apps & Integrations. If you paste your Google tag ID into that field, remove the matching snippet from Custom Code so you don’t double count. Webflow explains the steps in its Google tag guide. The GTM container steps above still work.
This gives clients a central place to manage analytics and lets us make changes without touching their site. Everyone wins.
Common pitfalls (and how to dodge them)
A few gotchas we’ve seen when folks are new to GTM:
Duplicate tracking
Don’t forget to remove your old analytics code from Webflow when moving to GTM. Double tagging leads to double counting, which leads to very angry spreadsheets.
Firing order
Stick your GTM snippet in the <head>, not the footer. You want your tags to load as early as possible for consistency and accurate data.
Form submissions in Webflow
Webflow forms don’t always play nice with GTM’s default form submission trigger. Use a click trigger on the submit button instead (target by class or text). It’s more reliable. Here’s our walkthrough on creating a GA4 form submit event with Tag Manager.
Test on all devices
That thing that works perfectly on your MacBook might ghost you on iPhone Safari. Use GTM Preview Mode + browser/device testing to cover your bases.
Bonus round: advanced GTM goodies you can use with Webflow
Once you’re comfy with the basics, you can level up your tracking with:
- Cross-domain tracking (for sites with separate shop/booking domains)
- Custom dimensions & metrics (e.g. user type, lead source, content category)
- A/B testing integrations (like Google Optimize was super duper at)
- Server-side tagging (faster, more private, better with ad blockers)
Yeah, some of these are a bit more advanced, but GTM makes them way more doable than trying to hard-code everything directly into Webflow. One more thing to keep in mind is consent: when visitors decline cookies, a lot of your data goes missing. We dug into that in the cookie consent dilemma. And if your site already sits behind Cloudflare, Cloudflare Zaraz is an alternative to Tag Manager that we’ve tried too.
Google Tag Manager in Webflow: quick answers
How do I add Google Tag Manager to Webflow?
Paste your GTM container snippet into the head code box under Site Settings > Custom Code (and the noscript snippet into the footer box), then publish and check it with GTM’s Preview mode. Our step-by-step guide to installing Google Tag Manager on Webflow walks through every click.
Do I need Google Tag Manager if I only use Google Analytics?
No, a single Google Analytics tracking code is fine for a simple site. GTM starts paying off once you add a second or third tool, like a Meta Pixel, a heatmap or conversion tracking.
Does Google Tag Manager slow down my Webflow site?
It can, but it doesn’t have to. GTM loads asynchronously, so it doesn’t block your page from rendering, although every tag inside it still adds weight. Keep the container lean and fire tags only where they are needed.
What is the data layer in Google Tag Manager?
The data layer is a JavaScript object that passes information from your Webflow site to GTM, like form data, product names or which plan a visitor picks. You use it for custom events and enhanced eCommerce tracking.
There you go. That’s why we always recommend using Google Tag Manager with Webflow projects, whether it’s a small landing page or a big ol’ client site with conversion tracking, retargeting, and enough analytics requests to make your CPU sweat.
Set it up once. Keep your Webflow project clean. And enjoy the sweet, sweet control of having all your tags in one place.
Any questions? Drop ‘em in the comments or give us a shout. We’re always happy to help fellow Webflowers tidy up their tracking setups.
Happy tagging!
If you need some step by step help, use our hand guide to installing Google Tag Manager on Webflow.