In this post we'll try and improve page speed scores, increase some of those core web vitals in Search Console and give your users a better browsing experience while still maintaining great analytics and ad tracking Tags in Google Tag Manager without the burden on search rankings and the user's browser.
We'll be using a few tools in this post so I'm going to list them all for you so you can come grab the links when you need them. If you're a Webflow expert you're most likely using these every day, but going to need:
- Google PageSpeed Insights
- Google Lighthouse (No link for this one, open Chrome, then hit View, Developer and then Developer Tools, you'll need the Lighthouse Tab in Dev tools. Basically the same as PageSpeed, but there are other nice insights. More info here.
- Pingdom
- GTmetrix
- ThinkWithGoogle
- Experte.com Update Janis from experte.com read the post and reached out to us with a great free tool they have where you can crawl your whole site and run a bulk speed test on every page. Very nice indeed, and this will save you a ton of time if you've got a lot of pages to check. It will also allow you to check a specific list of URLs and click out the the official pagespeed results if you'd like to see recommendations and whatnot.
All these tools do pretty similar things, measuring your page speed, but it's good to compare results from different tools.
Before we start, disclaimer, you don't need this tutorial if you're not experiencing issues and you don't have a bunch of ad tracking tags etc. in Tag Manager like we do. We use this method a lot on our Webflow projects to delay Tags and improve the speed of Webflow site as you don't really have a lot of control in Webflow when it comes to adding code and when what fires to improve page speed. This is not to say you shouldn't use this method in any site that has a bunch of Tags firing on page views or that are just embedded in your code. So let's start by answering why you would need this when using Tag Manager and conversion tracking, remarketing tags etc from Ad networks like Facebook, Google Ads, LinkedIn, Twitter, Pinterest etc and other tools like heat maps from Hotjar or Microsoft Clarity etc. (As an aside, if you don't have it and want, scroll, heat and click maps; go ahead and install Microsoft Clarity. It's a great free heat map tool. We’ve created a how-to post on that here.)
On another note, if you are using code from platforms like Facebook, Google Ads etc in your site and you're not using Google Tag Manager, you should seriously consider ripping it out and using Tag Manager to implement the code. We're a small Webflow studio and as Webflow designers we always want things neat, tidy, and simple, and this is what Tag Manager is great at providing. You can get the basics on Installing Tag Manager, adding your Google Analytics through Tag Manager and setting up basic conversions in the linked posts. Tag Manager makes adding tracking codes etc. to your site super simple and easy to manage. We'll do some more how-to's on adding more ad tracking and conversions in later posts. If there's something specific you want us to cover, post in the comments.
So why are we doing this how-to and the steps below to speed things up? Okay, go ahead, open the links in the list, enter the pages you want to scan and run the speed tests. Try running in Incognito mode in Chrome so your plugins don't interfere with things like Lighthouse. If you've got a bunch of tracking codes you might see some warnings about LCP, FID, CLS etc. and suggestions of deferring some code to speed things up. Now once you've run these test, leave those tabs open, we're gonna come back and see if things have improved and if there's less moaning about deferring things and whatnot and whether your scores improved when we're done and we rerun the tests.
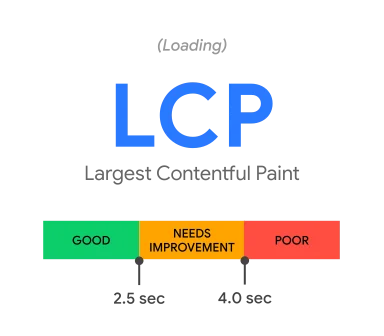
First up, what is LCP, well it stands for Largest Contentful Paint. Done. Crap, not really, I mean, what the hell is that. Basically, it's when you can see what's on your page, so when has stuff stopped loading and when is it visible in the viewport.
Typically you want this to be fast, well you want everything to be fast but why would tracking codes slow this down? It comes down to how these snippets of code load. You basically get two ways synchronously and asynchronously. In the first instance one thing loads after another and everything has to wait for the thing before it to load before it starts loading. So probably not great right. You don't want your header image and text to wait for some tracking script to load first just because it's sitting in the head of your page. This is where asynchronous comes in, here things load in parallel, so nothing is waiting for the thing before it, problem is that while things can now load when they want it does increase the bandwidth required as you're loading a bunch of things at the same time as well as increasing the load on the users's browser because it's rendering and doing a bunch of things at the same time.
So while Tag Manager is great, it's loading asynchronously, so the elements on your page and all the Tags you've added are loading at the same time and competing for resources which isn't so great. But how do we fix that without just ripping out all the Tags. We delay what's not essential to load immediately. And that's what we're going to be doing. Firing what's important immediately using the good old all All Pages trigger and the rest, the stuff that's important to you, but that you don't need right away a little later so that the other important stuff on the page can load first. We're gonna do this by adding a Trigger, some custom code in a Tag and another custom Trigger to fire the "not so important to load first" Tags.
So let's dig in and get started:
Step 1 - Decide what's most important and what's not.
This is probably the head scratcher, what we usually do is take a gander at Tag Manager and see what we have in there and what really needs to load first and what we can 'delay'. We tend to still load our Google Analytics 4 tags first on an normal All Pages trigger, stuff like Facebook Tags, Google Ads Remarketing Tags etc, are important, but an extra second or two won't really break the bank that if you have a whole bunch of those that it's usually the things that these tools, especially Google PageSpeed Insights and Lighthouse moan about.
Step 2 - Creating your Full Loaded Tag
Now we're going to create a custom code Tag and Trigger that will create an event which will give the page time to load before we fire those Tags we decided could wait a bit in Step 1.
Open up Tag Manager, go to Tags and hit new.

Give the Tag a name, choose Custom HTML as the Tag Type and paste the following code in:
<iframe height="300" style="width: 100%;" scrolling="no" title="Google Delayed Triggers - Create Event - AfterLoad" src="https://codepen.io/milkmoonstudio/embed/GRBPvrP?default-tab=js&theme-id=light" frameborder="no" loading="lazy" allowtransparency="true" allowfullscreen="true">
See the Pen <a href="https://codepen.io/milkmoonstudio/pen/GRBPvrP">
Google Delayed Triggers - Create Event - AfterLoad</a> by Jakes van Eeden (<a href="https://codepen.io/milkmoonstudio">@milkmoonstudio</a>)
on <a href="https://codepen.io">CodePen</a>.
</iframe>
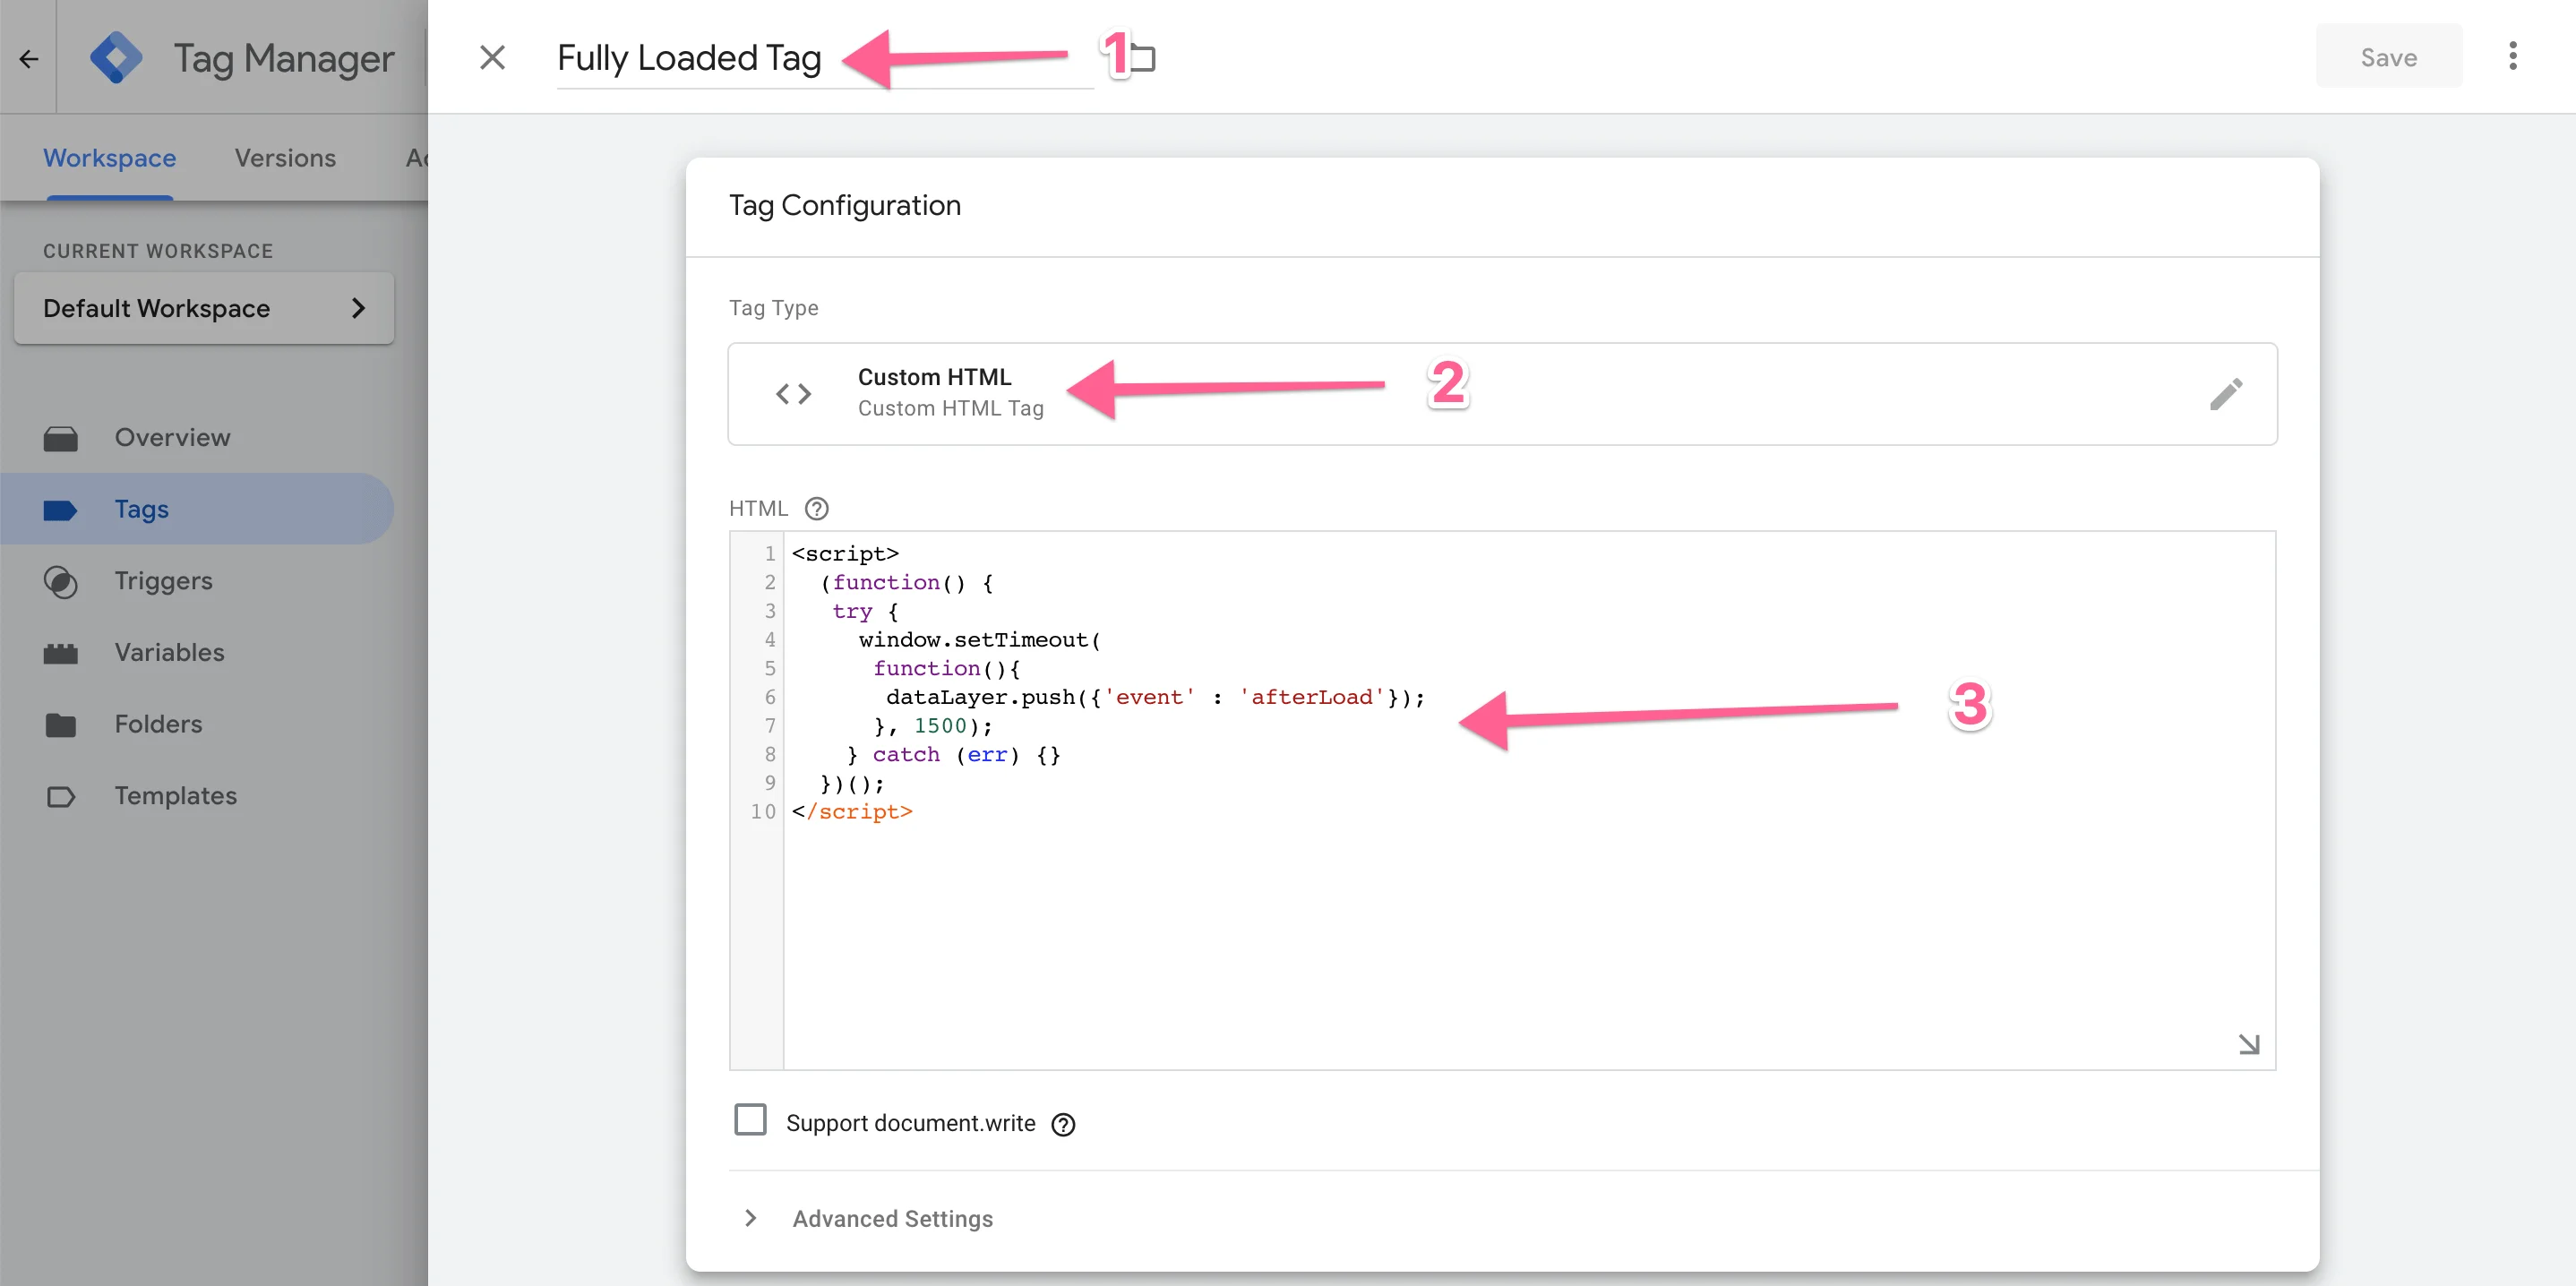
When you fire this Tag the custom code you just pasted in will run and create a event in the page's dataLayer, which will wait for 1.5 seconds. You can make this more if you want, but 1.5 should be fine and this tag will only trigger once the Window Loaded trigger event fires.
Now select the Trigger. You want to create a new Tigger here instead of just using the usual All Pages Trigger, we're trying the give the page time to load first, so select Page View - Window Loaded. Then give your Tag and name and save everything.

Now you'll have a Tag that will create a dataLayer event when fired and will only trigger on the Window Loaded event.
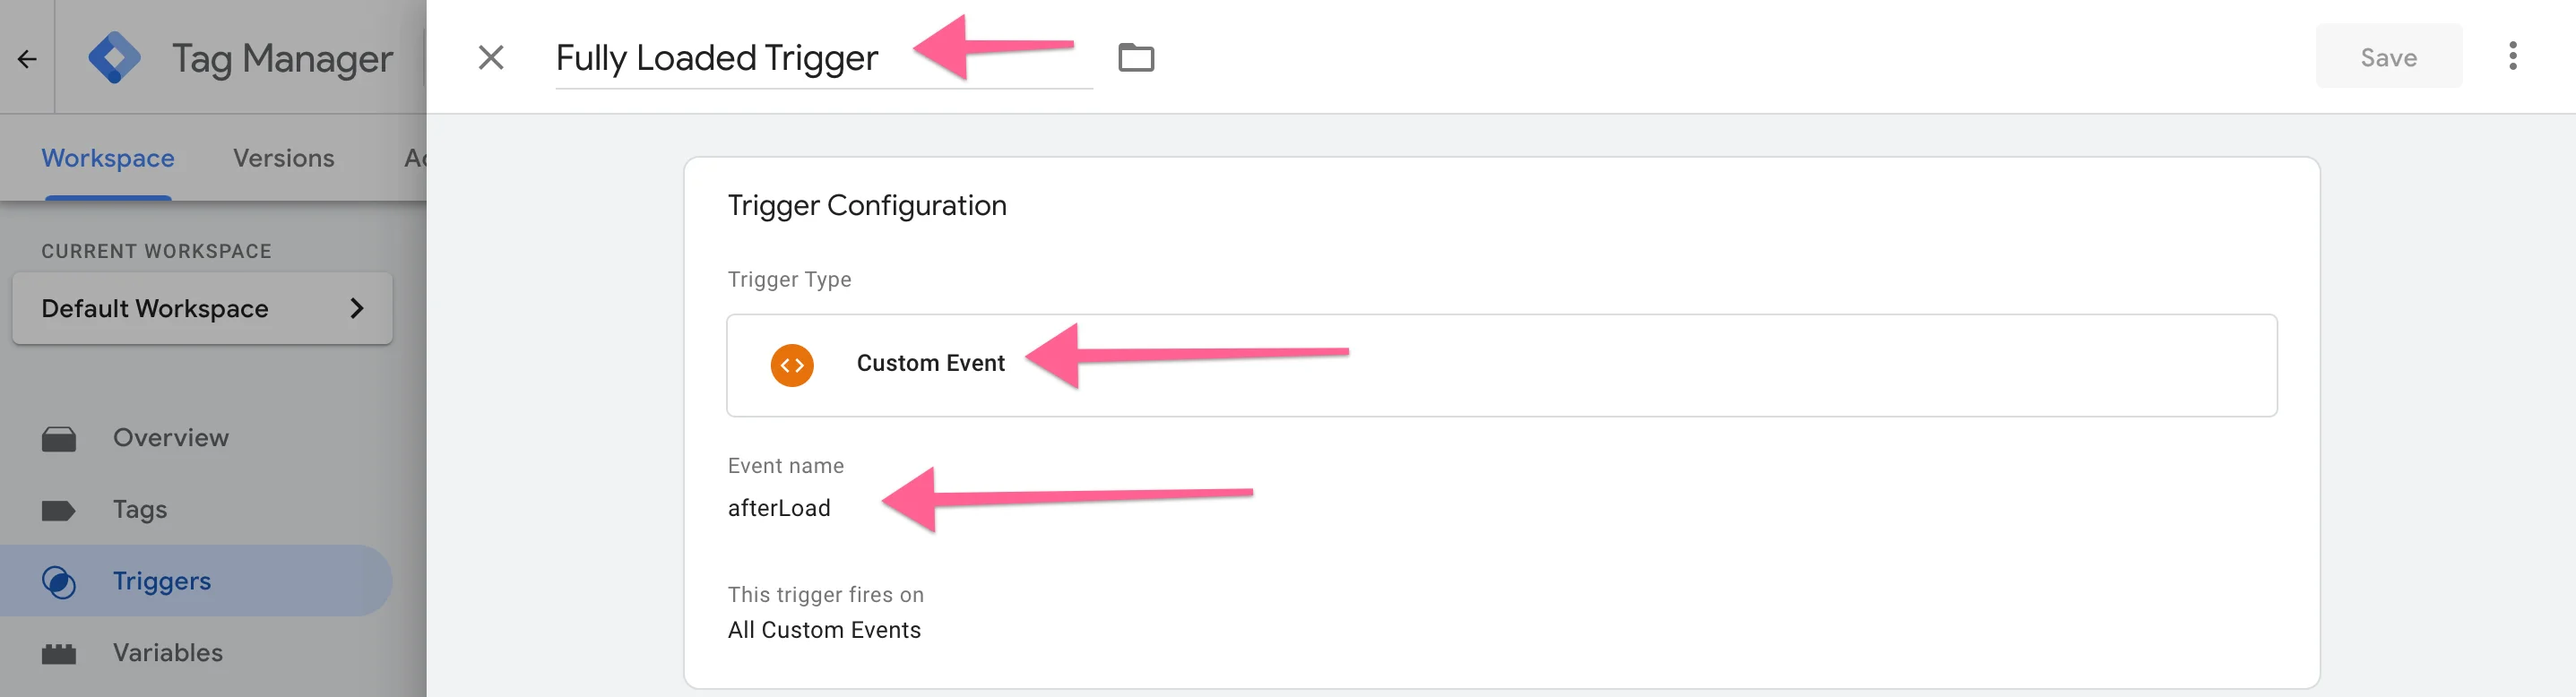
Step 3 - Create the custom event Trigger that you'll use on all Tags you want to delay.
Head to Trigger and hit new.

Give the Trigger a name, select Custom Event as the Trigger type and afterLoad as the Event Name. afterLoad is case-sensitive. Save and you're done.
Now you can use this Custom Event trigger as the selected trigger for all the Tags that need to be delayed a bit.
But what's happening, let's recap.
Unlike the most All Pages triggers the Tag you created in the beginning is now waiting for the Window Loaded trigger to fire, once that happens it's waiting 1.5 seconds before it pushes an event to the dataLayer called afterLoad. When this happens your Fully Loaded Trigger will fire and trigger all the Tags that you added it to. This gives everything else time to load and holds back a lot of the scrips Google PageSpeed usually moans about. So apart from helping to improve your scores it also provides a better user experience and allows for less penalisation from tools that monitor this kind of thing.
You don't have to follow the route we take by letting our GA Tag fire on All Pages, this can be delayed to, it just depends on how accurate you want what analytics to be, it's all up to you. For that matter, fire any Tag you don't need immediately using the custom event if you're happy with the delay
Last bit, publish the container, check that everything's working fine by previewing the site in Tag Manager to make sure everything still fires and then head over to the Tabs you left open when you ran the test. Run the tests again, there should now be a tiny improvement depending on how many Tags you delayed, but don't just do this because you want a better score, it's also good for your user experience and remember www.experte.com for bulk testing.
Have any questions or comments about how to improve page speed, hit us up in the comments, and remember when you run the tests, especially in Lighthouse, run both Mobile and Desktop more than once to just to check if there's a difference.
Remember to check out the How-To section of our blog for more tutorials. We've also recently done a post on increasing site speed by using Webflow with Cloudflare to cache and speed up your Webflow Project, so check that out.