


Changed your DNS and the site still isn't live? Here's how to flush your DNS cache, purge the big resolvers and speed up DNS resolution for Webflow or any site.
I’m gonna preface this by saying it’s not guaranteed to make a difference and it can depend both on your DNS provider and your ISP (i.e. where is your router pulling its DNS settings from).
So, today we’re talking about getting your Webflow site live ASAP, or, well, DNS propagation, which means it really has nothing to do with Webflow and this applies to all websites, DNS settings and how the internet works behind the scenes. But more on that later if you’re interested.
Like I said above, I’ve typed this out a bunch of times on the forum, and as the owner of a small Webflow studio, for clients making their own DNS changes. So, long overdue, but here it is on the blog to copy and paste. Today, we’re looking at the magical world of DNS flushing, or the less popular term, purging.
We’ll start with the best DNS provider to use, how to flush a few of the bigger DNS ‘networks’ in one go and finally your local DNS.
Whether you’re on macOS, Windows, or Linux, I’ll walk you through the process of flushing that DNS cache.
So, before we get into helping speed things along, let’s start with the best DNS provider to help avoid the need to speed things along. Now, we use Cloudflare. Why? Well, they’re the biggest and the fastest. Making a change on Cloudflare resolves through their huge data centres and massive edge network almost instantly. Also, you can do almost all the basics for free and as far as I can remember, if you buy a domain through them they don’t mark anything up, it’s cost price, including renewals. So, if there’s one thing to recommend, just switch to Cloudflare.
If you do make the move, we’ve got a post on using Webflow with Cloudflare to cache and speed up your project, and a newer one, our 2026 guide to the Cloudflare asset proxy and image optimisation for Webflow, so check those out.
Cloudflare and friends
For everyone else, here’s a pro tip: wait a few minutes after making changes, then purge/flush the DNS cache on all the big guys, starting with Cloudflare. This will prompt them to purge their records and check for fresh ones, and then they percolate down to everyone else:
- Cloudflare: Purge Cache
- Google: Purge Cache
- OpenDNS: Cache Check (Scroll to the bottom after the check to purge)
Always start by purging your domain first (A records), then move on to your CNAME, www, etc.
Finally, remember to clear your local DNS cache. This is usually the culprit if you or your clients aren’t seeing updates right away.
Now, before we get into clearing your local cache, we’re gonna go back to Cloudflare. They have DNS servers for regular users, families (so porn block I think) and malware ones. But aside from all that, their DNS servers are fast, both in terms of the updates we just spoke about above and in terms of response time (ping / latency), so instead of relying on what your router is pulling its DNS queries from (probably your slow ass ISP), change them to Cloudflare on your local machine. They are:
1.1.1.1
1.0.0.1
Those are their regular DNS servers, but just stick that into your network settings, and then you don’t have the roadblock of your router sending you to your ISP’s DNS servers that could be lagging behind and that you can’t flush.
Now, if you’ve done all of the above and the site isn’t live, it could just be the local cache on your machine, so follow along below to clear that:
Flushing DNS cache on macOS
- Open Terminal: You can find it in Applications > Utilities or just search for "Terminal" in Spotlight.
- Enter the Command: Type the following command and hit Enter:
sudo dscacheutil -flushcache; sudo killall -HUP mDNSResponder - Enter Your Password: You might need to enter your admin password. Voilà! Your DNS cache is now flushed.
Flushing DNS cache on Windows
- Open Command Prompt with Admin Privileges:
- Press Win + X and select "Terminal (Admin)" on Windows 11, or "Command Prompt (Admin)" or "Windows PowerShell (Admin)" on Windows 10.
- Alternatively, search for "cmd" or "Command Prompt" in the Start menu, right-click, and select "Run as administrator".
- Enter the Command: Type the following command and press Enter:
ipconfig /flushdns - Success Message: You should see a message confirming that the DNS Resolver Cache has been successfully flushed.
Flushing DNS cache on Linux
- Open Terminal: Usually, you can find it by searching "Terminal" or pressing Ctrl + Alt + T.
- Enter the Appropriate Command:
- For systems using systemd-resolved:If you would rather not restart the service,
sudo systemctl restart systemd-resolvedsudo resolvectl flush-cachesempties just its cache. - For systems using
dnsmasq:sudo systemctl restart dnsmasq - For systems using
nscd:sudo systemctl restart nscd - If none of these apply, you can always restart your network service:
sudo systemctl restart NetworkManager
- For systems using systemd-resolved:
And there you have it! With these steps, you should be able to flush your DNS cache like a seasoned IT pro. Whether you’re making changes to your website or just troubleshooting some weird connectivity issues, this guide will help you get things back on track.
Happy browsing, and may your caches always be fresh! Now, for those who don’t really know what all this is, there’s more…
Understanding DNS: what it is, how it works, and what DNS resolution means
What is DNS?
DNS, or Domain Name System, is essentially the phonebook of the internet. Humans access information online through domain names like milkmoonstudio.com or webflow.com. Web browsers interact through Internet Protocol (IP) addresses. DNS translates domain names to IP addresses so browsers can load Internet resources.
How does DNS work?
- DNS Query: The process starts when a user types a URL into their web browser. The browser needs to find the IP address associated with that domain name to display the website.
- DNS Recursor: The request goes to a DNS resolver, often provided by your Internet Service Provider (ISP) or a third-party DNS provider like Cloudflare DNS, Google DNS or OpenDNS. This resolver acts like a middleman between the user and the DNS system.
- Root Nameservers: The resolver queries one of the root nameservers. The root nameserver responds with the address of a TLD (Top-Level Domain) nameserver (like .com, .org, etc.) that stores information for domains with that specific TLD.
- TLD Nameservers: The resolver then queries the TLD nameserver, which provides the address of the authoritative nameserver for the specific domain.
- Authoritative Nameservers: The authoritative nameserver holds the actual DNS records for the domain. It responds with the IP address associated with the domain name.
- Returning the IP Address: The resolver sends the IP address back to the browser, which can now use it to retrieve the website’s data and display the site to the user.
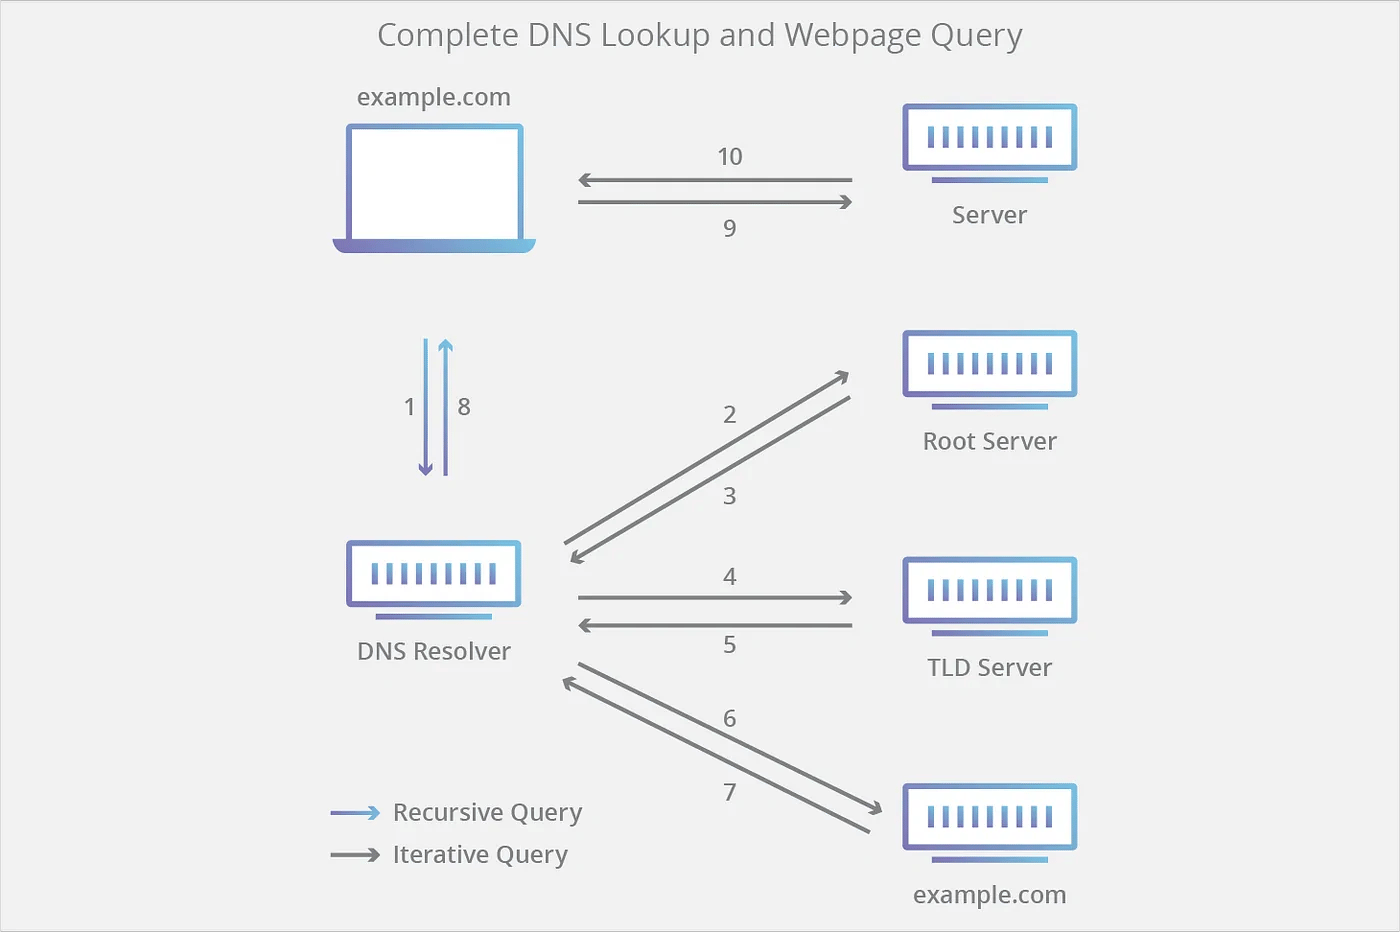
DNS resolution and making changes
DNS resolution is the process of translating a domain name into an IP address. When you make changes to your DNS settings, such as updating an A record or changing a CNAME, it affects how and where the DNS resolution process directs traffic.
Here’s what happens when you make changes to your DNS:
- Update Records: You log into your DNS provider’s dashboard (like Cloudflare, GoDaddy, etc.) and update your DNS records. This might include adding a new A record, updating an existing CNAME, or modifying MX records for email.
- Propagation: DNS changes are not instant. They must propagate across the internet, which can take anywhere from a few minutes to 48 hours. Propagation is the process where the updated information is distributed to all the DNS servers around the world.
- Cache Invalidation: Devices and DNS resolvers often cache DNS information to speed up subsequent requests. When you make a DNS change, the old information may still be cached. Clearing the DNS cache (flushing DNS) on both local devices and DNS servers can help ensure the updated records are used.
- Resolving with Updated Records: Once the new records have propagated and caches are cleared, DNS resolution processes will begin using the updated information. This means that when someone types your domain into their browser, the DNS resolver will direct them to the new IP address or updated resource.
And that’s about that in terms of background, so now, if you’re a Webflow designer or developer you can pretty much copy and paste this and just send it to a client when they struggle with long wait times for their DNS changes.
DNS is only one piece of a fast Webflow site. For the rest, have a read of our post on how page speed drives business success and our one on improving Google page speed with delayed Tag Manager triggers. Stuck on something else? Pop us an email.
Frequently asked questions
How do I clear the DNS cache?
Purge your domain on the big public resolvers (Cloudflare, Google and OpenDNS), then flush the DNS cache on your own machine. The steps for macOS, Windows and Linux are in the sections above, and the local flush is usually the one that finally makes a change show up.
How long does DNS propagation take?
Anywhere from a few minutes to 48 hours. Propagation is the updated record spreading to DNS servers around the world, and flushing the caches you control helps you see the change sooner.
Why is my Webflow site not live after changing DNS?
Most likely an old record is still cached somewhere, in your DNS provider, in your ISP’s resolver or on your own computer. Wait a few minutes, purge the big resolvers, then flush your local DNS cache.
What is the best DNS provider for fast DNS changes?
We use Cloudflare. Changes there resolve almost instantly through their edge network, and their 1.1.1.1 resolver is quick to respond too.