

Learn how to control a Webflow slider from link blocks anywhere on your page. A short jQuery script clicks the native slider dots, so your custom controls jump to any slide.
Hey, Webflow designers. Today, we're venturing into the juicy world of jQuery and custom slider controls. Yes, we’re about to make those static dots under your Webflow slider dance to your tune. We recently had a project where we needed to control the Webflow slider using linkblocks outside the Webflow slider element. (Long story short, we have an overlay nav element with a bunch of linkblocks that needed to take you to specific slides when you clicked on them). Below’s a short video showing our custom controls:
<div style="padding:81.1% 0 0 0;position:relative;"><iframe src="https://player.vimeo.com/video/873388654?badge=0&autopause=0&quality_selector=1&progress_bar=1&player_id=0&app_id=58479" frameborder="0" allow="autoplay; fullscreen; picture-in-picture" style="position:absolute;top:0;left:0;width:100%;height:100%;" title="Custom Slider Controls in Webflow"></iframe></div><script src="https://player.vimeo.com/api/player.js"></script>
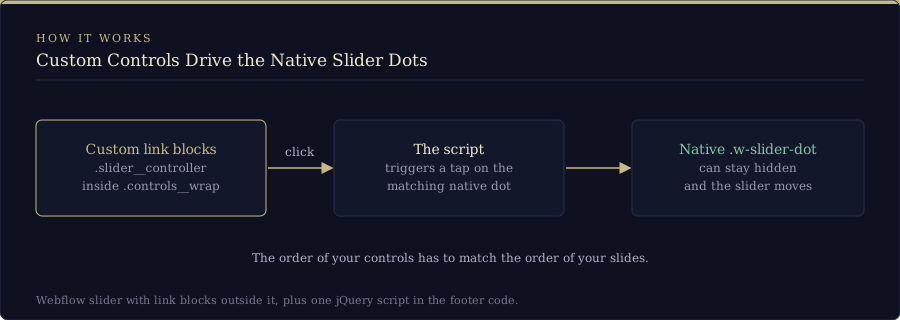
Anyhow, we Googled a bunch, figured out we could trigger a change to a specific slide by simulating a click on that slide’s navigation dot, and cobbled together a script to do that. Let’s kick off by giving you the script you’re gonna need for this:
<iframe height="300" style="width: 100%;" scrolling="no" title="Custom Slider Controls" src="https://codepen.io/milkmoonstudio/embed/preview/rNoRzNG?default-tab=html" frameborder="no" loading="lazy" allowtransparency="true" allowfullscreen="true">
See the Pen <a href="https://codepen.io/milkmoonstudio/pen/rNoRzNG">
Custom Slider Controls</a> by Jakes van Eeden (<a href="https://codepen.io/milkmoonstudio">@milkmoonstudio</a>)
on <a href="https://codepen.io">CodePen</a>.
</iframe>
Prelude to the dance: what you'll need
Before we wade into the code ocean, make sure you have the following ready:
- A Webflow project where you want to implement the custom slider controls. Classes on the slider don’t matter much. In the script we’re calling the native slider class rather than names you set in Webflow: .w-slider-dot
We don’t even have them visible in our project: element visibility was set to hidden. - A very basic understanding of jQuery (fear not, we’ll walk through it).
Act 1: Preparing the stage
First things first, let’s ensure our Webflow project is prepped and primed for some jQuery action.
Creating the slider:
- Navigate to your Webflow Designer.
- Create a new slider element.
- Customise it to your heart’s content but leave the dots below the slider as they are, or hide them.
Custom dot creation:
- Create a new div block and name it controls__wrap.
- Now, within controls__wrap, create your link blocks (one for each slide in your slider) and give each a class of slider__controller.
- Style these link blocks as you wish, these are your controls that will take you to each slide in your slider. Their order corresponds to the order of your slides.
Act 2: The jQuery ballet
Now, onto the code that will make those dots dance! We’re going to use jQuery to create a lively interaction between our custom dots and the Webflow native slider dots.
Adding the code:
- Head to your Site settings (for every page) or the Page settings of the page with the slider.
- Under the ‘Custom Code’ tab in Site settings, you’ll find a haven for your custom scripts in the ‘Footer code’ section. In Page settings, the equivalent is the ‘Before </body> tag’ field in the Custom code area. This is where our jQuery script will reside.
Pasting the script:
- Copy the script we shared earlier.
- Paste it into the ‘Footer code’ section of your Site settings (or the ‘Before </body> tag’ field in Page settings if only one page has the slider).
Understanding the magic:
The script loops through each custom dot within .controls__wrap, and when a custom dot is clicked, it triggers a tap event on the corresponding native Webflow slider dot, navigating to the respective slide.
Act 3: Curtains close, applause ensues
Now, head back to the Designer, hit publish, and behold the dance of the dots on your live site! Your custom dots should now control the Webflow slider, providing a tailored experience for your audience.
We hope this helps you as much as it helps us. I’m not sure who came up with the idea to control the dots, we just found a reference and a snippet of the code on Stack Overflow and then fleshed it out from there, but it’s neat, so enjoy.
FAQ
How do I link to a specific slide in a Webflow slider from outside the slider?
Put a link block anywhere on the page and have it simulate a click on the matching native slider dot. Our script does exactly that: it loops through the custom controls inside .controls__wrap and, when one is clicked, triggers a tap event on the corresponding .w-slider-dot, which moves the slider to that slide. The order of your custom controls has to match the order of your slides.
Can I hide the default Webflow slider dots and still use them?
Yes. The script only needs the native dots to exist in the page, it doesn’t need them to be visible. In our own project the dots were hidden with element visibility, so the Webflow slider dots did their job in the background while our custom controls did the talking.
Where does the custom code for Webflow slider dots go?
Paste the script into the ‘Footer code’ section under the ‘Custom Code’ tab in Site settings (every page), or into the ‘Before </body> tag’ field in Page settings (just the page with the slider). Then publish, because custom code doesn’t run in the Designer.
That’s the long and short of it. If sliders are your thing, we also have a post on vertical sliders with auto height in Webflow. If you like making things move, have a look at our visual guide to easing functions in Webflow and our post on mastering dynamic animations in Webflow. For more copy-and-paste goodness, our Webflow cloneables are worth a gander, and there’s more like this in the How-To section of our blog.