


How to build a CMS-powered background video in Webflow with custom elements: a native HTML5 video and source tags bound to CMS fields, with no custom code, plus a cloneable.
Today, we're going to build CMS-powered background videos in your Webflow projects, using custom elements to give you a native background <!-- fs-richtext-ignore --> <video> without any custom code or embeds. There’s also a handy cloneable at the end of the post for you to clone, and a short video talking through it.
What's a background video anyway?
Long story short, it’s a silent, looping, usually smallish video that autoplays, most of the time, behind something. Think of it as the unsung hero of web aesthetics, working tirelessly behind the scenes. Want a taste?
<iframe height="300" style="width: 100%;" scrolling="no" title="Background Video Example" src="https://codepen.io/milkmoonstudio/embed/qBvgpjK?default-tab=html%2Cresult" frameborder="no" loading="lazy" allowtransparency="true" allowfullscreen="true">
See the Pen <a href="https://codepen.io/milkmoonstudio/pen/qBvgpjK">
Background Video Example</a> by Jakes van Eeden (<a href="https://codepen.io/milkmoonstudio">@milkmoonstudio</a>)
on <a href="https://codepen.io">CodePen</a>.
</iframe>
The important bits here are autoplay, muted and loop. The solution in Webflow is also usually really simple: add a background video element, upload a small video and you’re done. Only, well, that doesn’t work on CMS pages or collection lists, because the file is uploaded to the element itself rather than pulled from a CMS field. What’s the solution? Well, usually you’d just do some custom embedded code, for either a <!-- fs-richtext-ignore --> <video> or <iframe> (and we’ve covered that in another post here), but now that we have the custom element in Webflow, we can just build a video element using at least two custom elements (maybe more): one for the video and one for each source inside it.
But first, let’s talk about iframe vs video.
Weighing your options
Choosing between a <!-- fs-richtext-ignore --> <video> tag and an iframe comes down to your specific needs:
- If you're looking for performance and direct control over your video content with better SEO prospects, go for the <!-- fs-richtext-ignore --> <video> tag.
- If ease of use, access to platform-specific features, and additional security are your priorities, an iframe might be the way to go.
Both approaches have their place in the web designer's toolkit, and the right choice depends on the balance of factors like control, performance, and functionality in your project. I’d say iframes load slower and, when you’re using something like Vimeo as the source for the video, the quality can suffer as you have no control over adaptive bitrates, etc. If you do want Vimeo as your source, we also wrote about optimising Vimeo background videos in Webflow with intersection code.
Enter the custom element: Webflow's game changer
Webflow's custom element is like finding a secret passage in a video game that leads you to hidden treasures. It allows us to create HTML elements directly on the canvas, including ones Webflow doesn’t offer natively, and once it sits inside a collection list you can bind it to CMS fields, attributes, tags and text. For a closer look, check out Webflow’s custom element guide. This little gem is our ticket to bringing CMS-driven videos in as background elements. (If you want more CMS-binding tricks, take a look at our post on creating text spans in dynamic CMS text elements.)
Crafting your CMS-powered background video
Step 1: Set up your CMS collection
Begin by setting up a CMS collection that holds your video files. Think of this as your video library where each book is a captivating tale waiting to be told. All you need are the download URLs from Vimeo. Just click the video file links in Vimeo and switch to the download links instead of the player links, as the player links will expire. (A correction from 2026: that last reason no longer holds. Vimeo says third-party player links (Video file links, then Play the video) do not expire. Also good to know: Vimeo only gives you these direct links on its Standard plan or higher, and if you downgrade, any links you have embedded stop working until you upgrade again. Source: help.vimeo.com/hc/en-us/articles/12426150952593.) Typically you want to add three for each video, though one will work: high quality, medium and low. Go easy on the high, as a 4K video can just kill the site’s performance. (A correction from 2026: browsers don’t pick the best quality for you. MDN says “The browser goes through a list of <source> elements to find a format it supports. It uses the first one it can display.” So the order of your source elements matters, so put the file you most want played first.)
Step 2: Put custom elements to work
With the stage set, we'll use custom elements to create a native HTML5 <!-- fs-richtext-ignore --> <video> tag, dynamically linking our CMS items. Imagine conjuring a video player out of thin air, powered by the magic of Webflow and your CMS. With the setup I just described, you’ll want four custom elements: the video, and inside it three source elements.
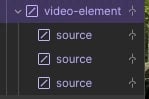
Once you’ve set up the structure, you’ll tag the four elements, with the outer one being video and the inner ones being source.
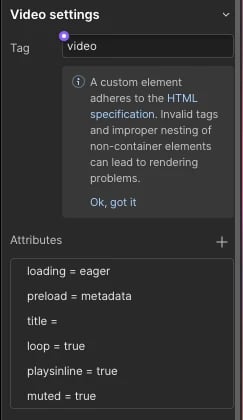
Here you can see we used attributes to apply loop=true, muted=true and playsinline=true, and the rest is just gravy. (You’ll also want autoplay=true on the video, because that is what makes it start on its own. Browsers generally block autoplay on videos with sound, so muted=true is what lets it start on its own.)
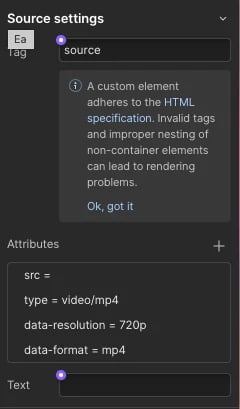
You’ll see we’re using attributes to bind the URL to the src. That and the type are the most important.
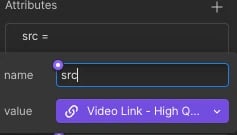
Step 3: Style and embed
Next, we'll style our video to fit perfectly as a background element, ensuring it complements your design without overpowering it. It's like dressing your video in its Sunday best. In the case of the cloneable we created a 16:9 aspect box around the video and set the video to absolute and cover, so that it, well, covers the aspect box no matter the size of the video. This bit is really up to whatever you were planning to achieve.
Grab the cloneable
Because we're all about sharing the love (and saving you time), we've put together a cloneable Webflow project. It's like handing you the keys to the kingdom: just grab, clone and customise to your heart's content. You’ll find more like it in our Webflow cloneables.
There’s also a video to check out where I yammer through the cloneable, but you can figure it out. Enjoy, drop a comment if you have questions, we’ll try and get to them, and there’s more on using custom code to do the same thing in this post. Looking for another CMS-driven trick? Have a look at our CMS-powered background gradients or our CMS-powered ticker tape.
Frequently asked questions
Can I use a CMS field for a Webflow background video?
Not directly with the built-in background video element. Webflow describes it as a component you upload a video file to, rather than one fed by a CMS field. The custom element approach above gets around that, because the video URLs come from your collection item and the elements are bound to them.
What size can a Webflow background video be?
Webflow’s built-in background video accepts files smaller than 30MB in webm, mp4, mov or ogg format. With the custom element method the files live on Vimeo (or wherever you host them), so that limit doesn’t apply, but smaller is still better: keep the files short, compressed and low resolution.
Will a CMS background video autoplay on mobile?
Usually, as long as it has autoplay, muted and playsinline set. Browsers block autoplay on videos with sound, which is why muted matters. Keep in mind that Webflow’s own background video component adds a play/pause button and stops for visitors with reduced motion turned on, and a custom element video doesn’t add either by itself, so add your own pause control if the video is big or distracting.