Un guide complet pour configurer Cloudflare Workers pour l'optimisation automatique des images, la mise en cache des actifs et la diffusion en périphérie sur votre site Webflow.
Webflow uses AWS and for a while used Fastly. While it's adequate, we've found that with large projects, especially ones that are image heavy, Cloudflare has provided us with significant speed boosts, better uptime, and a host of optimisation options, as well as workers. But unlike some other platforms it wasn't easy switching your DNS to Cloudflare. Webflow and Cloudflare didn't gel well when it comes to proxying your site and optimising it through Cloudflare.
In the olden days we came up with a hack to use the SSL setting and the non-ssl connection details along with the cassette app to cache and optimise images. Eventually apps were removed from Cloudflare and with a lot of trial and error we can up with a worker of our own to proxy and cache images from Webflow on Cloudflare.
Well, good news. That's changed.
Webflow has migrated to Cloudflare, and for a while we were in limbo.
The great news is that becasue of their move to Cloudfalre we now have Orange-to-Orange (O2O) working natively. No more hacky workarounds, no more Cassette apps, no more complicated subdomains for your assets. If you've read our previous post on caching Webflow with Cloudflare, you can basically throw most of that out the window (well, keep the parts about why you'd want to do this in the first place).
So what is the current situation when it comes to caching and proxying through Cloudflare. Well now that Webflow supports O2O the orange cloud is on on your DNS settings, full supported by Webflow and no more SSL worries etc. It also means you can now easily use the extensive range of security tools and workers that Cloudflare offers.
HOWEVER, and this is the big caveat, all you assets from images to CSS still sits on a Webflow CDN domain, and since it's not on YOUR DOMAIN, you still have no control over that, unless....
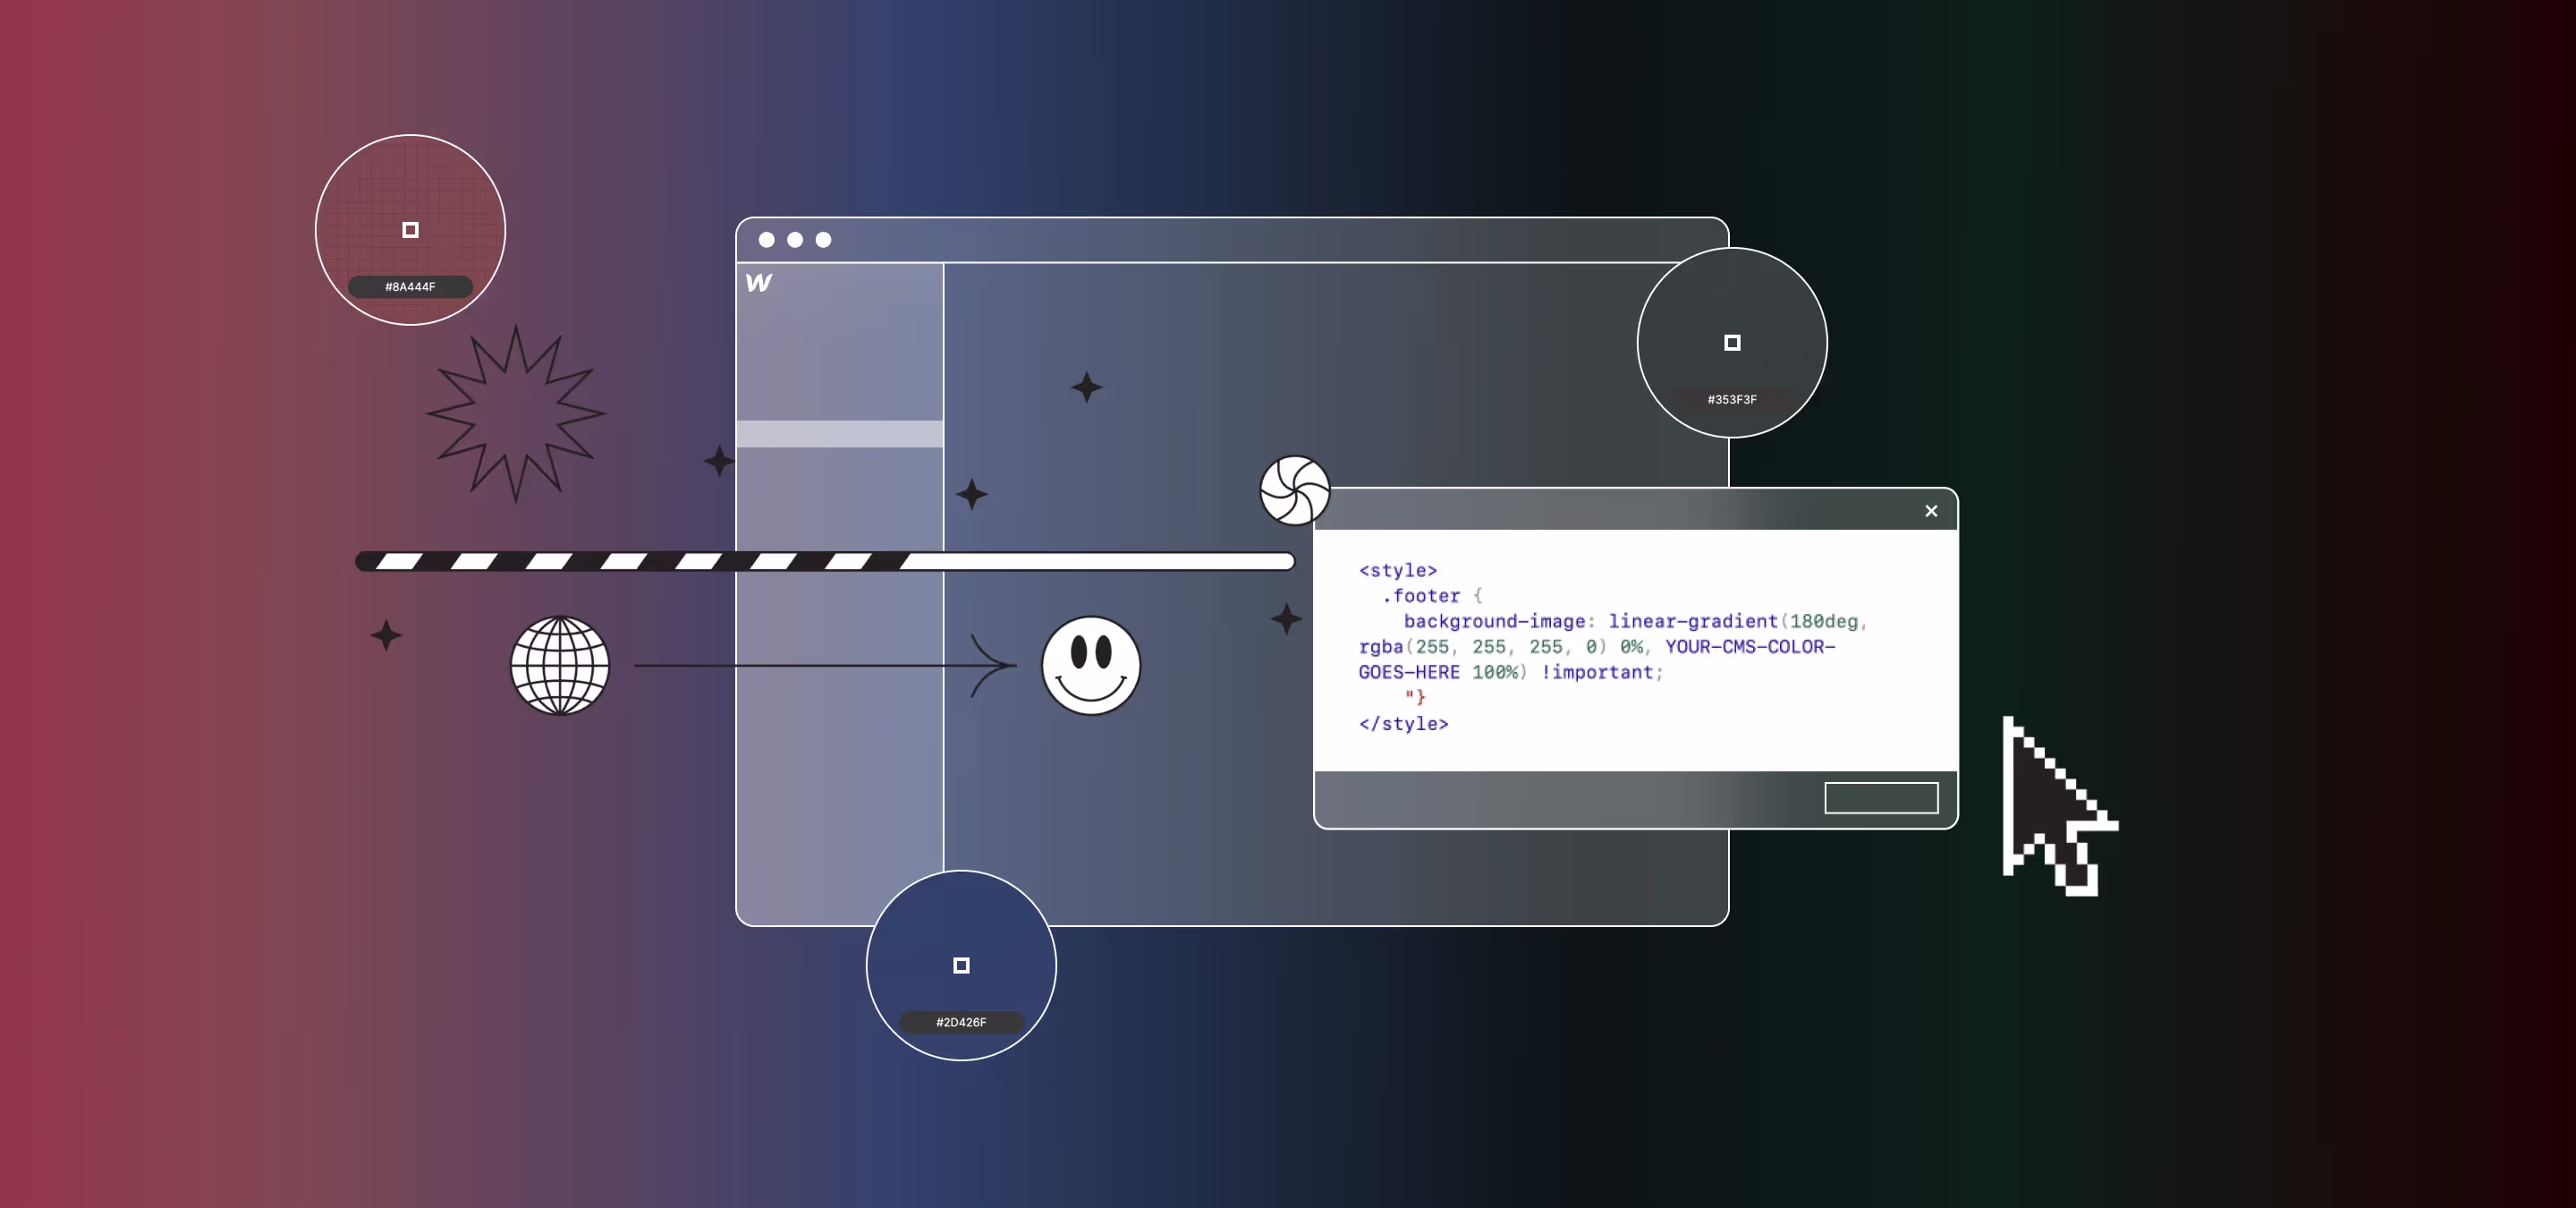
In this post, we'll walk you through setting up a Cloudflare Worker that'll transform your Webflow site so that virtually all assets get proxied and cached. We're talking automatic image optimisation, asset proxying, and edge caching all served from your own domain. Sounds fun, right? In the past we only focussed on images, now we're talking it a step further, tackling more and making it easier to use than ever.
Just a reminder, this is advanced stuff. We've made the script more intuitive but please pay attention to setup. Please read carefully, a video will come at a later date. Let's dive in!
Below is the quick start guide, to find out more about the script details please visit the MD on github here as that goes into much more detail.
What We're Trying to Achieve
Here's the deal. Webflow hosts all your assets on their CDN domains (cdn.prod.website-files.com, assets.website-files.com, etc.). This creates a few limitations:
- No image optimisation – Images are served as-is, no automatic AVIF or WebP conversion, you do that in Webflow and nothing haoppens on the fly.
- CORS restrictions – Cross-origin requests can sometimes fail
- No unified caching – Your assets are scattered across different domains
- Social media headaches – OG images aren't optimised for sharing
Our Cloudflare Worker tries to solve a lot of this by intercepting your site's HTML and rewriting all those Webflow CDN URLs to route through your domain.

Once it's set up, you get:
- Automatic format conversion – AVIF for modern browsers, WebP for others, or whatever you prefer
- Quality optimisation – Configurable compression (we use 85% as the default, looks great)
- Edge caching – All assets cached at Cloudflare's 300+ global data centers (please remember that there is np cache priming)
- CORS-free delivery – Everything served from your domain
- Social media optimisation – OG and Twitter images converted to JPEG for compatibility (please remeber that Cloudflre can convert to avif but won't convert back)
And here's the best part. Once this is all running, you can layer on Cloudflare's other features too. Page Rules, Caching Rules, WAF, Bot Protection, the works. It's your zone now, go wild.
But it's not just images.
The Worker also proxies and caches all your CSS, JavaScript, and font files through your domain (or tries to). Your WOFF2s, your TTFs, your minified JS bundles — all of it gets pulled from Webflow's CDN, cached at Cloudflare's edge, and served from your domain with proper cache headers. AVIF images? They're already optimised, so the Worker skips the transformation and just proxies them directly. Favicons get the full image treatment too. Basically, if Webflow's serving it from their CDN, we're grabbing it and making it yours.
So, we've upped the game. Below you'll find high-level instructions. The video just shows it running, but, once I have time I'll record a full guide. For now you can follow the written guide.
Part 1: Setting Up Your Domain with Cloudflare and Webflow
There are two ways to connect your Cloudflare-managed domain to Webflow:
- Standard setup — Cloudflare just handles DNS, Webflow serves everything (proxy OFF)
- O2O setup — Traffic goes through your Cloudflare zone first, then Webflow (proxy ON)
We want O2O because that's what lets us use Workers, caching rules, WAF, and all the other Cloudflare goodies. But let's cover both so you know the difference.
Prerequisites
Your Webflow site needs to be on Cloudflare's infrastructure. Sites created after April 21, 2025 are already there. For older sites, check your Workspace settings → Domain Updates to see if you need to migrate first.
Standard DNS Setup (No O2O)
If you just want Cloudflare to manage your DNS without proxying (this is what Webflow's default instructions tell you to do):
For your root domain (@):
- Type:
A - Name:
@ - Value:
198.202.211.1 - Proxy status: DNS only (grey cloud)
For www:
- Type:
CNAME - Name:
www - Target:
cdn.webflow.com - Proxy status: DNS only (grey cloud)
This works fine, but you're not getting any Cloudflare features beyond DNS. Traffic goes straight to Webflow.
O2O Setup (What We Want)
To enable Orange-to-Orange and actually use Cloudflare's features, you need proxied CNAME records:
For your root domain (@):
- Type:
CNAME - Name:
@ - Target:
cdn.webflow.com - Proxy status: Proxied (orange cloud ON)
For www:
- Type:
CNAME - Name:
www - Target:
cdn.webflow.com - Proxy status: Proxied (orange cloud ON)
Important: Delete any existing A records pointing to 198.202.211.1. You can't have both. For O2O, it's CNAME records with the proxy enabled.
If you have other subdomains (like blog.yourdomain.com), add a proxied CNAME for each one too.

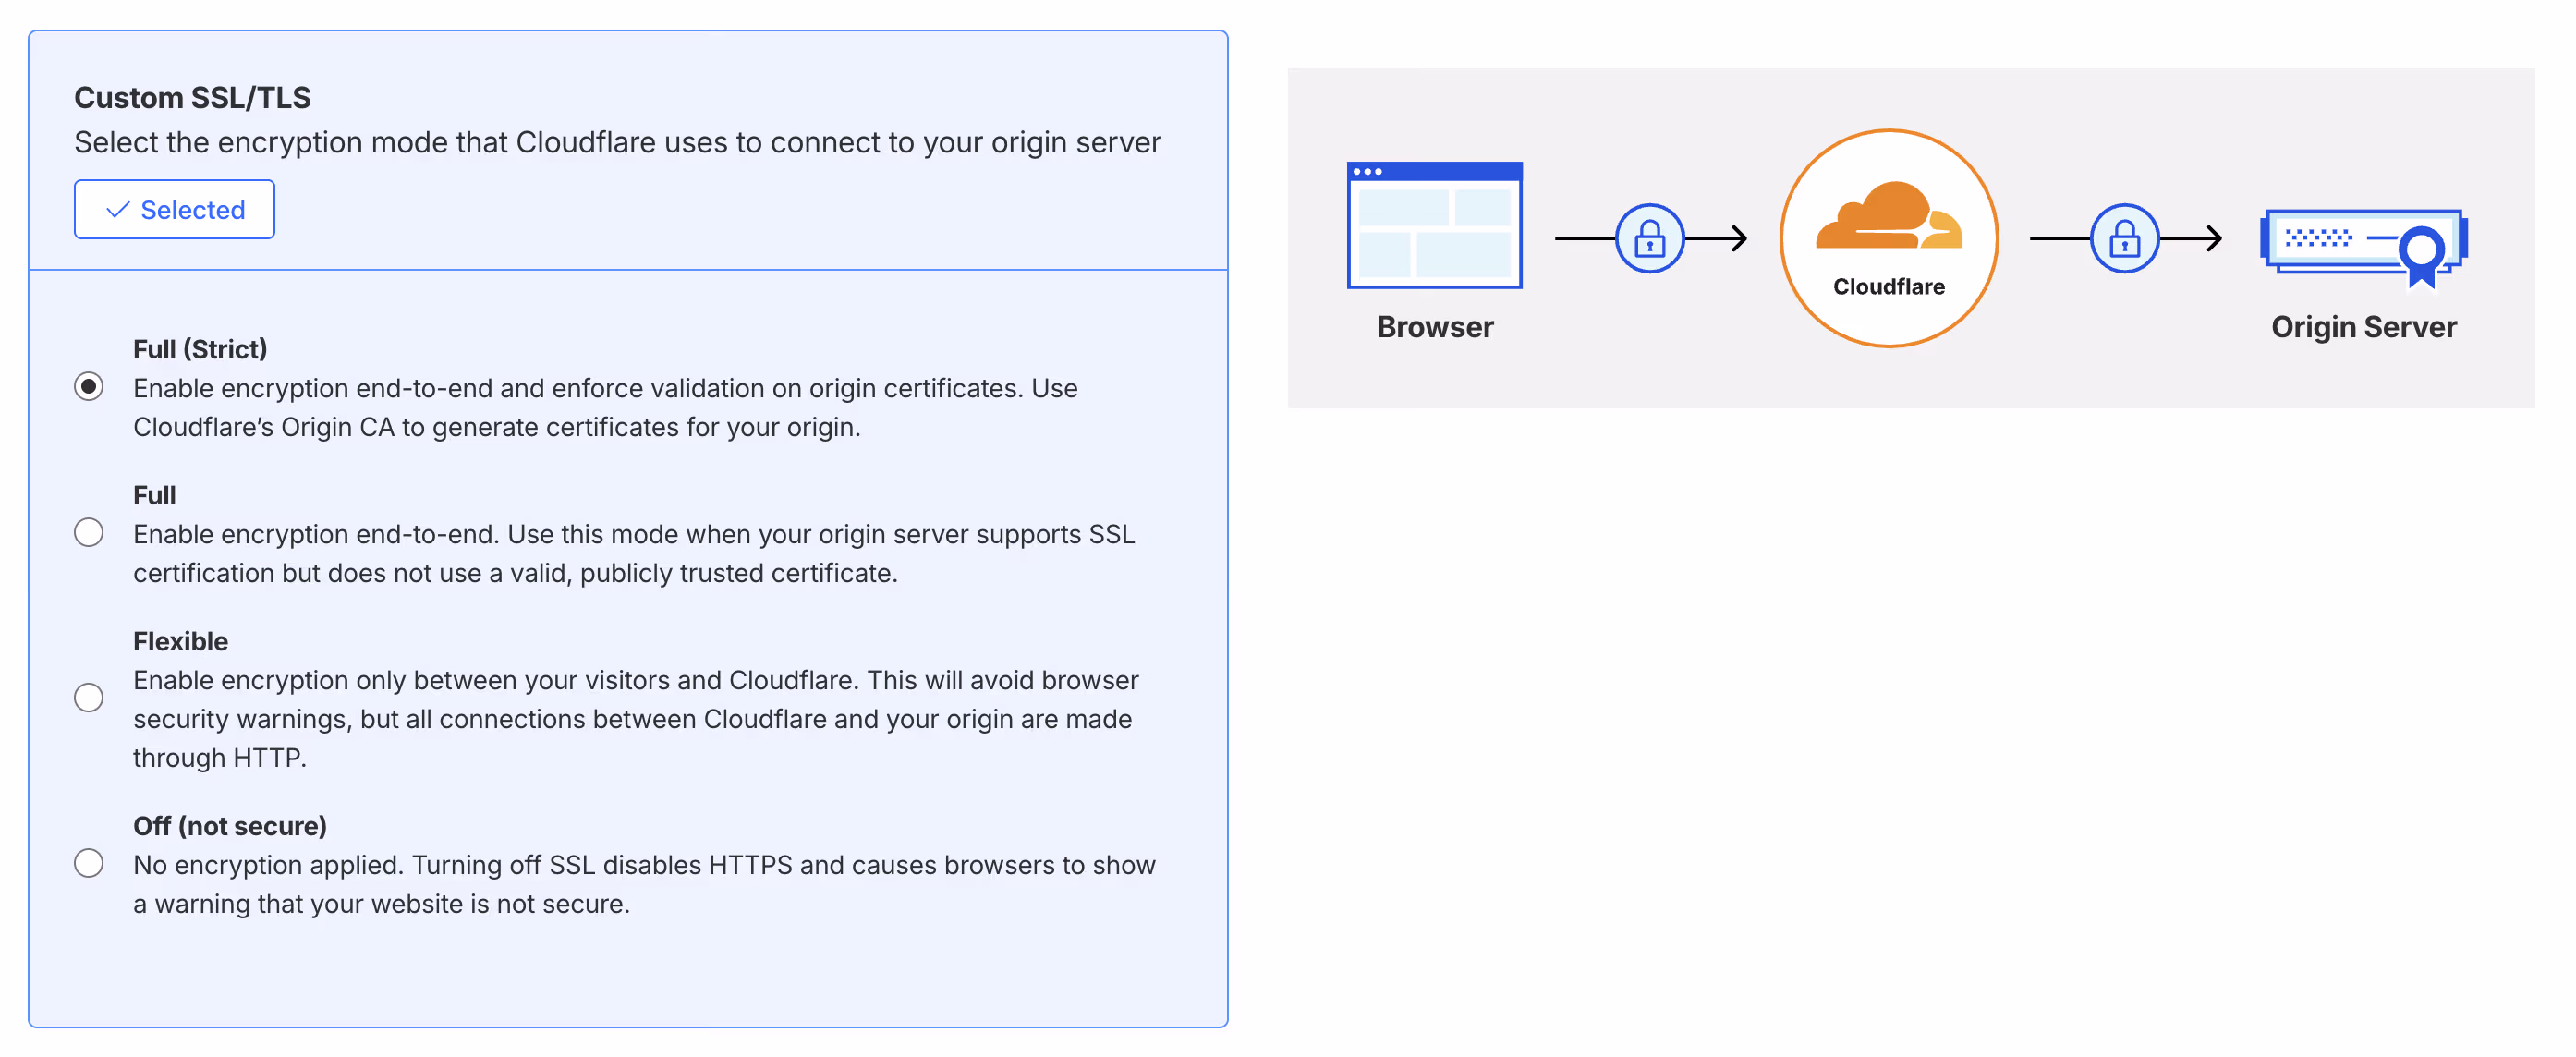
SSL/TLS Settings
Head to SSL/TLS in your Cloudflare dashboard and set the encryption mode to Full (strict).
Add the Domain in Webflow
Over in Webflow:
- Go to Project Settings → Hosting → Production
- Add your domain (both root and www)
- Publish your site
About That "Update Needed" Warning
Here's the thing. Once the orange cloud is on, Webflow can't see your DNS records anymore. So it's going to complain or might complain. You'll see "Update needed" or "Update pending" in your Publishing settings.
Ignore it.
This is expected behaviour. Webflow's verification can't see through the proxy. If your site loads correctly, everything is fine. You can keep publishing normally. I've had the warning stick around, and in some casees it vanishes.
Step 5: Verify It's Working
Visit your site. If it loads, you're golden. You can also:
- Use SSL Labs to test your SSL certificate
- Use whatsmydns.net to confirm your domain resolves to Cloudflare IPs
- Check the response headers for
cf-ray(indicates Cloudflare is in the chain)
Right, O2O is sorted. Now let's get to the fun part.
Part 2: Enabling the Required Cloudflare Features
Before we deploy the Worker, we need to enable a few things in Cloudflare and make sure the right subscriptions are active.
Enable Image Transformations
This is the magic sauce that lets Cloudflare convert and optimise your images on the fly.
- Go to Cloudflare Dashboard → Your Zone
- Navigate to Images → Transformations
- Click Enable Image Transformations
Without this, the /cdn-cgi/image/ URLs won't work and your images will just 404. Not ideal.
Costs: Free tier gets you 5,000 transformations per month. Paid is $9/month for 50,000 transformations, then $0.50 per 1,000 after that. For most Webflow sites, the free tier is plenty to start.
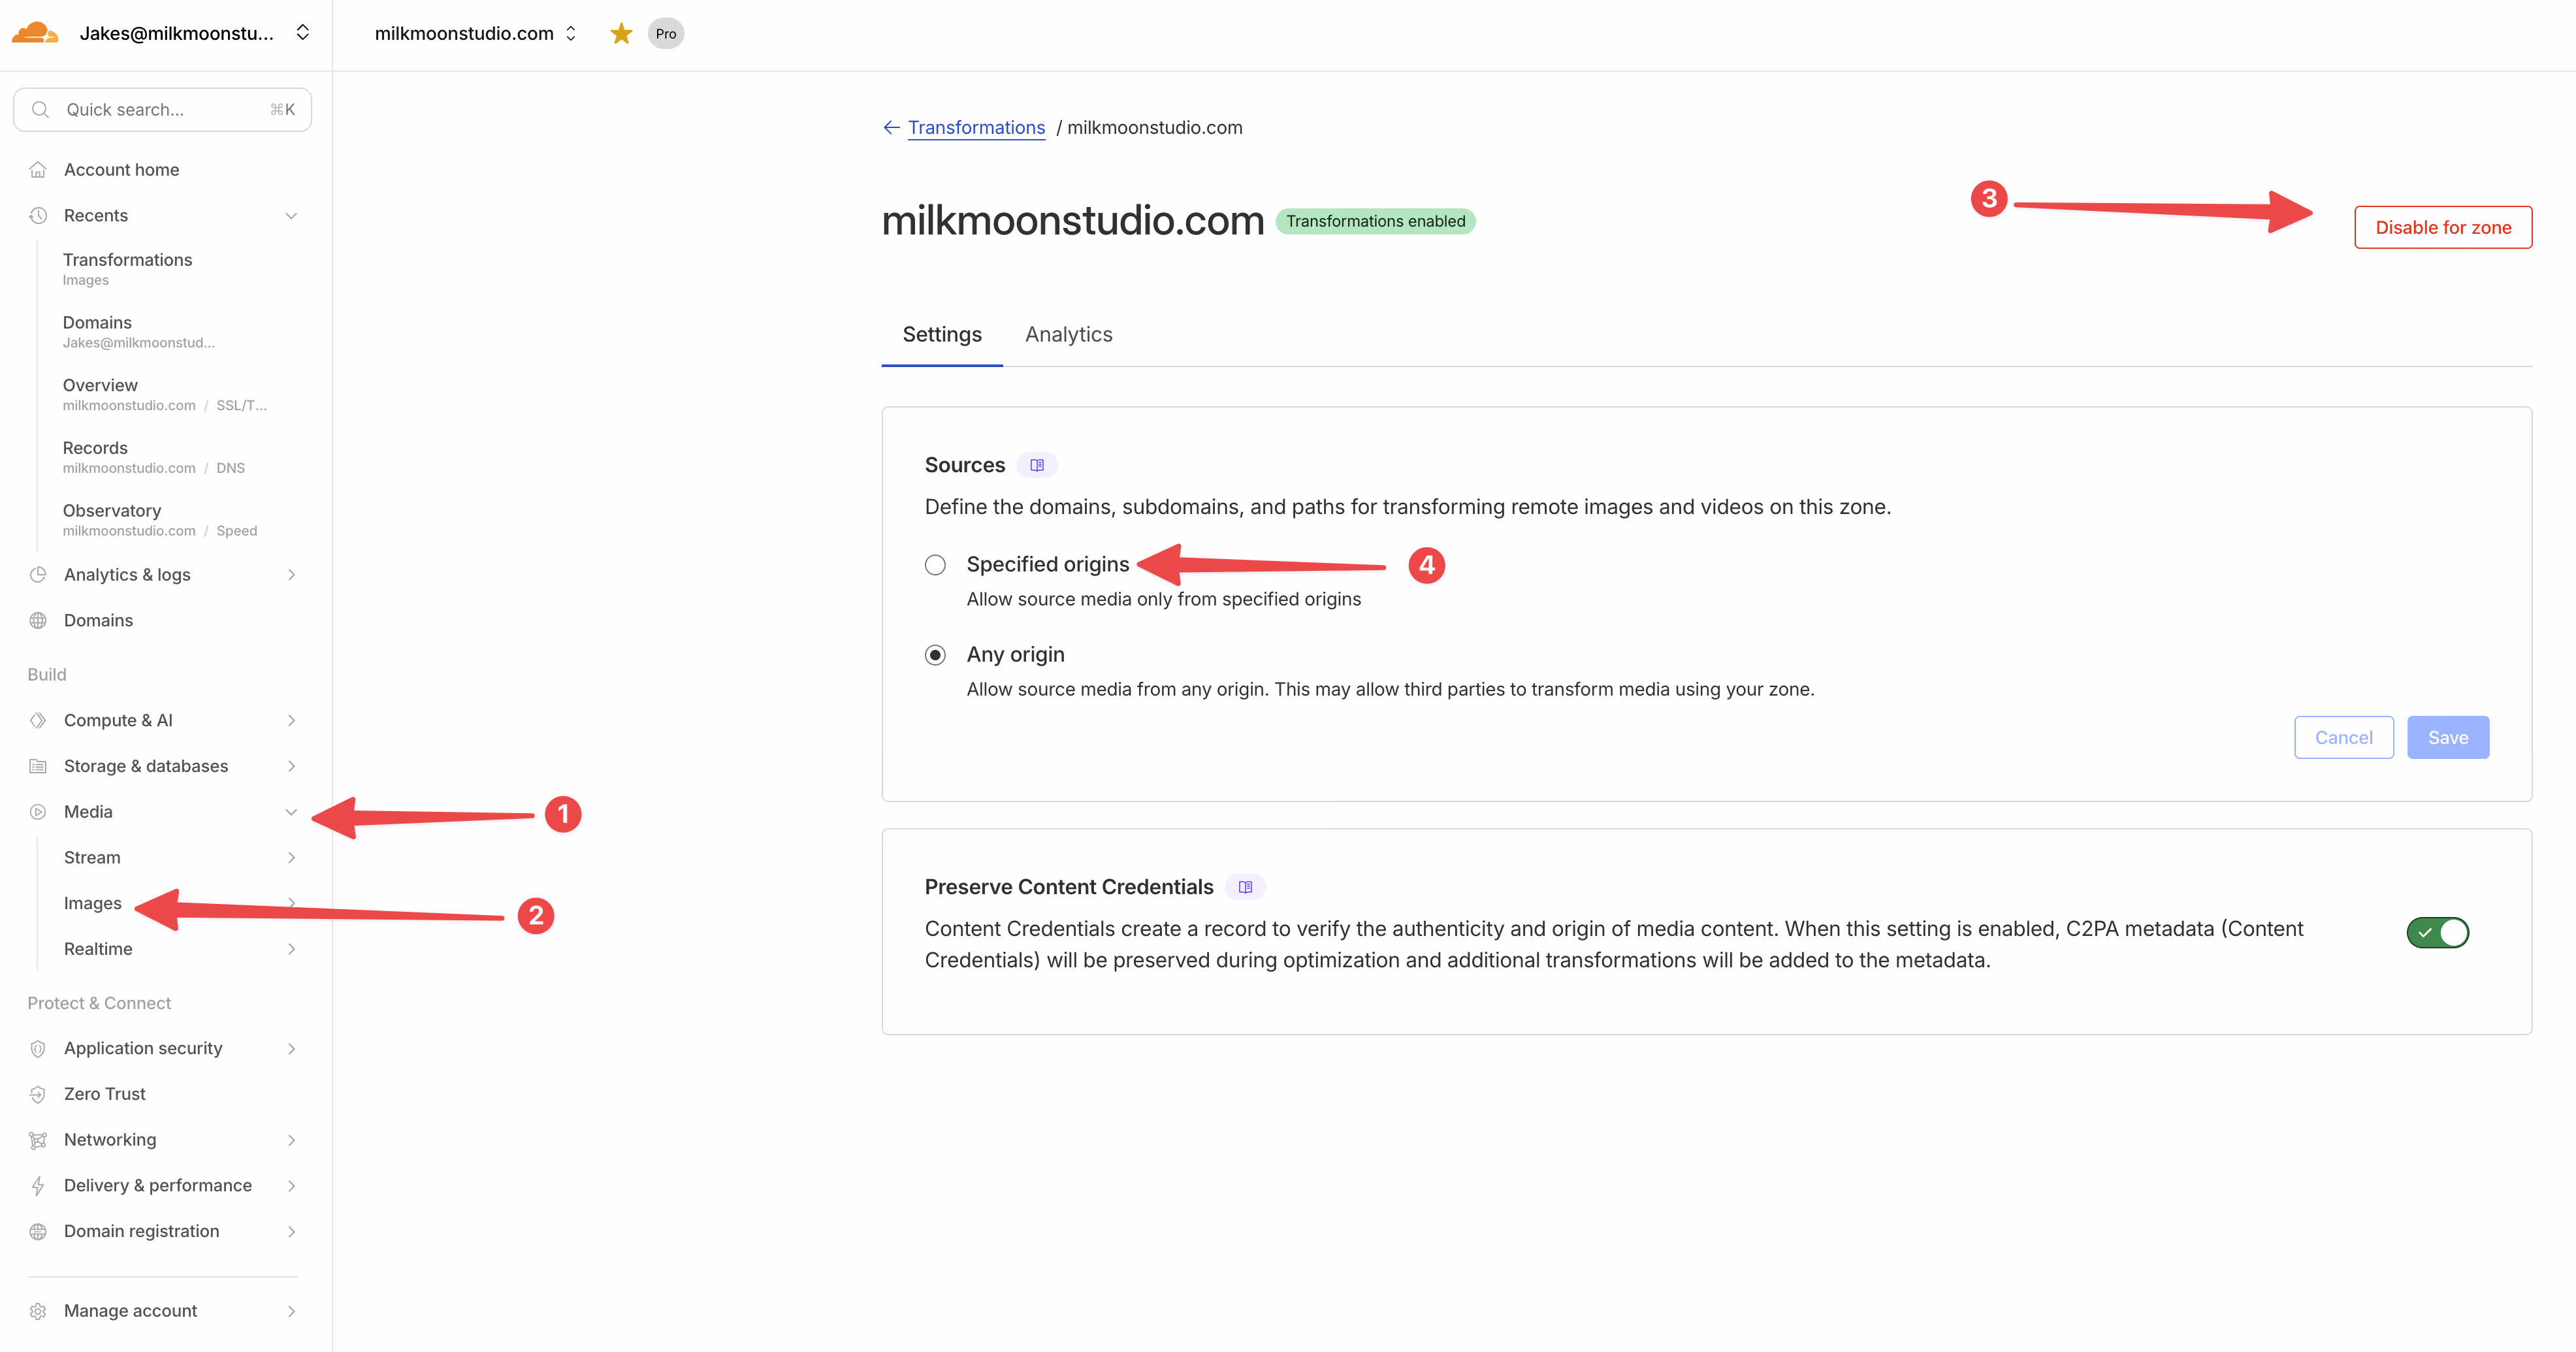
Add Allowed Origins
Still in Images → Transformations, click on Sources and add these origins:
Origin:
-
cdn.prod.website-files.com assets.website-files.comassets-global.website-files.comG-
uploads-ssl.webflow.com cdn.webflow.com-
www.yourdomain.comCritical!
That last one is crucial and easy to miss. The transform URLs reference your own domain as the source (because we're proxying through /img-original/), so Cloudflare needs permission to fetch from itself. Meta, we know.
Enable Workers
You'll need Workers enabled on your zone.
- Go to Workers & Pages in the Cloudflare Dashboard
- If you haven't used Workers before, you'll be prompted to set up a subdomain
Costs: Free tier gets you 100,000 requests per day. That's a lot. Paid is $5/month for 10 million requests if you need more.
Part 3: Creating the Worker
Now for the actual Worker. This is where the magic happens.
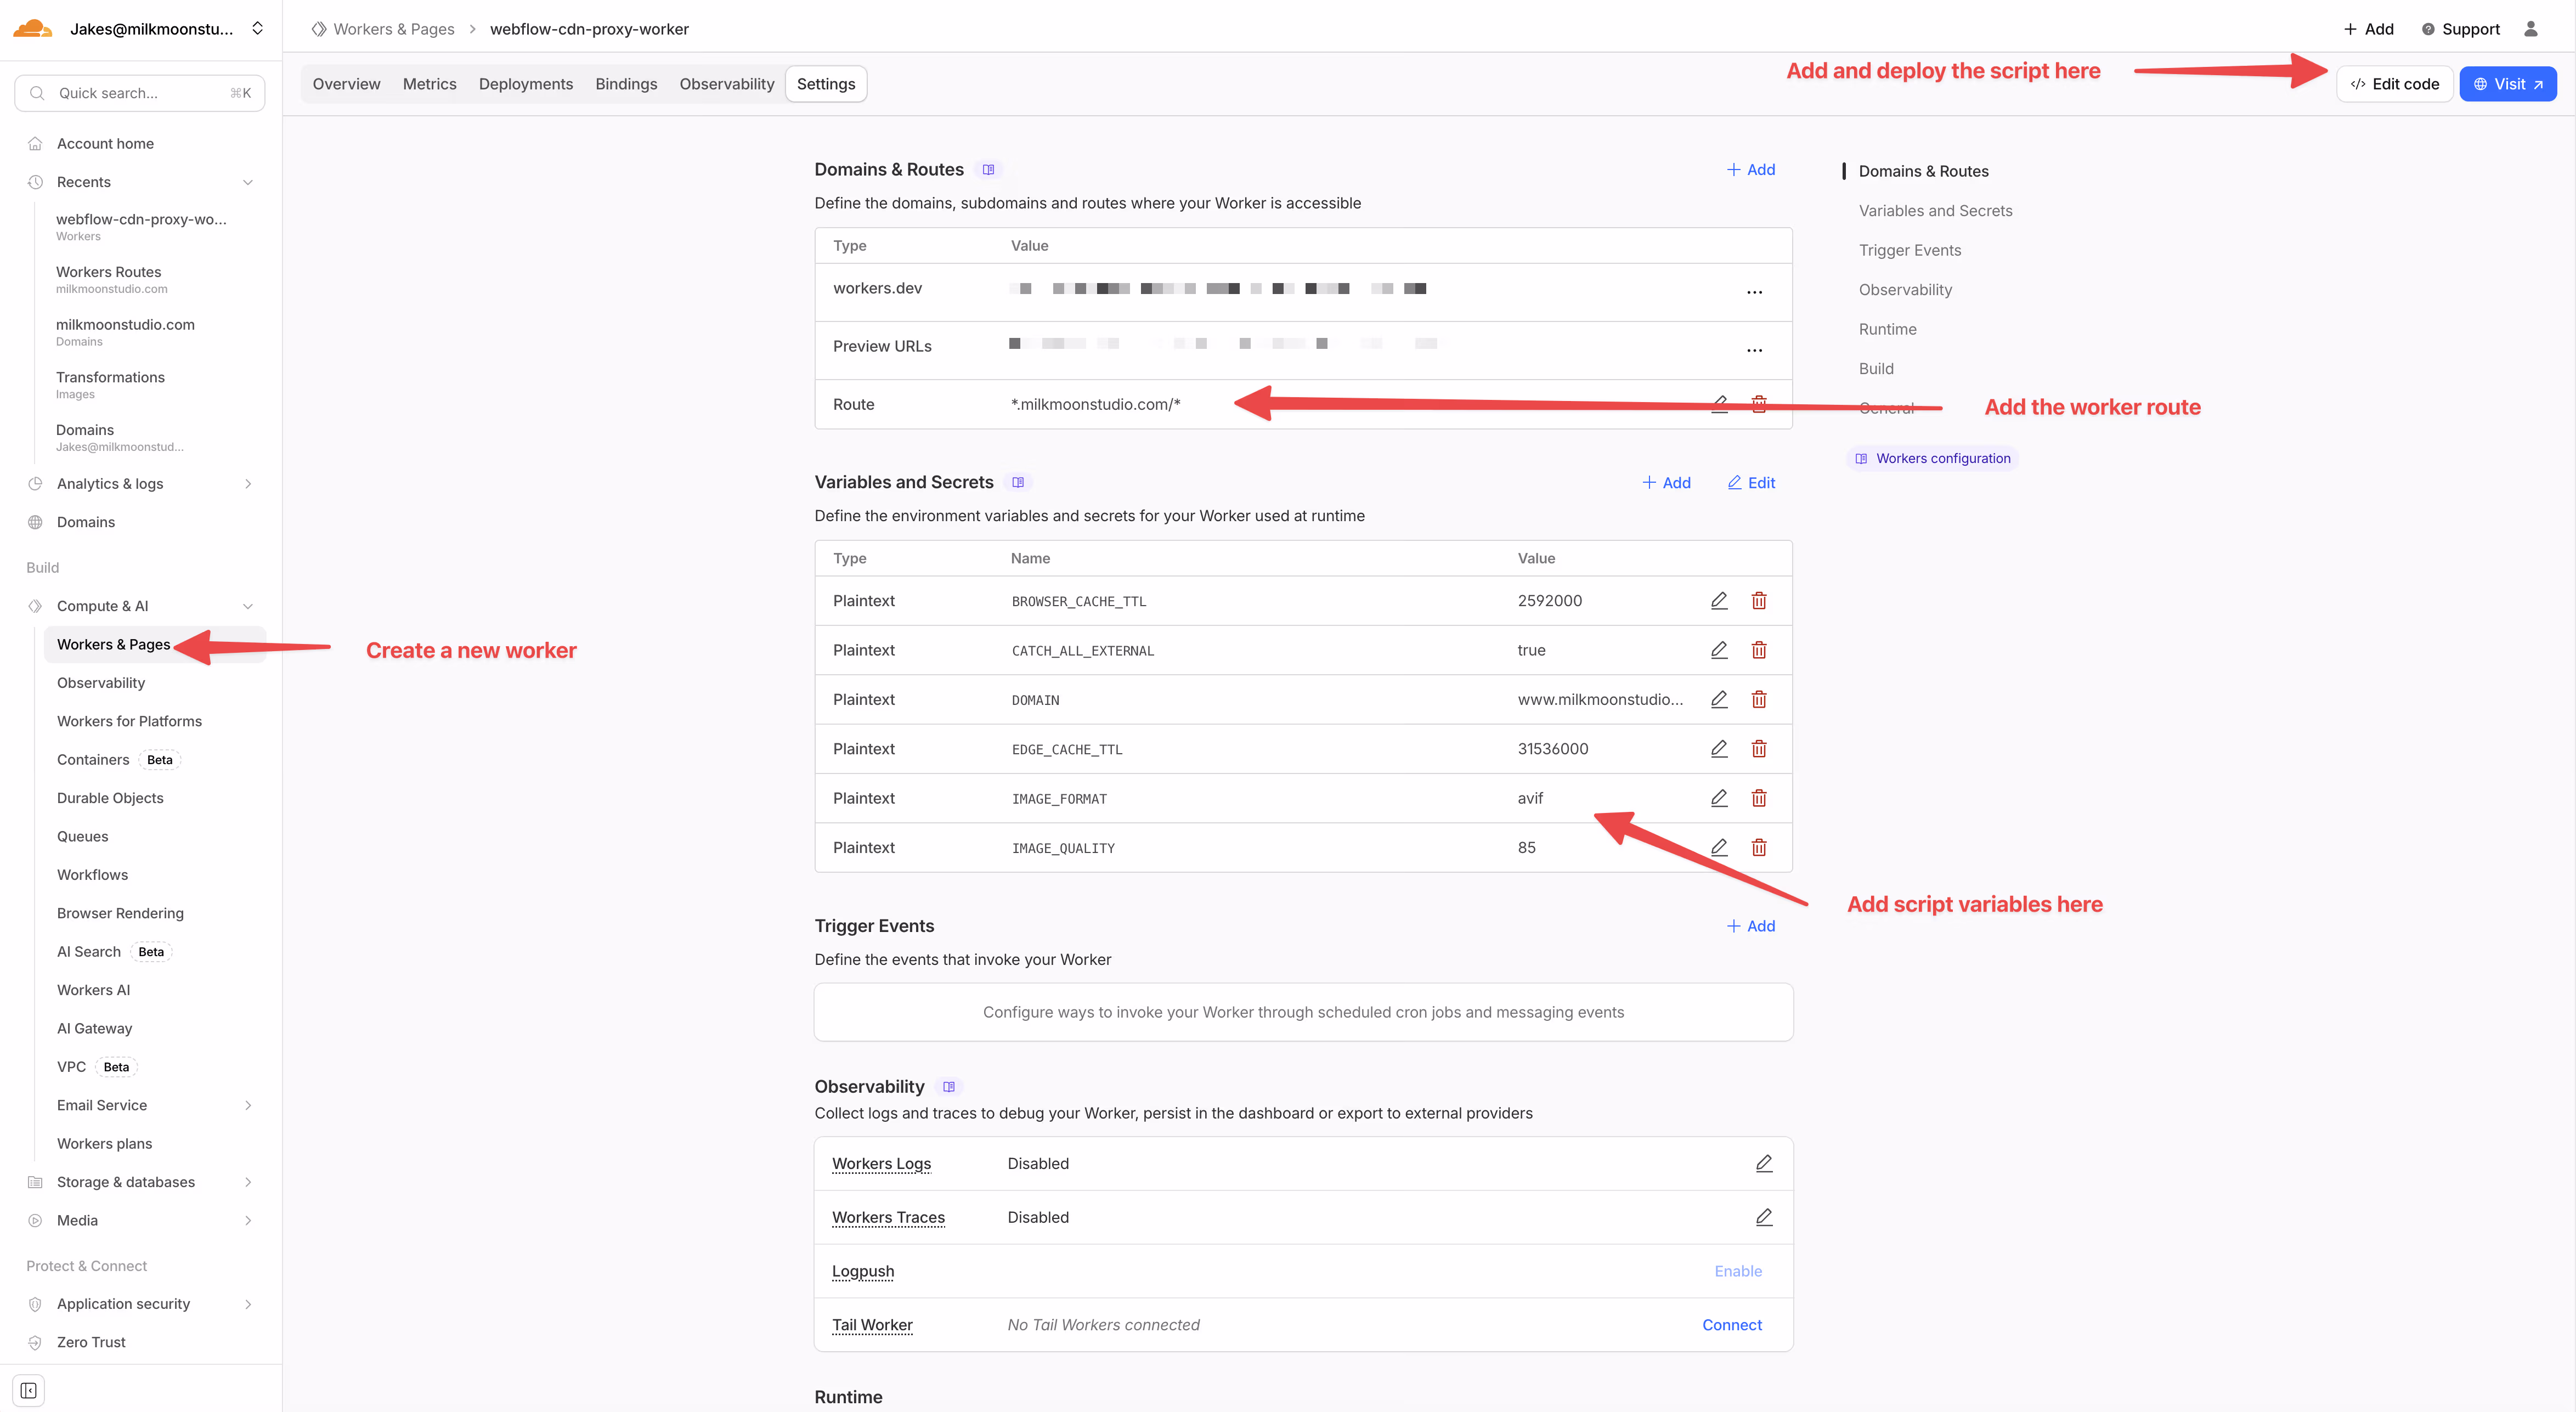
Step 1: Create a New Worker
- Go to Workers & Pages
- Click Create Application → Create Worker
- Give it a name (something like
webflow-optimizeroucache du site) - Vous verrez un modèle Hello World. Supprimez tout cela
Étape 2 : collez le code du travailleur
Nous avons un script Worker complet qui gère tout. Il s'agit d'environ 600 lignes de JavaScript qui :
- Intercepte les réponses HTML provenant de Webflow
- Réécrit toutes les URL des images pour utiliser le redimensionnement des images Cloudflare
- Proxie directement les images AVIF (elles sont déjà optimales)
- Proxies et caches CSS, JS et polices
- Gère les images OG/Twitter pour le partage sur les réseaux sociaux
- Ajoute des en-têtes CORS appropriés
- Met en cache tout ce qui se trouve à la périphérie
Collez le script Worker complet (vous pouvez le récupérer sur notre GitHub ou sur la page ici).
Étape 3 : Enregistrer et déployer
Frappez Sauvegardez et déployez. The Worker est maintenant en ligne, mais il ne fait rien pour l'instant car nous ne lui avons pas dit où il devait courir.
Partie 4 : Variables d'environnement
Le Worker utilise des variables d'environnement afin que vous puissiez le configurer sans modifier le code. Dirigez-vous vers votre travailleur → Réglages → Variables.
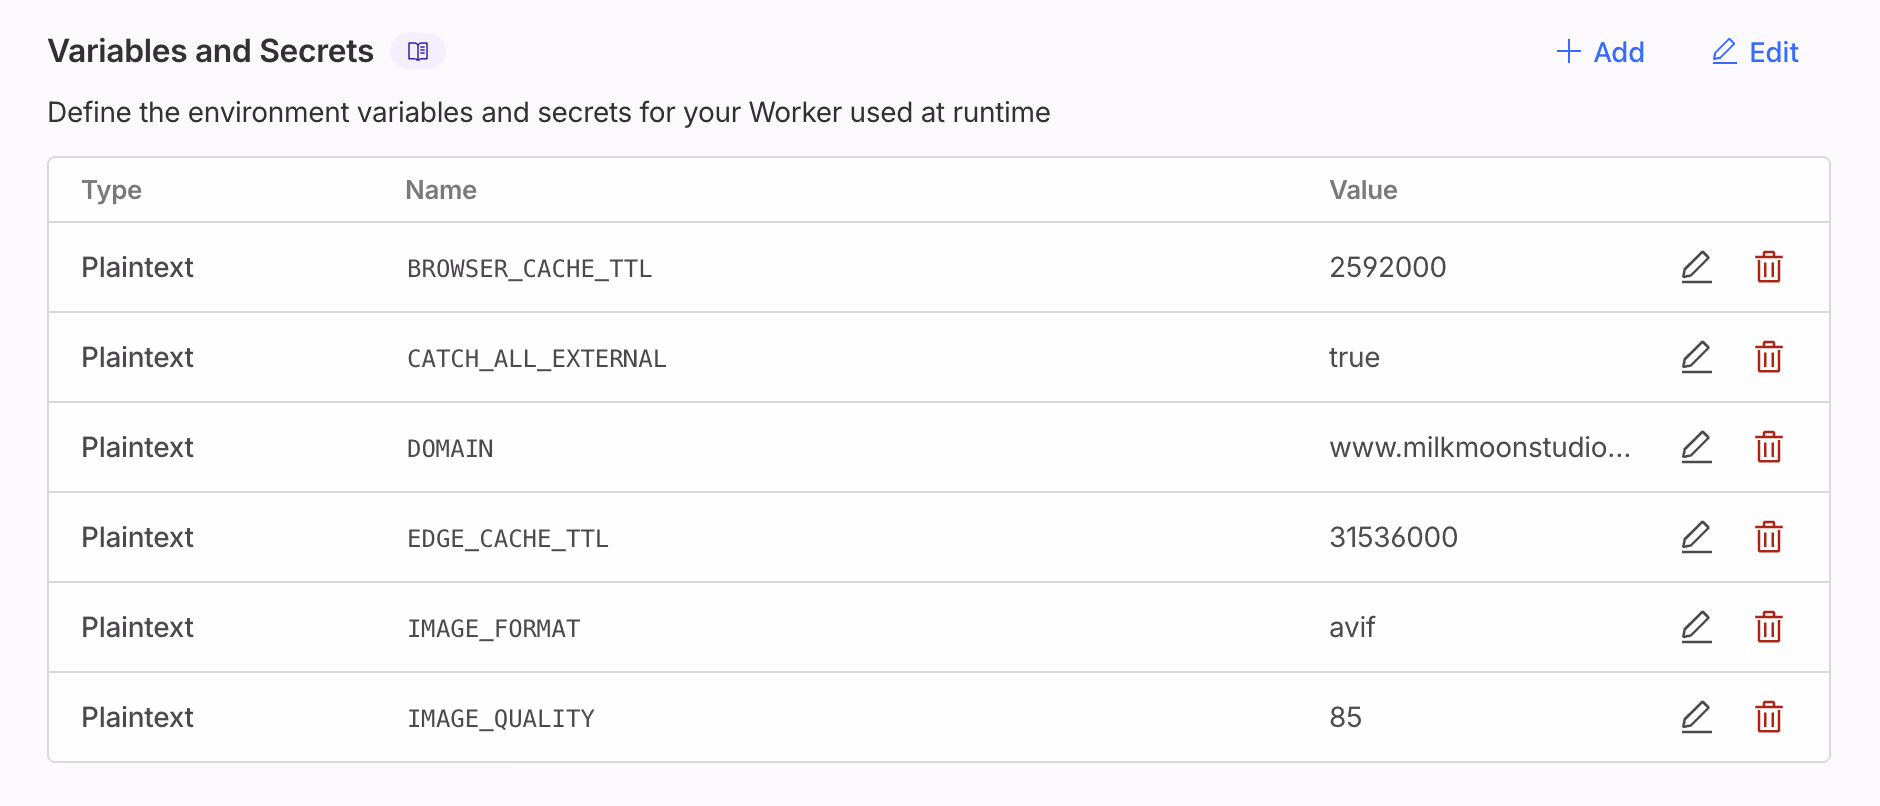
Variable requise
Variable : DOMAINE
Valeur : Votre domaine (sans https ://) donc dans notre cas www.milkmoonstudio.com
Cela indique au Worker quel domaine utiliser dans les URL réécrites. S'il n'est pas présent, le code vérifiera le domaine actuel et l'utilisera comme solution de secours.
Variables facultatives (avec des valeurs par défaut raisonnables, toutes les variables ont des options de repli par défaut)
Variable : FORMAT_IMAGE
Valeur : « auto », webp », ou avif
Variable : IMAGE_QUALITY
Valeur : 85 (Qualité 1-100, 85 est un bon équilibre)
Variable : OG_IMAGE_FORMAT
Valeur : jpeg (Format pour le partage social (images)
Variable : OG_IMAGE_QUALITY
Valeur : 80 (Qualité (pour les images OG)
Variable : EDGE_CACHE_TTL
Valeur : 31536000 (Durée du cache Edge (en secondes) (par défaut : 1 an)
Variable : BROWSER_CACHE_TTL
Valeur : 604800 (Durée du cache du navigateur en secondes (par défaut : 1 semaine)
Variable : CATCH_ALL_EXTERNAL
Valeur : faux (Traitez également les images CDN non WebFlow, fonctionnalité très expérimentale qui nécessite des transformations d'images (pour utiliser n'importe quel domaine)
Recommandations :
- Gardez
FORMAT_IMAGEcommeauto— il sert AVIF aux navigateurs qui le supportent, WebP aux autres QUALITÉ_DE L'IMAGEà 85 convient parfaitement à la plupart des images. Passez à 70-75 si vous essayez vraiment de compresser des octets- Gardez
OG_IMAGE_FORMATcommejpeg— certaines plateformes sociales ne gèrent toujours pas AVIF/WebP pour les aperçus
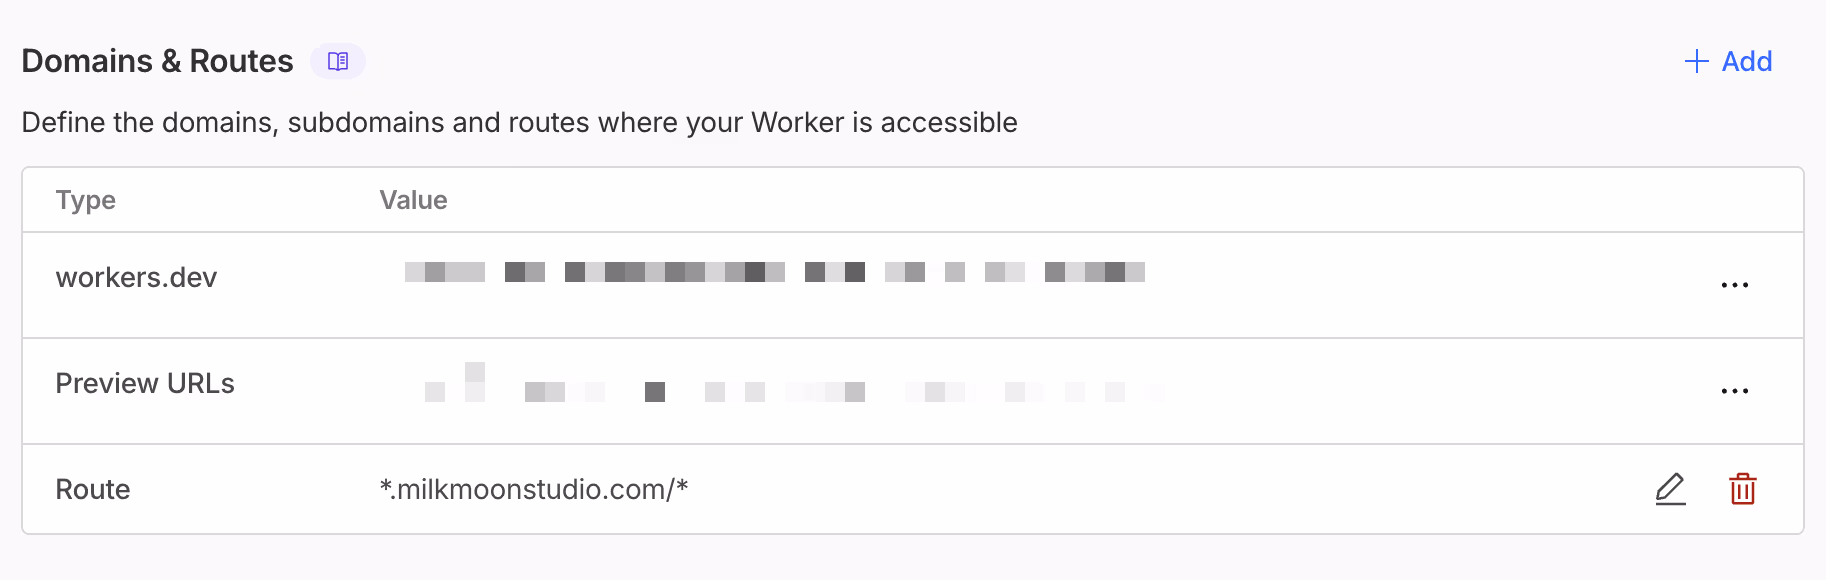
Partie 5 : Configuration de l'itinéraire des travailleurs
Voici un point critique qui fait trébucher les gens. Le Worker doit fonctionner sur votre domaine personnalisé, et non *.travailleurs.dev sous-domaine. L'API Cache ne fonctionne pas sur travailleurs.dev, ce qui signifie qu'il n'y a pas de mise en cache, ce qui va à l'encontre de l'objectif.
Ajouter l'itinéraire
- Dans votre Worker, accédez à éléments déclencheurs → Routes
- Cliquez Ajouter un itinéraire
- Configurez :
- Parcours :
*yourdomain.com/* - Zone: Select your zone
- Parcours :
- Click Add Route
The * at the start catches both www.yourdomain.com and yourdomain.com. The /* at the end catches all paths.
If you only use www, you can be more specific: www.yourdomain.com/*
Part 6: How It All Works

Right, let's talk about what's actually happening under the hood. This bit's for the curious (and for when something inevitably goes wrong and you need to debug it).
The Request Flow
When someone visits your site:
- Request hits Cloudflare – Your zone first (O2O)
- Worker intercepts – Checks if it's an HTML request
- Fetches from Webflow – Gets the HTML (cached at edge)
- Transforms URLs – Rewrites all Webflow CDN URLs
- Returns transformed HTML – Browser receives the modified page
When the browser then requests an image:
- Request hits
/cdn-cgi/image/format=auto,quality=85/https://yourdomain.com/img-original/... - Cloudflare Image Resizing – Parses the transform URL
- Fetches source – Gets the original from your
/img-original/endpoint - Worker proxies –
/img-original/fetches from Webflow CDN - Transforms – Converts to AVIF/WebP, applies quality
- Caches – Both original and transformed cached at edge
- Returns – Optimised image served to browser
URL Structure

Let's break down what a transformed URL looks like:
Original (in Webflow):
https://cdn.prod.website-files.com/63565c108c96756a59b92502/image.jpg
Transformed (in your HTML):
https://yourdomain.com/cdn-cgi/image/format=auto,quality=85/https://yourdomain.com/img-original/https%3A%2F%2Fcdn.prod.website-files.com%2F63565c108c96756a59b92502%2Fimage.jpg
Breaking that down:
https://yourdomain.com/cdn-cgi/image/– Cloudflare's image resizing endpointformat=auto,quality=85/– The transformation parametershttps://yourdomain.com/img-original/– Our proxy endpointhttps%3A%2F%2Fcdn.prod...– The URL-encoded original image URL
What Gets Transformed vs Proxied
- PNG, JPG, WebP, GIF: Optimised via Cloudflare Image Resizing
/cdn-cgi/image/→/img-original/ SVG: Sanitized (scripts removed), format preserved/cdn-cgi/image/→/img-original/AVIF: Proxied only (already optimal)/img-cache/CSS, JSProxied and cached/asset-cache/Fonts: (woff, woff2, ttf, otf, eot)Proxied and cached/asset-cache/ (very experimental)Favicons: Optimised as images/cdn-cgi/image/→/img-original/OG/Twitter images: Converted to JPEG/cdn-cgi/image/→/img-original/

Part 7: Testing Your Setup
Time to make sure everything's working properly.
Basic Checks
1. View Page Source
- Visit your site
- Right-click → View Page Source
- Search for
/cdn-cgi/image/– should appear in image URLs - Search for
/asset-cache/– should appear in CSS and JS URLs
If you see these, the Worker is running and transforming your HTML.
2. Check Network Tab
- Open DevTools (F12 or Cmd+Option+I)
- Go to the Network tab
- Reload your page
- Filter by "Img"
- Check that image URLs are coming from your domain, not Webflow's CDN
3. Verify Cache Headers Click on an image in the Network tab and check the Response Headers:
X-Cache: HIT= Served from Cloudflare's cache (good!)X-Cache: MISS= First request, now cached (also fine)Content-Type: image/aviforimage/webp= Format conversion working
4. Test Social Sharing
- Use Facebook's Sharing Debugger
- Use Twitter's Card Validator
- Check that OG images load without errors
Using DrFlare Extension
The easiest way to test your setup is using the DrFlare Extension for Chrome. Launch it from DevTools and refresh the page. You'll see detailed stats and can hover over images for on-site analysis. It has been depricated but brought back to life as DrFlare Reloaded, get it here.
Please remeber to refresh the browser once you have Dr Flare open.
Part 8: Troubleshooting
Things go wrong. Here's how to fix the common issues.
Images Return 404
Symptoms: Images don't load, 404 errors in console.
Checklist:
- ✅ Image Transformations enabled in Cloudflare?
- ✅ Your domain added to Allowed Origins?
- ✅ Worker route active and correct?
- ✅
DOMAINenvironment variable set correctly?
Check Worker logs: Cloudflare Dashboard → Workers → Your Worker → Logs
Assets Still Loading from Webflow CDN
Symptoms: CSS/JS URLs haven't been transformed.
Checklist:
- ✅ Worker deployed on custom domain route (not
*.workers.dev)? - ✅ Route pattern correct? (e.g.,
*yourdomain.com/*) - Clear browser cache and reload (Ctrl/Cmd + Shift + R)
View page source – if URLs aren't transformed, the Worker isn't running on that route.
OG Images Not Working on Social Media
Symptoms: Social previews show broken images.
Check:
- Use the Facebook/Twitter validators to see the actual error
- Verify
OG_IMAGE_FORMATis set tojpeg - Check the meta tag in page source has been transformed
Webflow Shows "Update Needed" for Domain
This is expected! When the Cloudflare proxy is enabled, Webflow can't see your DNS records. If your site loads correctly, ignore this warning.
525 Handshake Error
This usually means something's wrong with your SSL setup:
- Check SSL/TLS mode is set to Full (strict) in Cloudflare
- Make sure you don't have conflicting SSL settings
Part 9: Costs
Let's talk money. How much is this going to set you back?
Cloudflare Workers
- Free tier: 100,000 requests/day
- Paid: $5/month for 10 million requests
Image Transformations
- Free tier: 5,000 transformations/month
- Paid: $9/month for 50,000 transformations, then $0.50 per 1,000
For a Typical Webflow Site
The caching strategy minimises costs significantly:
- HTML cached at edge → fewer origin requests
- Original images cached → transformation only happens once per image
- Transformed images cached → served from edge on repeat visits
- 1-year TTL → images stay cached until you purge them
- Remember, cache and page rules allow for a more complex cache strategy. For example, blog pages can be cached less aggressively than a homepage, because posts update more regularly, while static pages can often be cached almost indefinitely.
Clearing the Cache
Once you’ve set up your caching strategy, remember that changes may not reflect immediately. If you set the edge cache for a week for a page or asset, it’ll only drop the cached version at the edge after that week has passed.
To clear the cache in the Cloudflare Dashboard, head to Caching → Configuration and use either Custom Purge (to be more specific about what you clear) or Purge Everything (which dumps the entire cache).
Once done, remebr to clear the browser cache or test using Private Browsing or Incognito Mode.
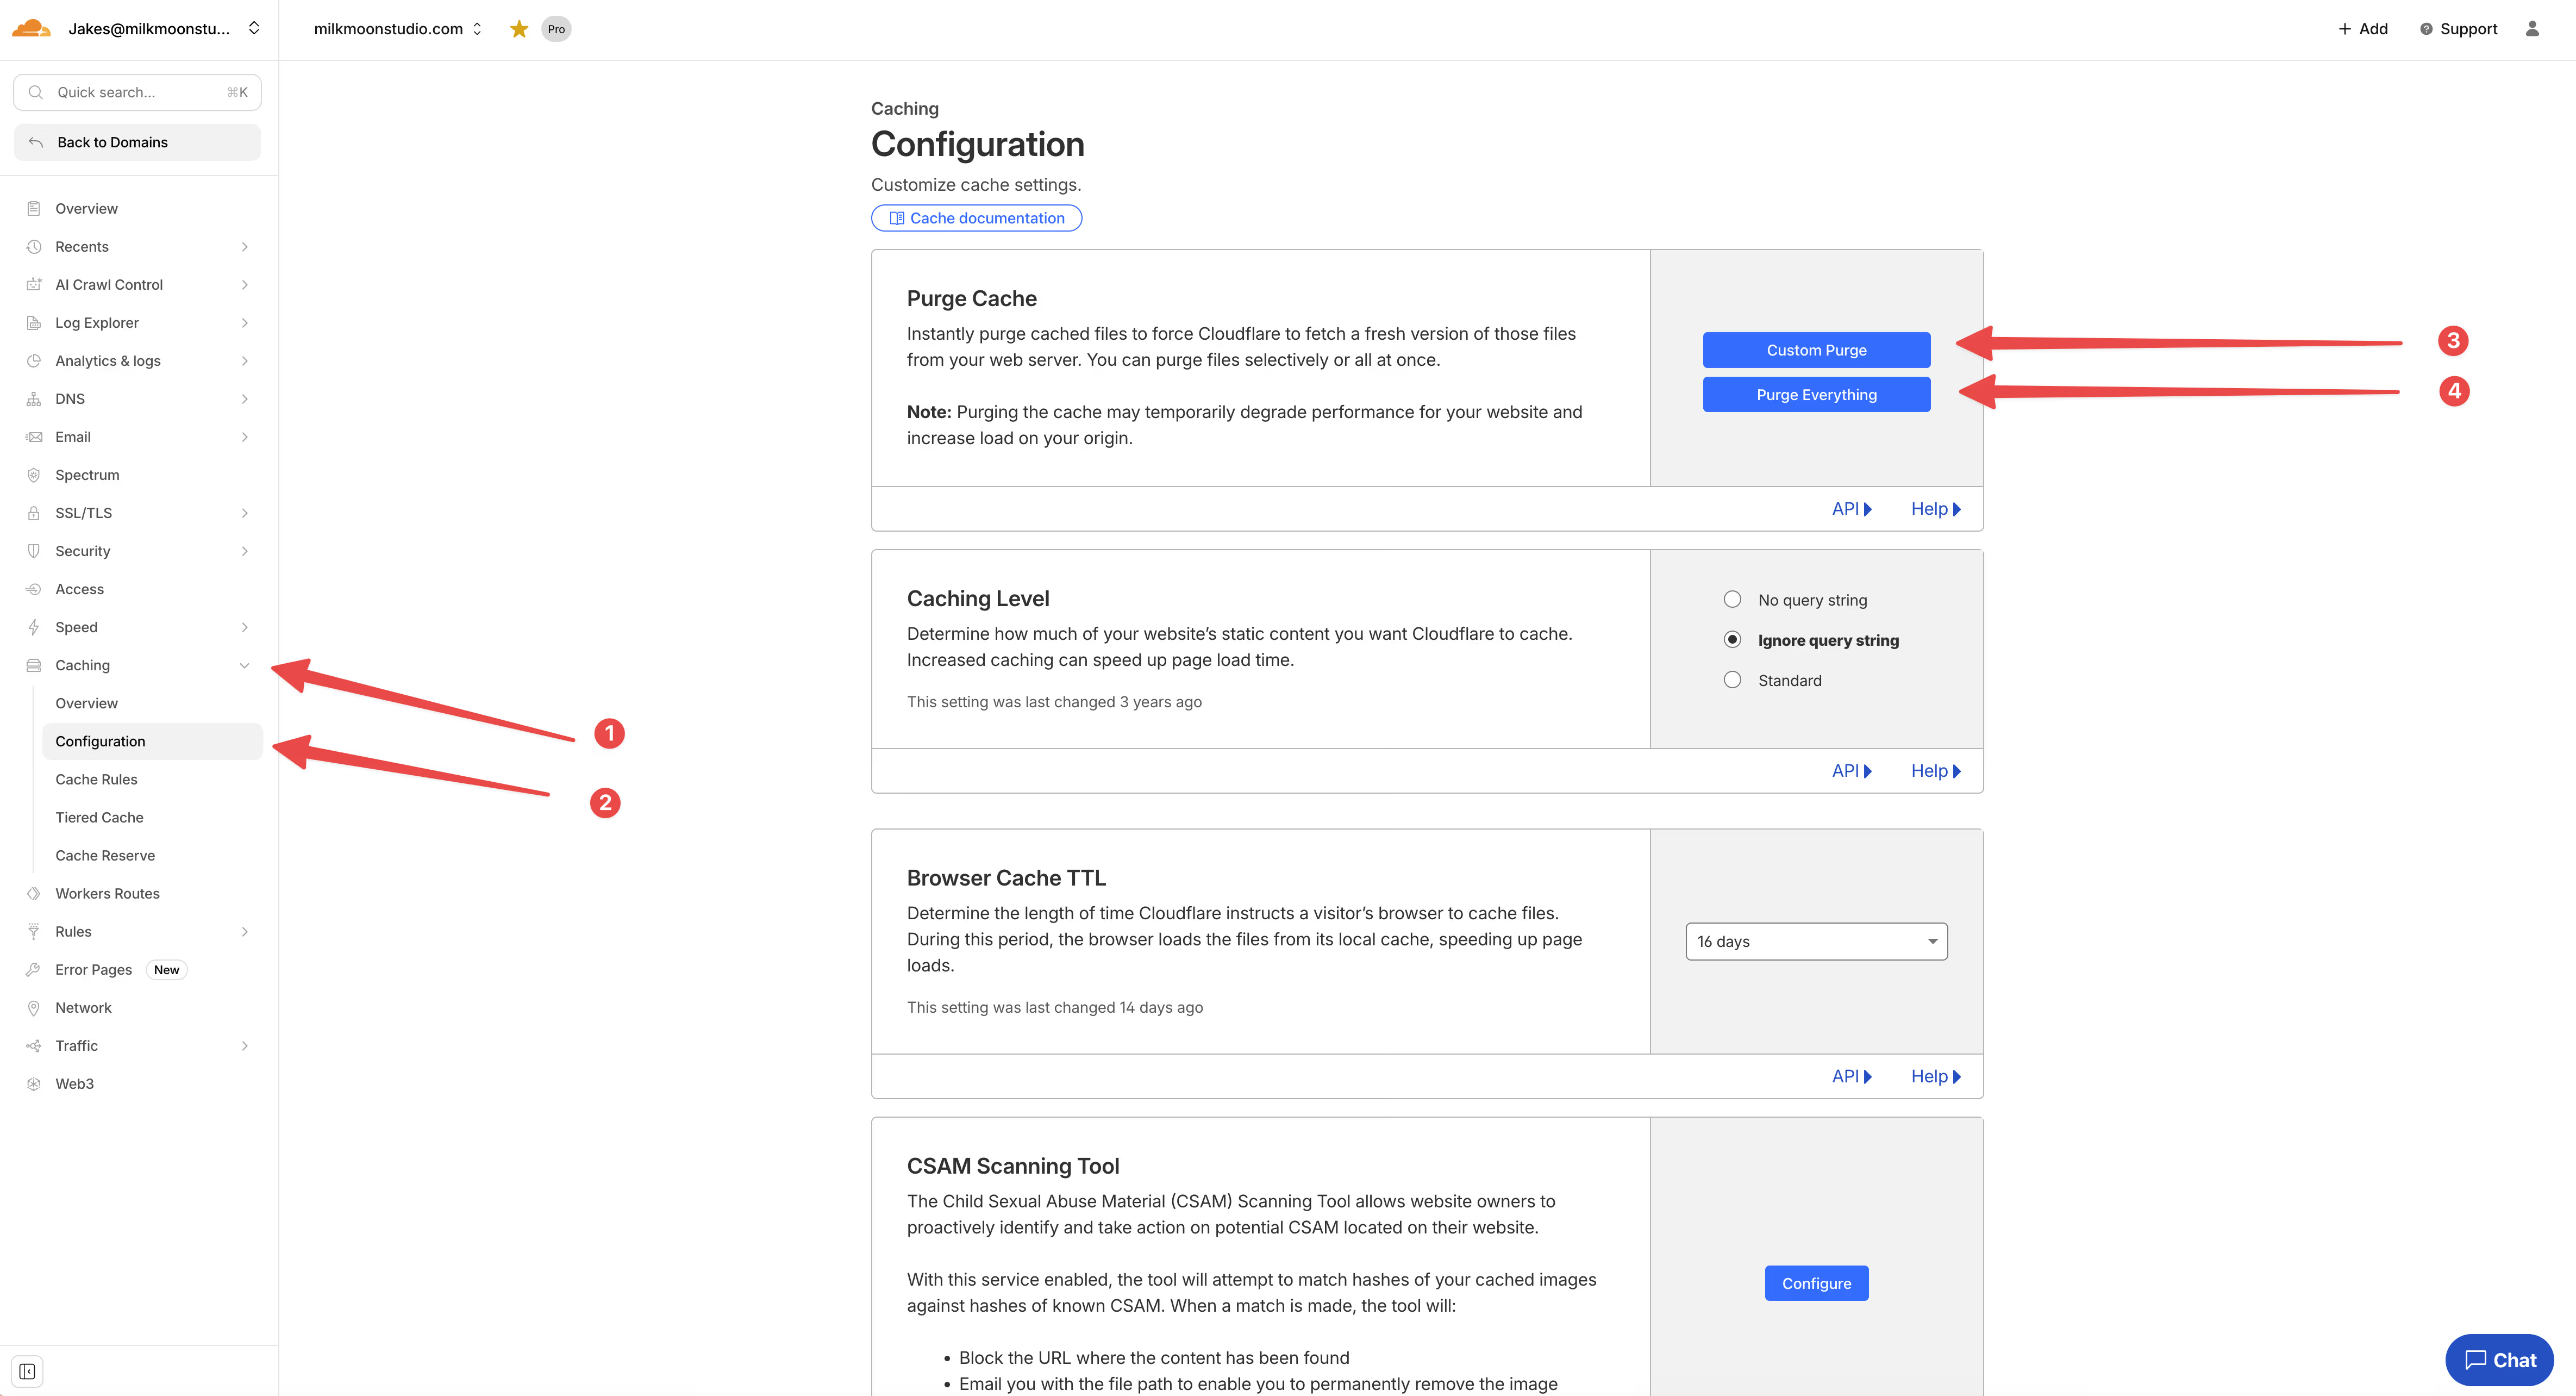
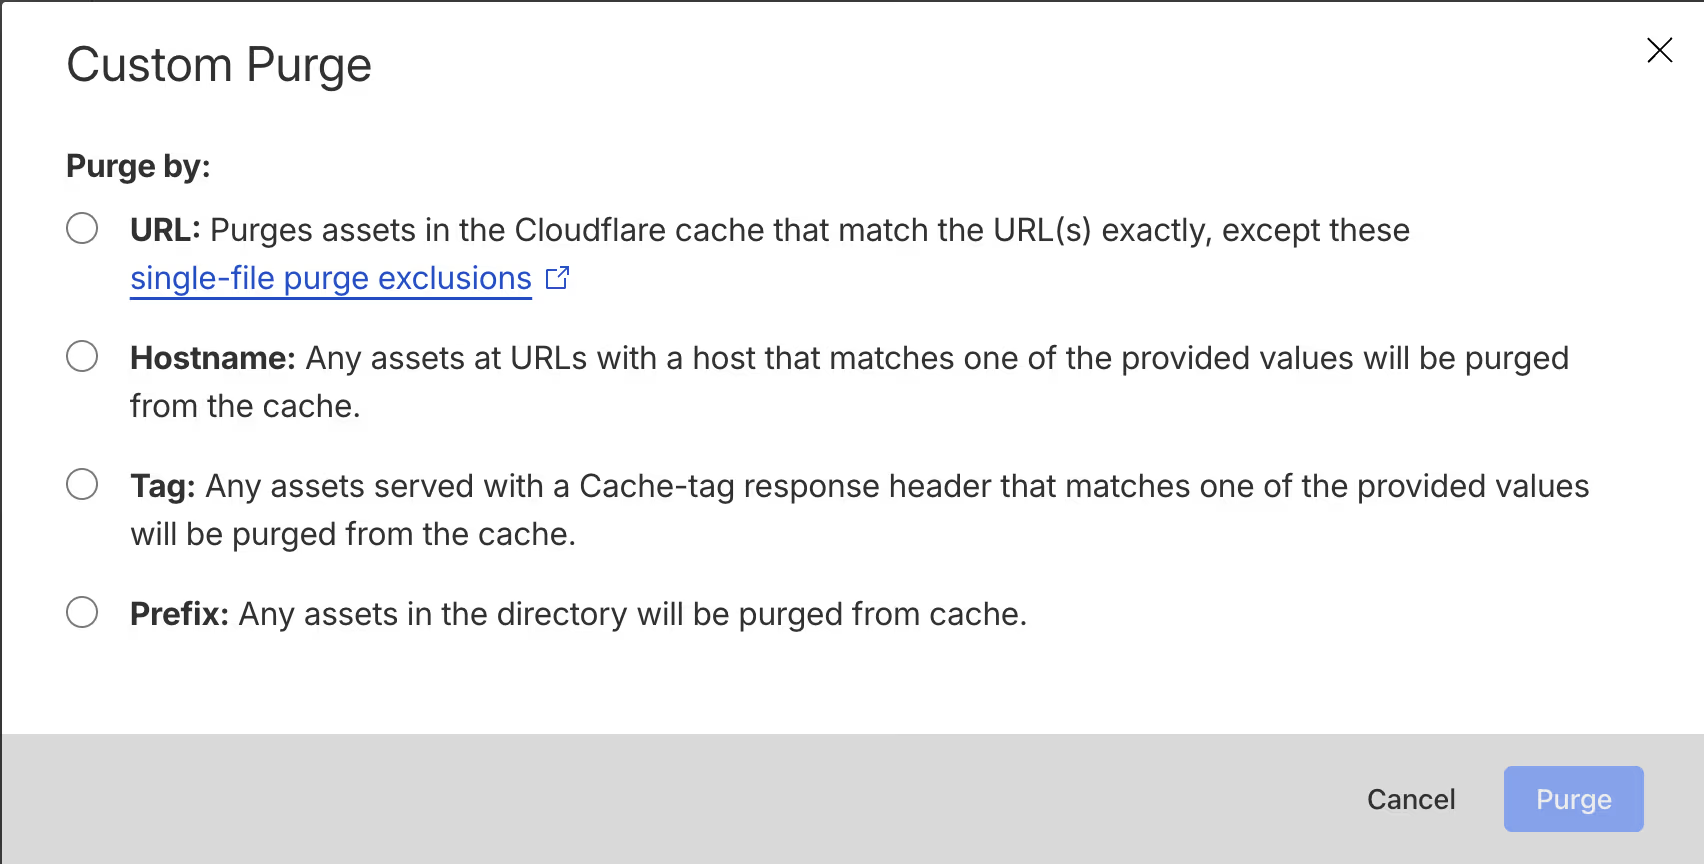
Custom provides the following options. This allows for tartgeted purges.
Purging cache with a Webhook in the Webflow Settings Panel
It is also possible to purge when you hit publish in Webflow by adding a Webhook to your Webeflow settings.
Webflow → Cloudflare Cache Purge Webhook
Here's the quick rundown:
The Flow
- Webflow fires a webhook when you publish your site
- Something receives that webhook and calls Cloudflare's API to purge the cache
The catch: Cloudflare doesn't have a direct "receive webhook" endpoint, so you need a middleman (Cloudflare Worker, Zapier, Make, or a simple serverless function).
Setup Steps
1. In Webflow
- Go to Site Settings → Integrations → Webhooks
- Add a webhook with trigger type: Site publish
- Point it to your middleman URL (Worker, Zapier, etc.)
2. In Cloudflare
- Grab your Zone ID (from your domain's overview page)
- Create an API Token with
Zone.Cache Purgepermission
3. The Middleman (Cloudflare Worker example)
Your Worker receives the Webflow webhook and hits Cloudflare's purge endpoint:
POST https://api.cloudflare.com/client/v4/zones/{zone_id}/purge_cache
With body: {"purge_everything": true}
Docs
- Webflow Webhooks: https://developers.webflow.com/data/docs/working-with-webhooks
- Cloudflare Purge Cache API: https://developers.cloudflare.com/api/resources/cache/methods/purge/
Part 10: Limitations
Nothing's perfect. Here's what to know:
Known Limitations
- Cache Reserve not available: Webflow uses O2O proxying, which bypasses Cache Reserve. Assets cache at edge only.
- JSON-LD not transformed: Structured data URLs aren't modified. Search engines handle original URLs fine.
- Regex-based transformation: Multiple passes over HTML. Acceptable for typical pages (<200KB).
What Doesn't Work
- Data URLs (
data:image/...): Inline, nothing to proxy - Blob URLs (
blob:...): Browser-generated, can't proxy - Relative URLs: Already on your domain
- Non-Webflow CDN assets: Unless
CATCH_ALL_EXTERNAL=true
Dynamic Content
The Worker only transforms HTML at initial response. Images added via JavaScript after page load might not be transformed unless they're also in the initial HTML. If you're doing a lot of client-side rendering, keep this in mind.
Rollback Instructions
If something goes horribly wrong (it probably won't, but just in case):
Quick Disable (Keep Worker)
- Go to Worker → Triggers → Routes
- Delete the route
- Site immediately serves directly from Webflow
- Switch on Developer Mode to bypass the cache
Full Removal
- Delete the Worker route
- Delete the Worker itself
- (Optional) Disable Image Transformations
- (Optional) Remove Allowed Origins
Your site will revert to standard Webflow hosting with the O2O proxy still active. You'll still have Cloudflare's other features like WAF and bot protection.
Wrapping Up
And that's it. You've now got a properly turbocharged Webflow site running through Cloudflare with image optimisation, asset caching, and all the edge goodness you could want.
The best part? Once this is running, you can layer on additional Cloudflare features. Set up Page Rules for specific caching behaviour. Add WAF rules for security. Configure Bot Protection. Use Waiting Room if you're expecting traffic spikes. It's your zone now. You'll need to play around to make the most of it.
A lot of teh optimisation comes from playing with cachingn and page rules etc.
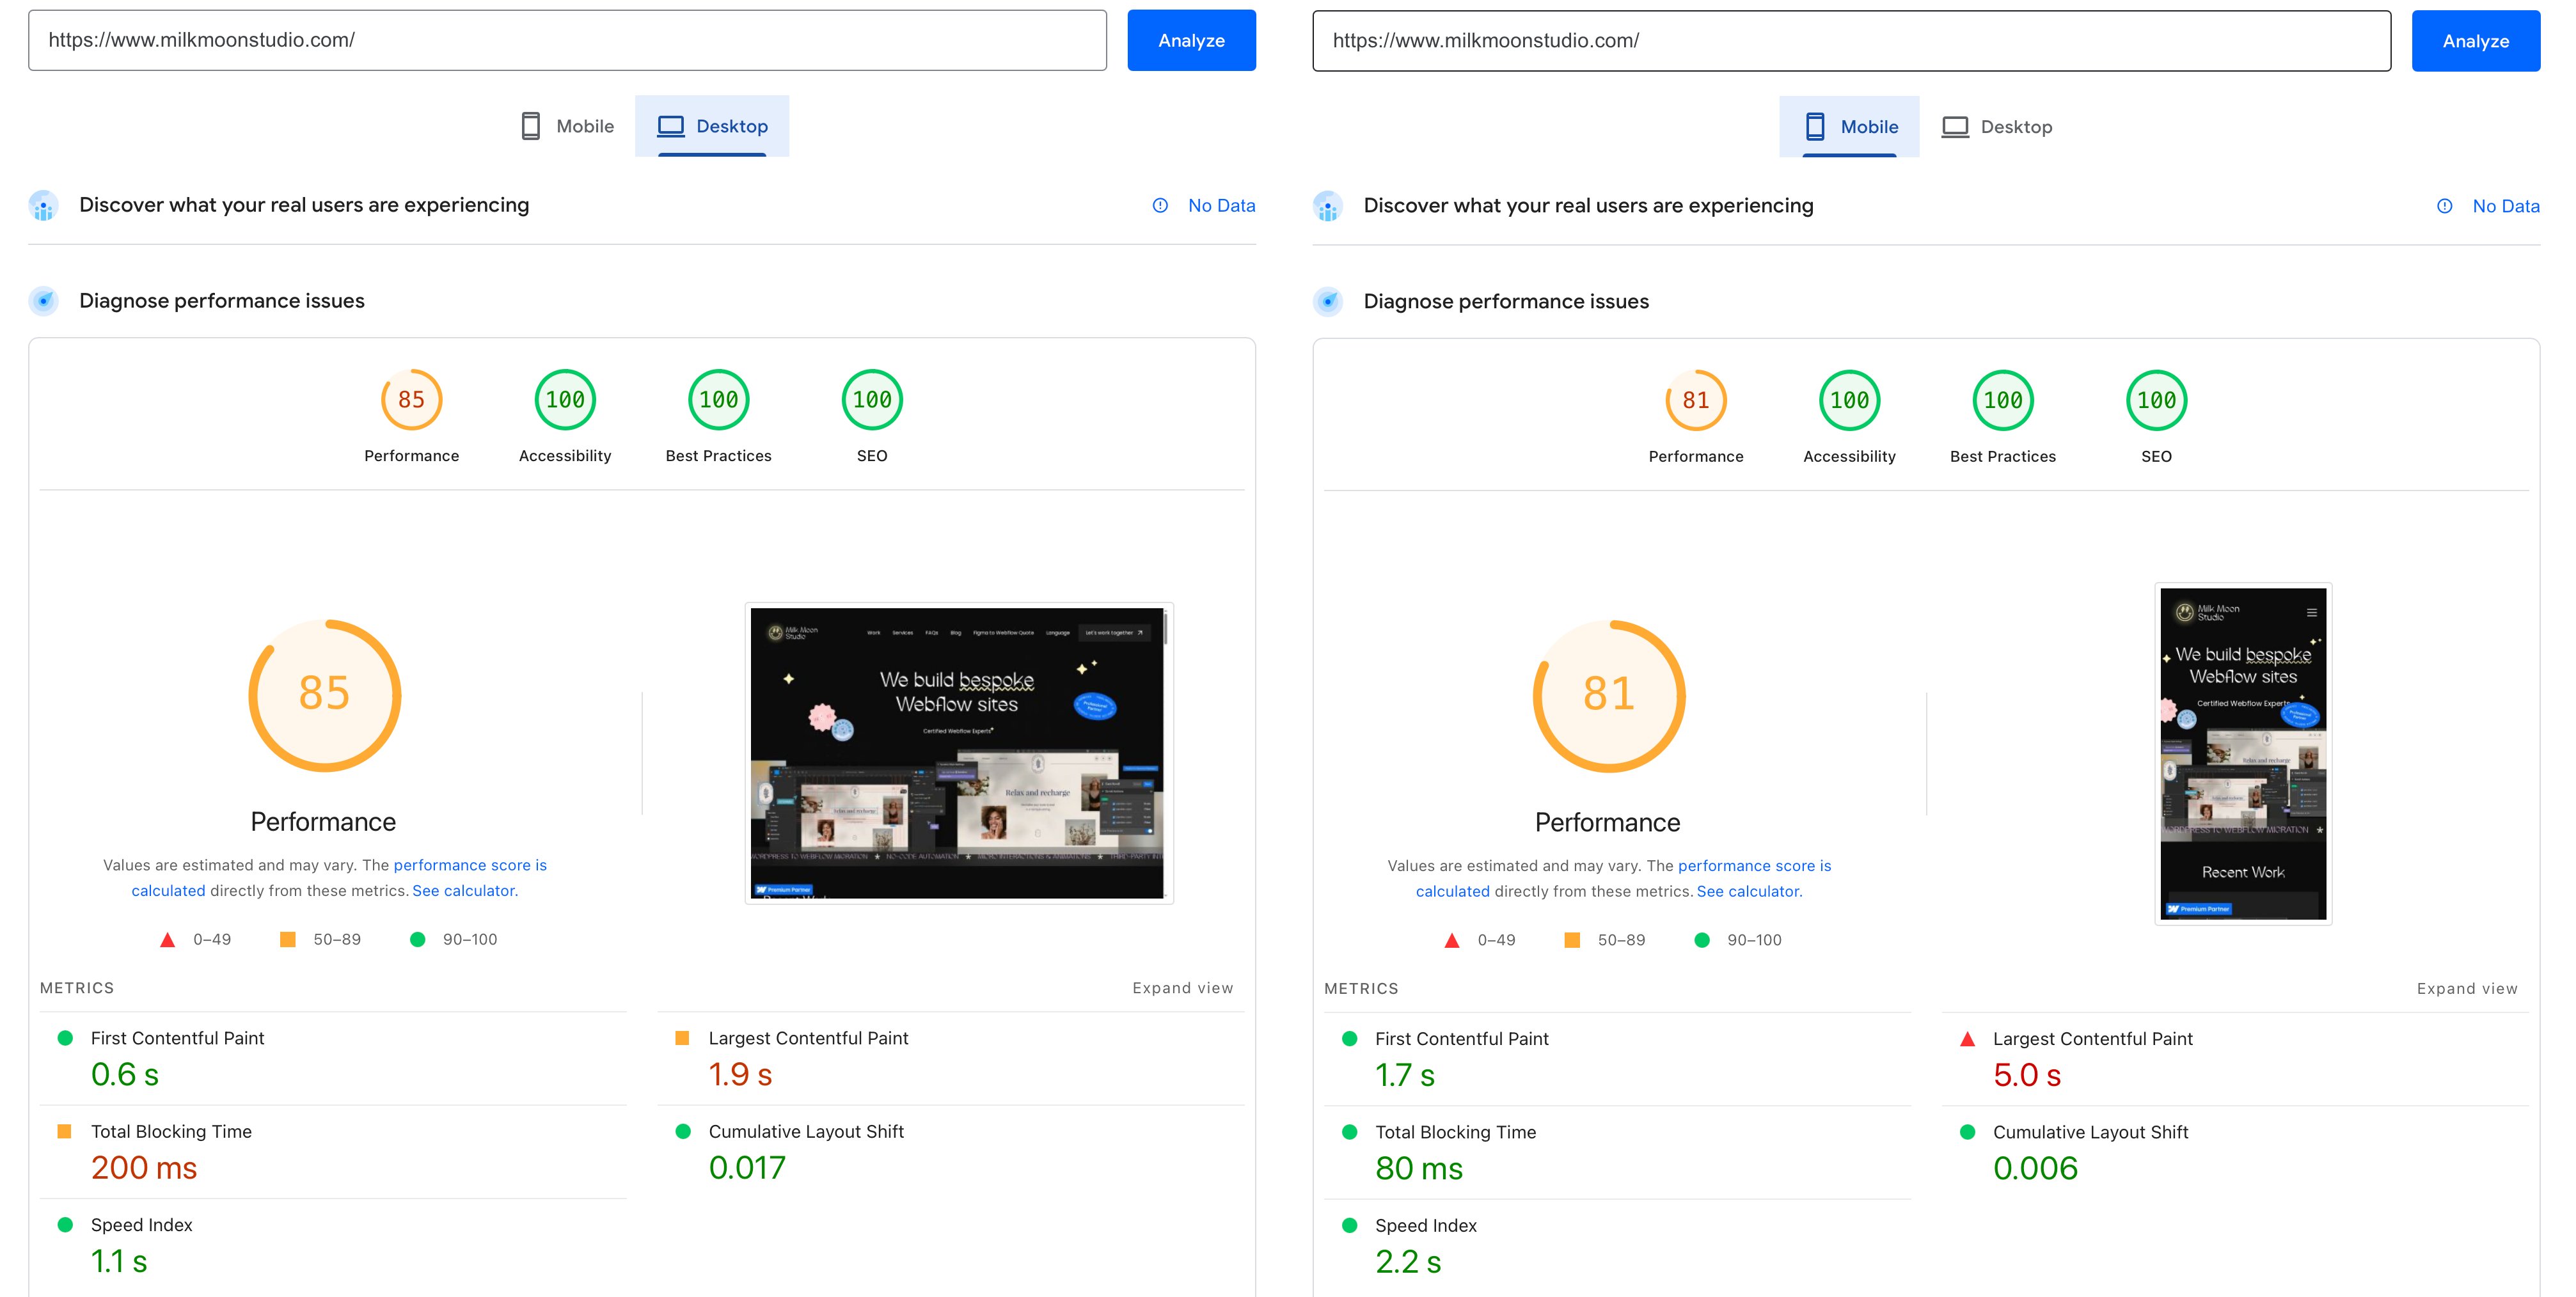
We've been running this setup in production for a while now and the performance gains seem solid. Faster load times, better Core Web Vitals, smaller image files, and happier clients.
If you run into issues or have questions, drop us a message. We're always happy to chat about Webflow performance optimisation (it's kind of our thing). We'll try and get back to you as soon as possible.
Remember to check out the How-To section of our blog for more tutorials. We've got posts on everything from Tag Manager setup to dynamic font sizing.
Jusqu'à la prochaine fois, continuez à construire. ✌️
Ces tests ont été effectués au moment de la publication, donc toutes les saloperies habituelles que je teste sur notre site à un moment donné devraient fonctionner.